guildai/guildai

Open source experiment tracking and optimization for machine learning
| repo name | guildai/guildai |
| repo link | https://github.com/guildai/guildai |
| homepage | https://guild.ai |
| language | Python |
| size (curr.) | 8089 kB |
| stars (curr.) | 316 |
| created | 2017-09-27 |
| license | Apache License 2.0 |
Guild AI
This is the source repository for Guild AI.
Guild AI is an open source toolkit that automates and optimizes machine learning experiments.
- Run unmodified training scripts, capturing each run result as a unique experiment
- Automate trials using grid search, random search, and Bayesian optimization
- Compare and analyze runs to understand and improve models
- Backup training related operations such as data preparation and test
- Archive runs to S3 or other remote systems
- Run operations remotely on cloud accelerators
- Package and distribute models for easy reproducibility
For more on features, see Guild AI - Features.
Important links:
- Latest release on PyPI
- Guild AI website
- Guild AI Slack (for questions/support)
- Documentation
- Open issues
Requirements
- Linux, macOS, Windows (Windows requires Docker)
- Python 2.7 or 3 with
pipandvirtualenvor Conda - TensorFlow
Install Guild AI
To install Guild AI with pip, run:
pip install guildai
If you already have Guild AI installed, you can upgrade it to the latest release using:
pip install guildai --upgrade
To install pre-release versions (e.g. you want the latest features or
fixes), include the --pre command line option:
pip install guildai --upgrade --pre
NOTE: You may need to run pip as a privileged user (e.g. run using
sudo) or else specify the --user command line option if you file
permission errors when running pip install.
Ensure that you have TensorFlow installed.
NOTE: As of Guild 0.6, all major computational and ML frameworks are supported including PyTorch, Keras, MLKit, scikit-learn, and XGBoost. TensorFlow is required for TensorBoard integration. Your models do not have to use TensorFlow to work with Guild AI. The TensorFlow requirement will be removed in future releases of Guild.
For detailed install instructions, see Install Guild AI.
Quick Start
In this Quick Start guide, we create a mock training script and run it to illustrate the following features:
- Run, capture and compare experiments
- Use grid search and random search to explore hyperparameter space
- Use Bayesian optimization to achieve the best performance
Links to more advanced topics are provided at the end of this section.
Mock training script
In a new project directory, create a file named train.py:
import numpy as np

x = 0.1
noise = 0.1

loss = (np.sin(5 * x) * (1 - np.tanh(x ** 2)) + np.random.randn() * noise)

print("x: %f" % x)
print("noise: %f" % noise)
print("loss: %f" % loss)
NOTE: This is a mock (fake) training script — it doesn’t train anything! However, it illustrates the basics of training, where an operation is used to minimize loss given a set of inputs. In this example, we calculate loss using a noisy function and a single input x, which represents our hyperparameter.
Run an experiment
Open a command console and change to the project directory.
Use Guild to run the mock training script:
guild run train.py
Guild prompts you with the default values as defined in
train.py. Press Enter to run the script.
NOTE: Guild automatically detects the flags defined in train.py and
uses the default values. Later we run train.py with different values
for x and even use Guild to find values that minimize the function
loss.
When Guild runs a script, it captures the run as a unique experiment. You can list runs by running:
guild runs
View information for this run using:
guild runs info
By default, Guild shows information for the latest run.
NOTE: For information on any Guild command, use: guild COMMAND --help. For a list of commands, use guild --help. Online help is
available at
https://guild.ai/docs/commands/.
Experiments are saved on disk within file system directories. List files associated with the latest run using:
guild ls
In the case of our mock training script, the files list is empty because the script doesn’t generate any files. However, you can see the path where the run is located.
Guild stores information associated with each run in files located in
the .guild subdirectory of each run. You can list all of the files
associated with the latest run, including Guild files, by specifying
the --all command line option:
guild ls --all
If you want to export an experiment, use the export command:
guild export /tmp/my-experiments
This is useful for creating archives of runs that can be imported by
you and others using the import command. For a more advanced example
of backing runs up to the cloud, see Get Started - Backup and
Restore.
You can list runs located in an archive directory by specifying the
--archive command line option:
guild runs --archive /tmp/my-experiments
Run a second experiment
In the command console, run:
guild run train.py x=0.2
Press Enter to confirm the operation.
Guild runs train.py a second time using a new value for x.
Compare the two runs using compare:
guild compare
Guild Compare is spreadsheet-like application that lets you view
experiment results. Use the cursor keys to navigate to various
columns. Sort a column in ascending order by press 1 and in
descending order by pressing 2. Press ? to view a list of key
bindings for Guild Compare.
When you’re done comparing the runs, press q to return to the
command prompt.
Run multiple trials using grid and random search
Guild supports running multiple trials using various methods.
First, use Guild to run three trials over a discrete search space for
x (i.e. a grid search, or parameter sweep) run:
guild run train.py x=[-2.0,0.0,2.0]
Press Enter to confirm. Guild generates three trials, one for each
specified value of x.
Next, run three trials using random search over a uniform
distribution of x:
guild run train.py x=uniform[-1.0:1.0] --max-trials 3
Press Enter to run the trials. Guild generates another three trials,
according to the command line option --max-trials.
Compare the runs again:
guild compare --table
This time we use the --table command line option for compare. This
tells Guild to print the results as a table rather than run
interactively.
Sort the results by loss in ascending order by running:
guild compare --table --min loss
Limit the results to the top three results (i.e. the three results
with the lowest loss) by using the --top option:
guild compare --table --min loss --top 3
Optimize loss using Bayesian methods
As you can see from the previous sections, Guild specializes in running, capturing, and comparing experiments. In this section, we demonstrate how this facility can be further used to optimize hyperparameters.
Let’s try to find values for x that minimize loss. Because our
mock training script is noisy (to simulate machine learning processes
that are inherently noisy) we cannot find a single value for x where
loss is always lowest. Nonetheless, we can find a range of values
that tend to produce better results.
In the command console, run:
guild run train.py x=uniform[-2.0:2.0] --optimizer bayesian --max-trials 20
Press Enter to continue. Guild runs 20 trials, trying values for x
with the goal of minimizing loss. By default, Guild uses a Bayesian
method with Gaussian processes to explore values for x that have a
higher likelihood of producing lower values of loss. You can specify
other optimizers including forest (decision trees) and ggbrt
(gradient boosted trees).
NOTE: Guild’s built-in Bayesian optimization support is implemented using the excellent skopt library. In future releases, Guild will support additional optimization libraries, including optimizers you define yourself.
For more information on using Bayesian optimizers in Guild, see Get Started - Bayesian Optimization .
Compare all of the runs:
guild compare
In this case we run compare in interactive mode. To quickly find
runs with the lowest loss, use the cursor keys to navigate to the
loss column and press 1 to sort in ascending order.
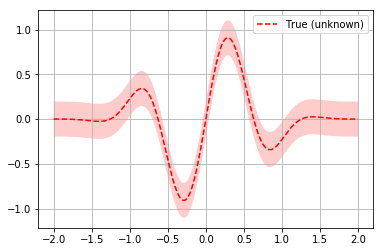
Values for x that are close to -0.3 should be listed toward the
top.
The function defined in train.py (again, a mock function used for
illustration purposes — it doesn’t actually train anything) can be
used to plot the relationship between x and loss:

We indeed see that loss is lowest where x is around -0.3.
Press q to exit Guild Compare.
Clean up
If you want to delete a run, use:
guild runs rm RUN_ID_OR_INDEX
You can get the RUN_ID using guild runs. You can also specify a
run INDEX, which is included in the runs list.
To delete all runs, use:
guild runs rm
You can restore deleted runs using the restore command.
For a more complete coverage of managing runs with Guild, see Get Started - Manage Runs.
Learn more
Refer to the Guild AI website for more information on Guild.
For more step-by-step tutorials, see the other Get Started guides:
For a complete list of commands supported by Guild, see:
Get help
If you have questions or are facing problems, please contact us on Guild AI Slack or open an issue on GitHub.


