man-group/dtale

Flask/React client for visualizing pandas data structures
| repo name | man-group/dtale |
| repo link | https://github.com/man-group/dtale |
| homepage | http://andrewschonfeld.pythonanywhere.com |
| language | JavaScript |
| size (curr.) | 123654 kB |
| stars (curr.) | 831 |
| created | 2019-07-15 |
| license | GNU Lesser General Public License v2.1 |


![]()
What is it?
D-Tale is the combination of a Flask back-end and a React front-end to bring you an easy way to view & analyze Pandas data structures. It integrates seamlessly with ipython notebooks & python/ipython terminals. Currently this tool supports such Pandas objects as DataFrame, Series, MultiIndex, DatetimeIndex & RangeIndex.
Origins
D-Tale was the product of a SAS to Python conversion. What was originally a perl script wrapper on top of SAS’s insight function is now a lightweight web client on top of Pandas data structures.
In The News
- Man Institute (warning: contains deprecated functionality)
- Python Bytes
- towards data science
Tutorials
Contents
- Getting Started
- UI
- For Developers
- Startup Behavior
- Documentation
- Requirements
- Acknowledgements
- License
Getting Started
| PyCharm | jupyter |
|---|---|
 |
 |
Installing the egg
# install dtale egg (important to use the "--upgrade" every time you install so it will grab the latest version)
$ pip install --upgrade dtale
Now you will have the ability to use D-Tale from the command-line or within a python-enabled terminal
Python Terminal
This comes courtesy of PyCharm
 Feel free to invoke
 python or ipython directly and use the commands in the screenshot above and it should work
Issues With Windows Firewall
If you run into issues with viewing D-Tale in your browser on Windows please try making Python public under “Allowed Apps” in your Firewall configuration. Here is a nice article: How to Allow Apps to Communicate Through the Windows Firewall
Additional functions available programatically
import dtale
import pandas as pd

df = pd.DataFrame([dict(a=1,b=2,c=3)])

# Assigning a reference to a running D-Tale process
d = dtale.show(df)

# Accessing data associated with D-Tale process
tmp = d.data.copy()
tmp['d'] = 4

# Altering data associated with D-Tale process
# FYI: this will clear any front-end settings you have at the time for this process (filter, sorts, formatting)
d.data = tmp

# Shutting down D-Tale process
d.kill()

# using Python's `webbrowser` package it will try and open your server's default browser to this process
d.open_browser()

# There is also some helpful metadata about the process
d._data_id  # the process's data identifier
d._url  # the url to access the process

d2 = dtale.get_instance(d._data_id)  # returns a new reference to the instance running at that data_id

dtale.instances()  # prints a list of all ids & urls of running D-Tale sessions
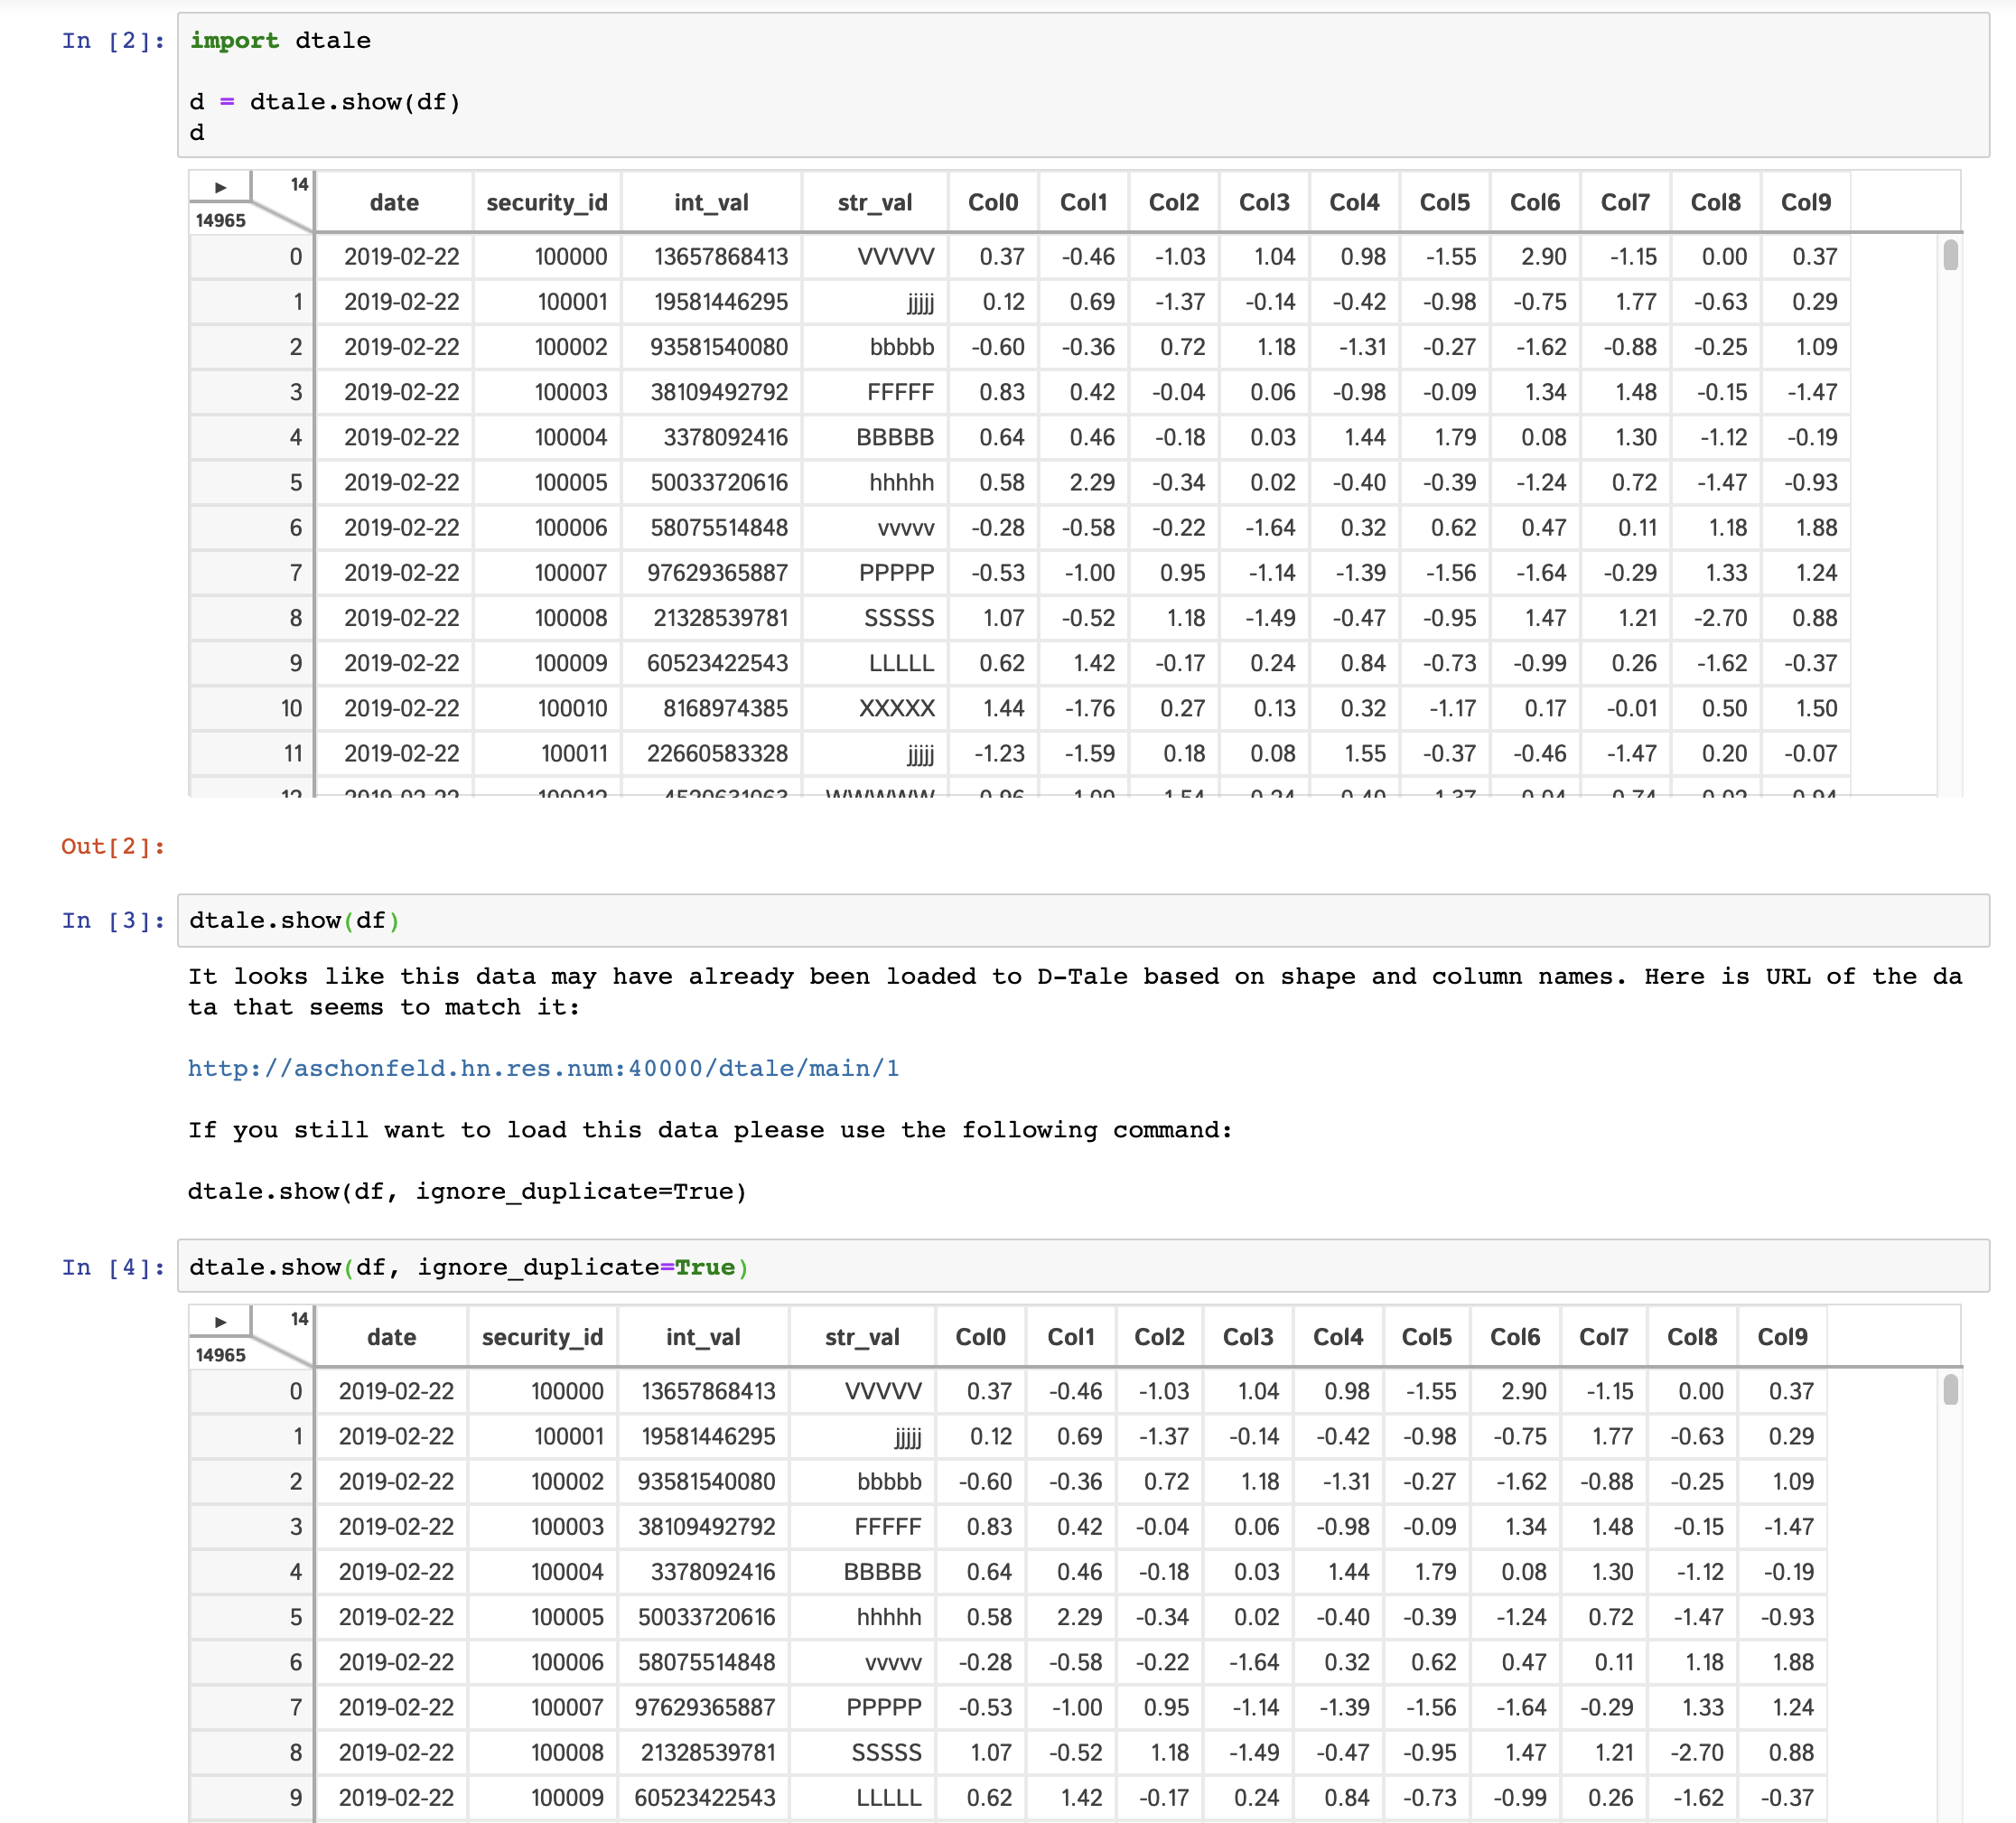
Duplicate data check
To help guard against users loading the same data to D-Tale multiple times and thus eating up precious memory, we have a loose check for duplicate input data. The check runs the following:
- Are row & column count the same as a previously loaded piece of data?
- Are the names and order of columns the same as a previously loaded piece of data?
If both these conditions are true then you will be presented with an error and a link to the previously loaded data. Here is an example of how the interaction looks:
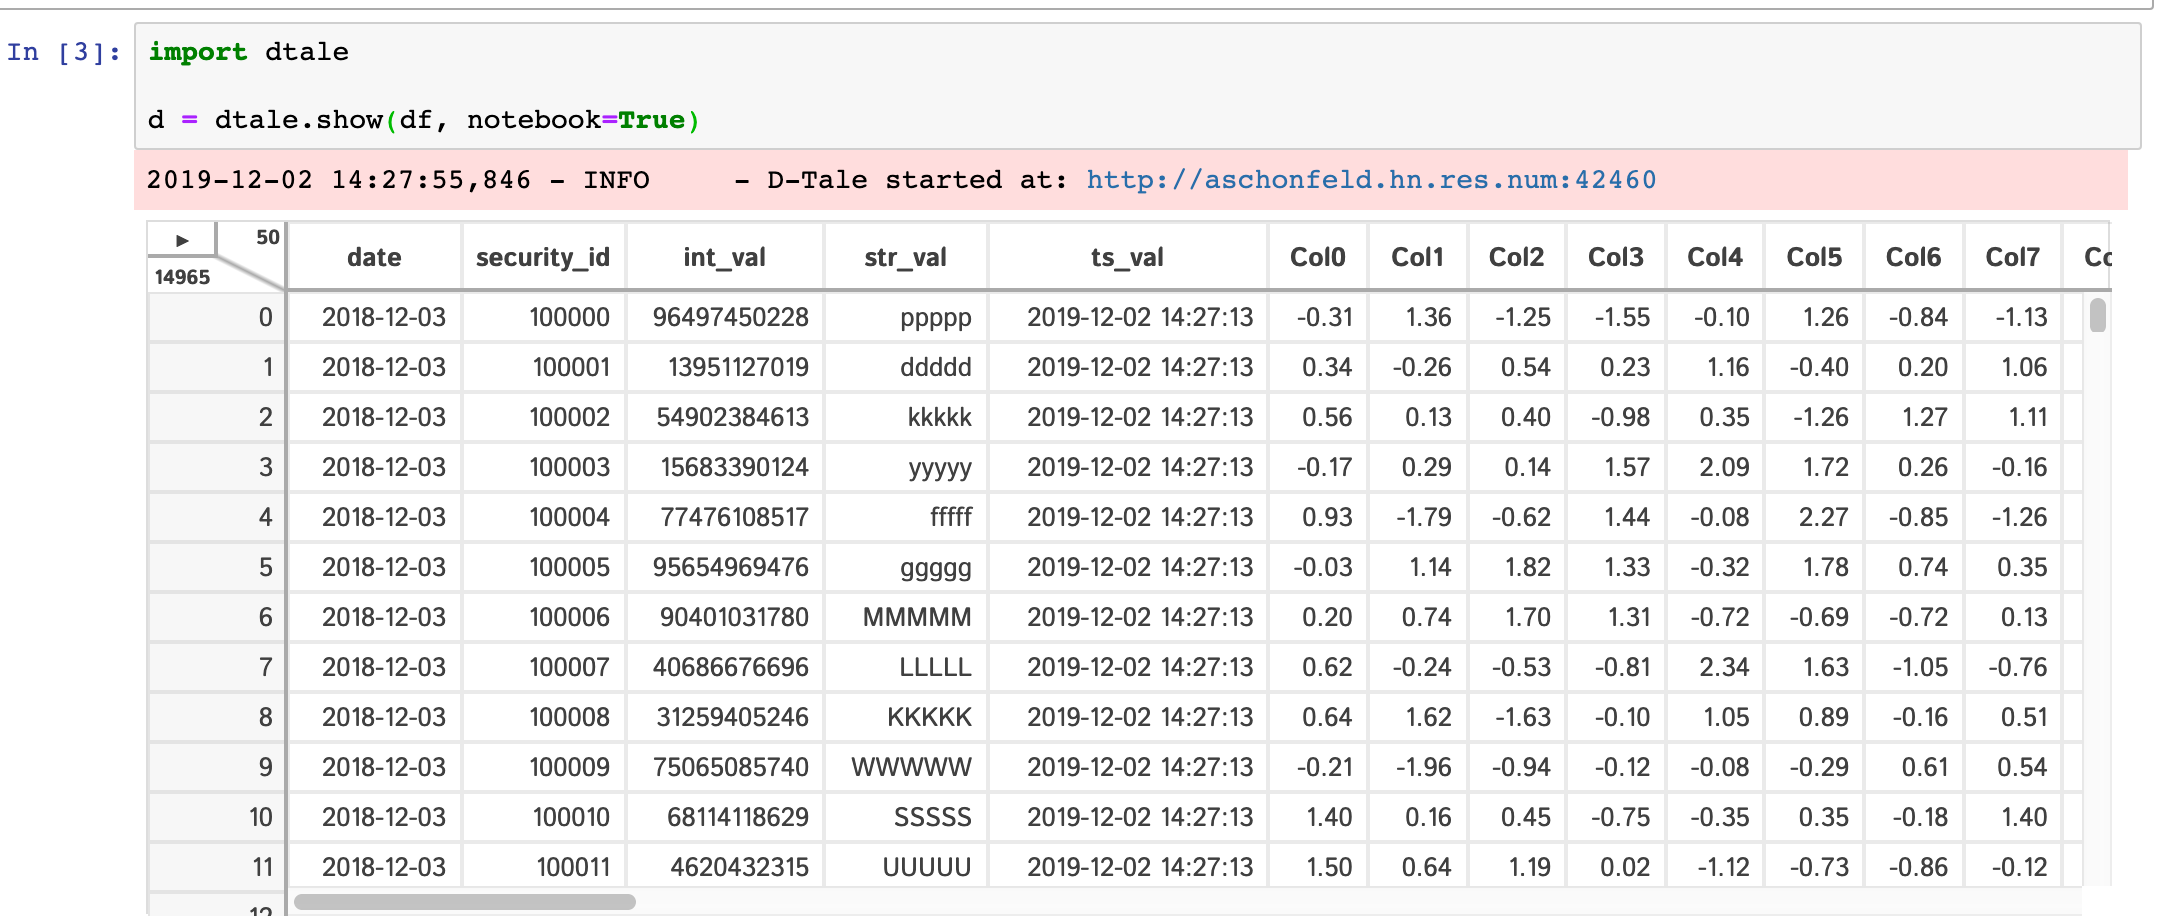
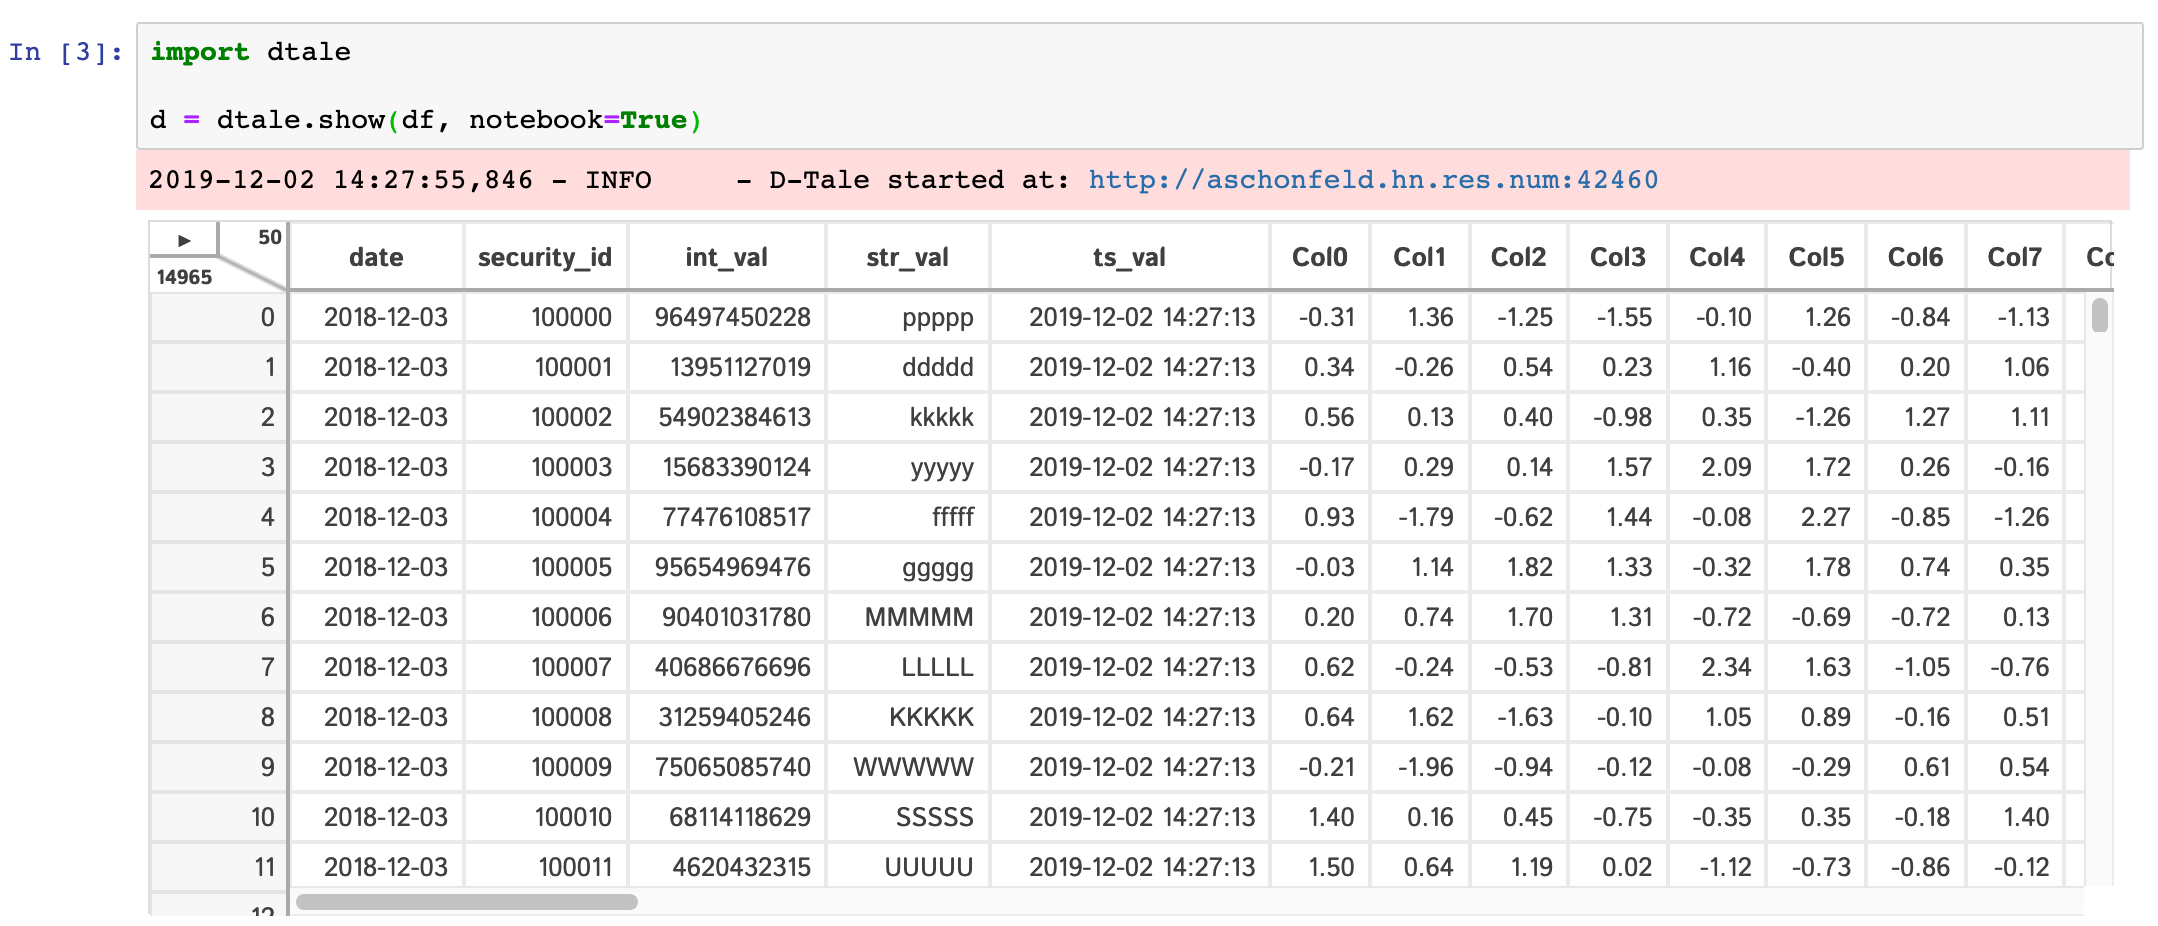
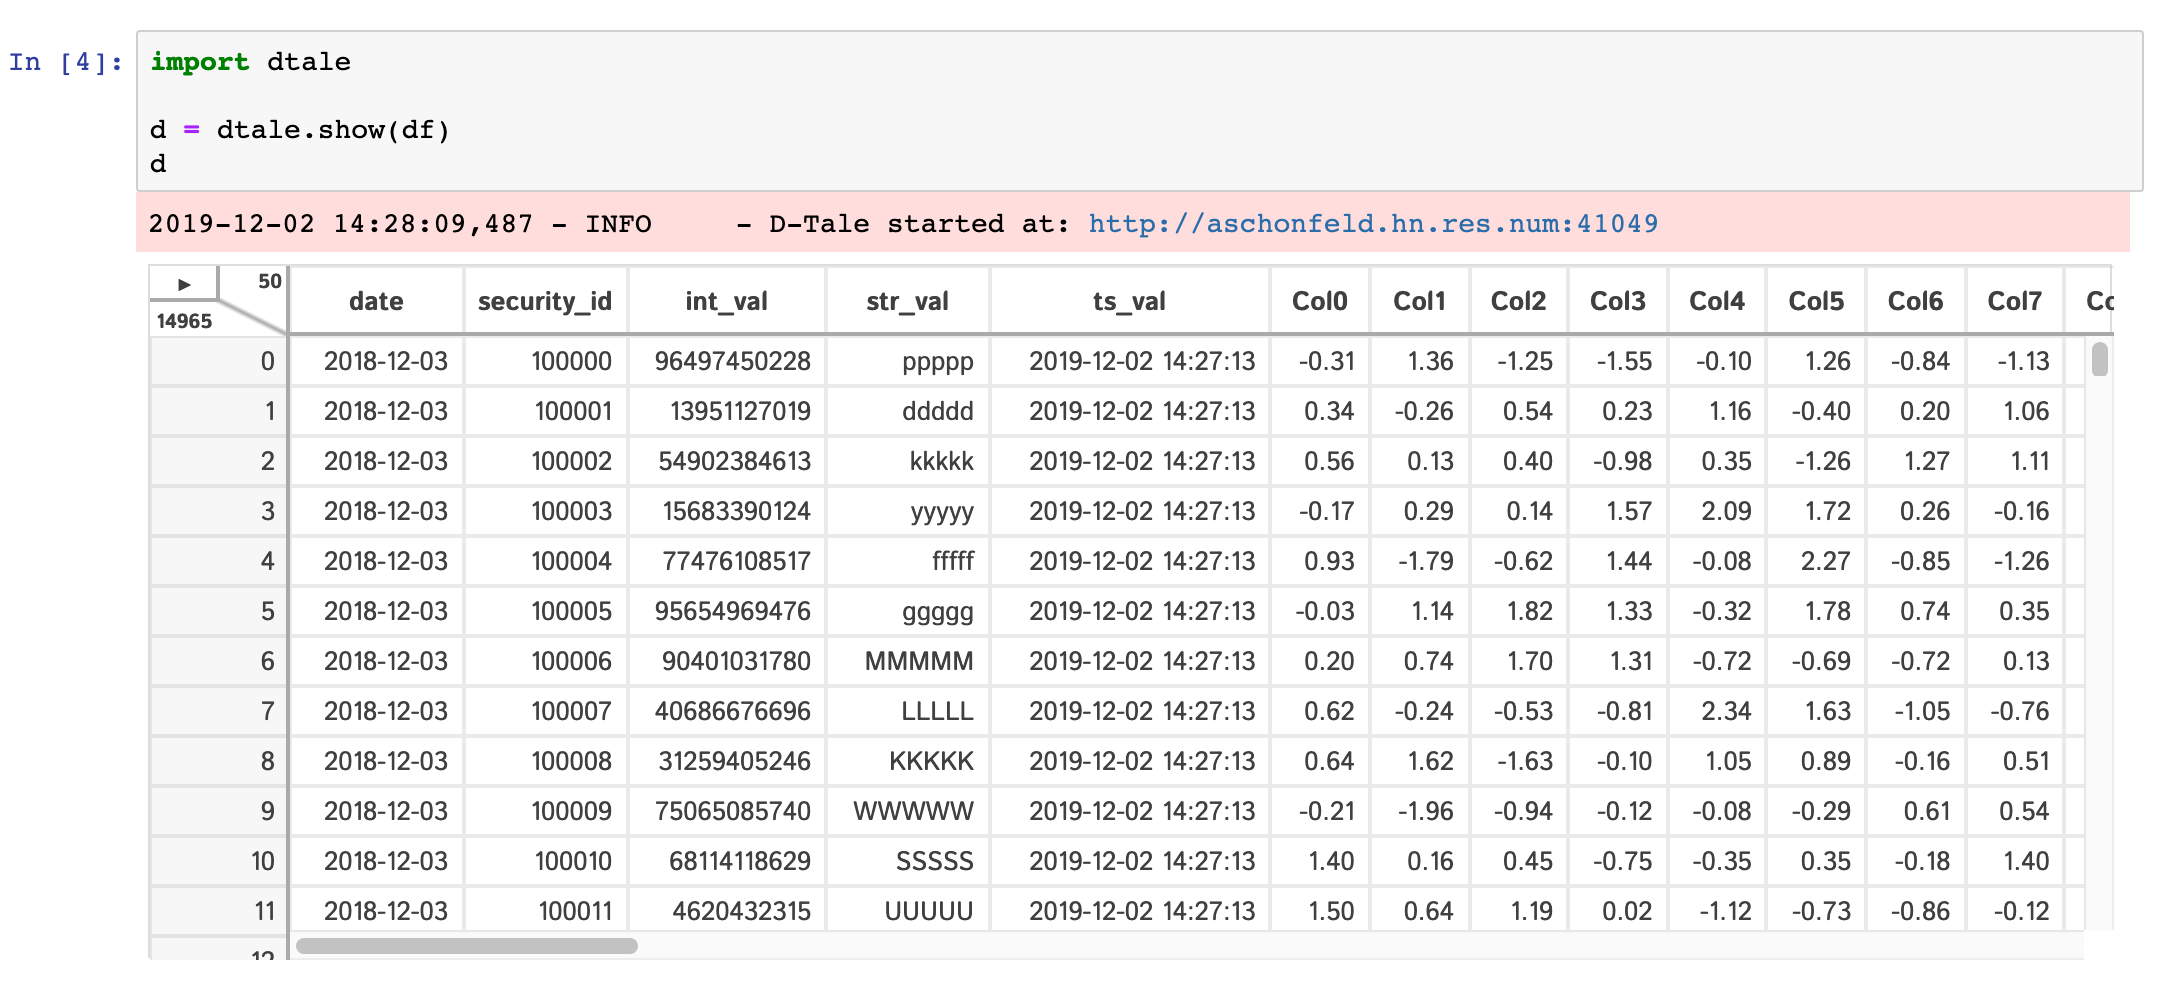
Jupyter Notebook
Within any jupyter (ipython) notebook executing a cell like this will display a small instance of D-Tale in the output cell. Here are some examples:
dtale.show |
assignment | instance |
|---|---|---|
 |
 |
 |
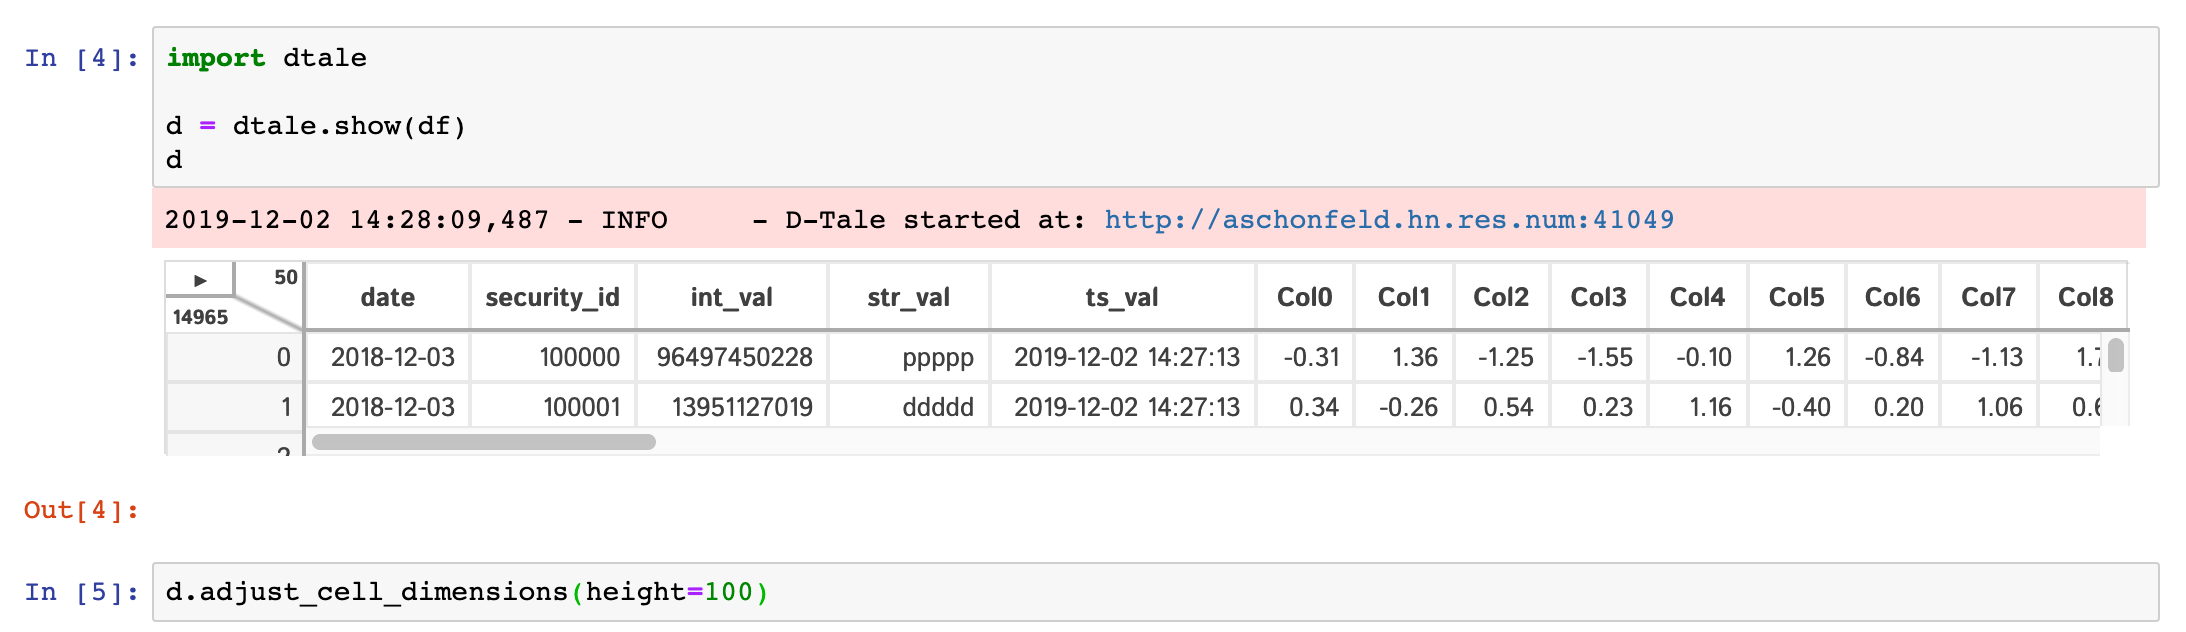
If you are running ipython<=5.0 then you also have the ability to adjust the size of your output cell for the most recent instance displayed:
One thing of note is that a lot of the modal popups you see in the standard browser version will now open separate browser windows for spacial convienence:
| Column Menus | Correlations | Describe | Column Analysis | Instances |
|---|---|---|---|---|
 |
 |
 |
 |
 |
JupyterHub w/ Kubernetes
Please read this post
Google Colab & Kaggle
These are hosted notebook sites and thanks to the work of flask_ngrok users can run D-Tale within their notebooks.
DISCLAIMER: It is import that you set USE_NGROK to true when using D-Tale within these two services. Here is an example:
import pandas as pd

import dtale
import dtale.app as dtale_app

dtale_app.USE_NGROK = True

dtale.show(pd.DataFrame([1,2,3]))
Here are some video tutorials of each:
| Service | Tutorial | Addtl Notes |
|---|---|---|
| Google Colab | 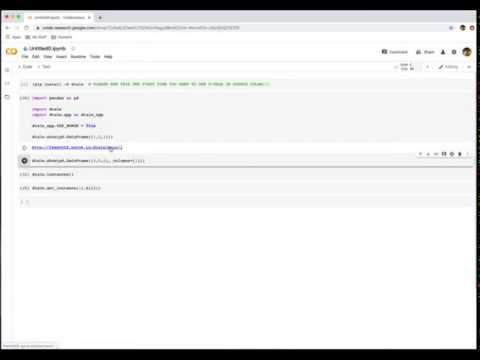 |
|
| Kaggle | 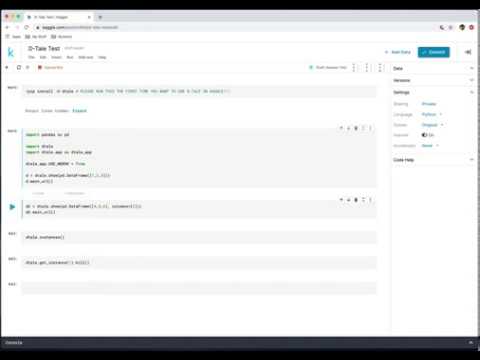 |
make sure you switch the “Internet” toggle to “On” under settings of your notebook so you can install the egg from pip |
R with Reticulate
I was able to get D-Tale running in R using reticulate. Here is an example:
library('reticulate')
dtale <- import('dtale')
df <- read.csv('https://vincentarelbundock.github.io/Rdatasets/csv/boot/acme.csv')
dtale$show(df, subprocess=FALSE, open_browser=TRUE)
Now the problem with doing this is that D-Tale is not running as a subprocess so it will block your R console and you’ll lose out the following functions:
- manipulating the state of your data from your R console
- adding more data to D-Tale
open_browser=TRUE isn’t required and won’t work if you don’t have a default browser installed on your machine. If you don’t use that parameter simply copy & paste the URL that gets printed to your console in the browser of your choice.
I’m going to do some more digging on why R doesn’t seem to like using python subprocesses (not sure if it something with how reticulate manages the state of python) and post any findings to this thread.
Here’s some helpful links for getting setup:
reticulate
installing python packages
Command-line
Base CLI options (run dtale --help to see all options available)
| Prop | Description |
|---|---|
--host |
the name of the host you would like to use (most likely not needed since socket.gethostname() should figure this out) |
--port |
the port you would like to assign to your D-Tale instance |
--name |
an optional name you can assign to your D-Tale instance (this will be displayed in the <title> & Instances popup) |
--debug |
turn on Flask’s “debug” mode for your D-Tale instance |
--no-reaper |
flag to turn off auto-reaping subprocess (kill D-Tale instances after an hour of inactivity), good for long-running displays |
--open-browser |
flag to automatically open up your server’s default browser to your D-Tale instance |
--force |
flag to force D-Tale to try an kill any pre-existing process at the port you’ve specified so it can use it |
Loading data from arctic(high performance datastore for pandas dataframes) (this requires either installing arctic or dtale[arctic])
dtale --arctic-host mongodb://localhost:27027 --arctic-library jdoe.my_lib --arctic-node my_node --arctic-start 20130101 --arctic-end 20161231
Loading data from CSV
dtale --csv-path /home/jdoe/my_csv.csv --csv-parse_dates date
Loading data from JSON
dtale --json-path /home/jdoe/my_json.json --json-parse_dates date
or
dtale --json-path http://json-endpoint --json-parse_dates date
Loading data from a Custom loader
- Using the DTALE_CLI_LOADERS environment variable, specify a path to a location containing some python modules
- Any python module containing the global variables LOADER_KEY & LOADER_PROPS will be picked up as a custom loader
- LOADER_KEY: the key that will be associated with your loader. By default you are given arctic & csv (if you use one of these are your key it will override these)
- LOADER_PROPS: the individual props available to be specified.
- For example, with arctic we have host, library, node, start & end.
- If you leave this property as an empty list your loader will be treated as a flag. For example, instead of using all the arctic properties we would simply specify
--arctic(this wouldn’t work well in arctic’s case since it depends on all those properties)
- You will also need to specify a function with the following signature
def find_loader(kwargs)which returns a function that returns a dataframe orNone - Here is an example of a custom loader:
from dtale.cli.clickutils import get_loader_options

'''
  IMPORTANT!!! This global variable is required for building any customized CLI loader.
  When find loaders on startup it will search for any modules containing the global variable LOADER_KEY.
'''
LOADER_KEY = 'testdata'
LOADER_PROPS = ['rows', 'columns']


def test_data(rows, columns):
    import pandas as pd
    import numpy as np
    import random
    from past.utils import old_div
    from pandas.tseries.offsets import Day
    from dtale.utils import dict_merge
    import string

    now = pd.Timestamp(pd.Timestamp('now').date())
    dates = pd.date_range(now - Day(364), now)
    num_of_securities = max(old_div(rows, len(dates)), 1)  # always have at least one security
    securities = [
        dict(security_id=100000 + sec_id, int_val=random.randint(1, 100000000000),
             str_val=random.choice(string.ascii_letters) * 5)
        for sec_id in range(num_of_securities)
    ]
    data = pd.concat([
        pd.DataFrame([dict_merge(dict(date=date), sd) for sd in securities])
        for date in dates
    ], ignore_index=True)[['date', 'security_id', 'int_val', 'str_val']]

    col_names = ['Col{}'.format(c) for c in range(columns)]
    return pd.concat([data, pd.DataFrame(np.random.randn(len(data), columns), columns=col_names)], axis=1)


# IMPORTANT!!! This function is required for building any customized CLI loader.
def find_loader(kwargs):
    test_data_opts = get_loader_options(LOADER_KEY, kwargs)
    if len([f for f in test_data_opts.values() if f]):
        def _testdata_loader():
            return test_data(int(test_data_opts.get('rows', 1000500)), int(test_data_opts.get('columns', 96)))

        return _testdata_loader
    return None
In this example we simplying building a dataframe with some dummy data based on dimensions specified on the command-line:
--testdata-rows--testdata-columns
Here’s how you would use this loader:
DTALE_CLI_LOADERS=./path_to_loaders bash -c 'dtale --testdata-rows 10 --testdata-columns 5'
Accessing CLI Loaders in Notebook or Console
I am pleased to announce that all CLI loaders will be available within notebooks & consoles. Here are some examples:
dtale.show_csv(path='test.csv', parse_dates=['date'])dtale.show_json(path='http://json-endpoint', parse_dates=['date'])dtale.show_json(path='test.json', parse_dates=['date'])dtale.show_arctic(host='host', library='library', node='node', start_date='20200101', end_date='20200101')
UI
Once you have kicked off your D-Tale session please copy & paste the link on the last line of output in your browser
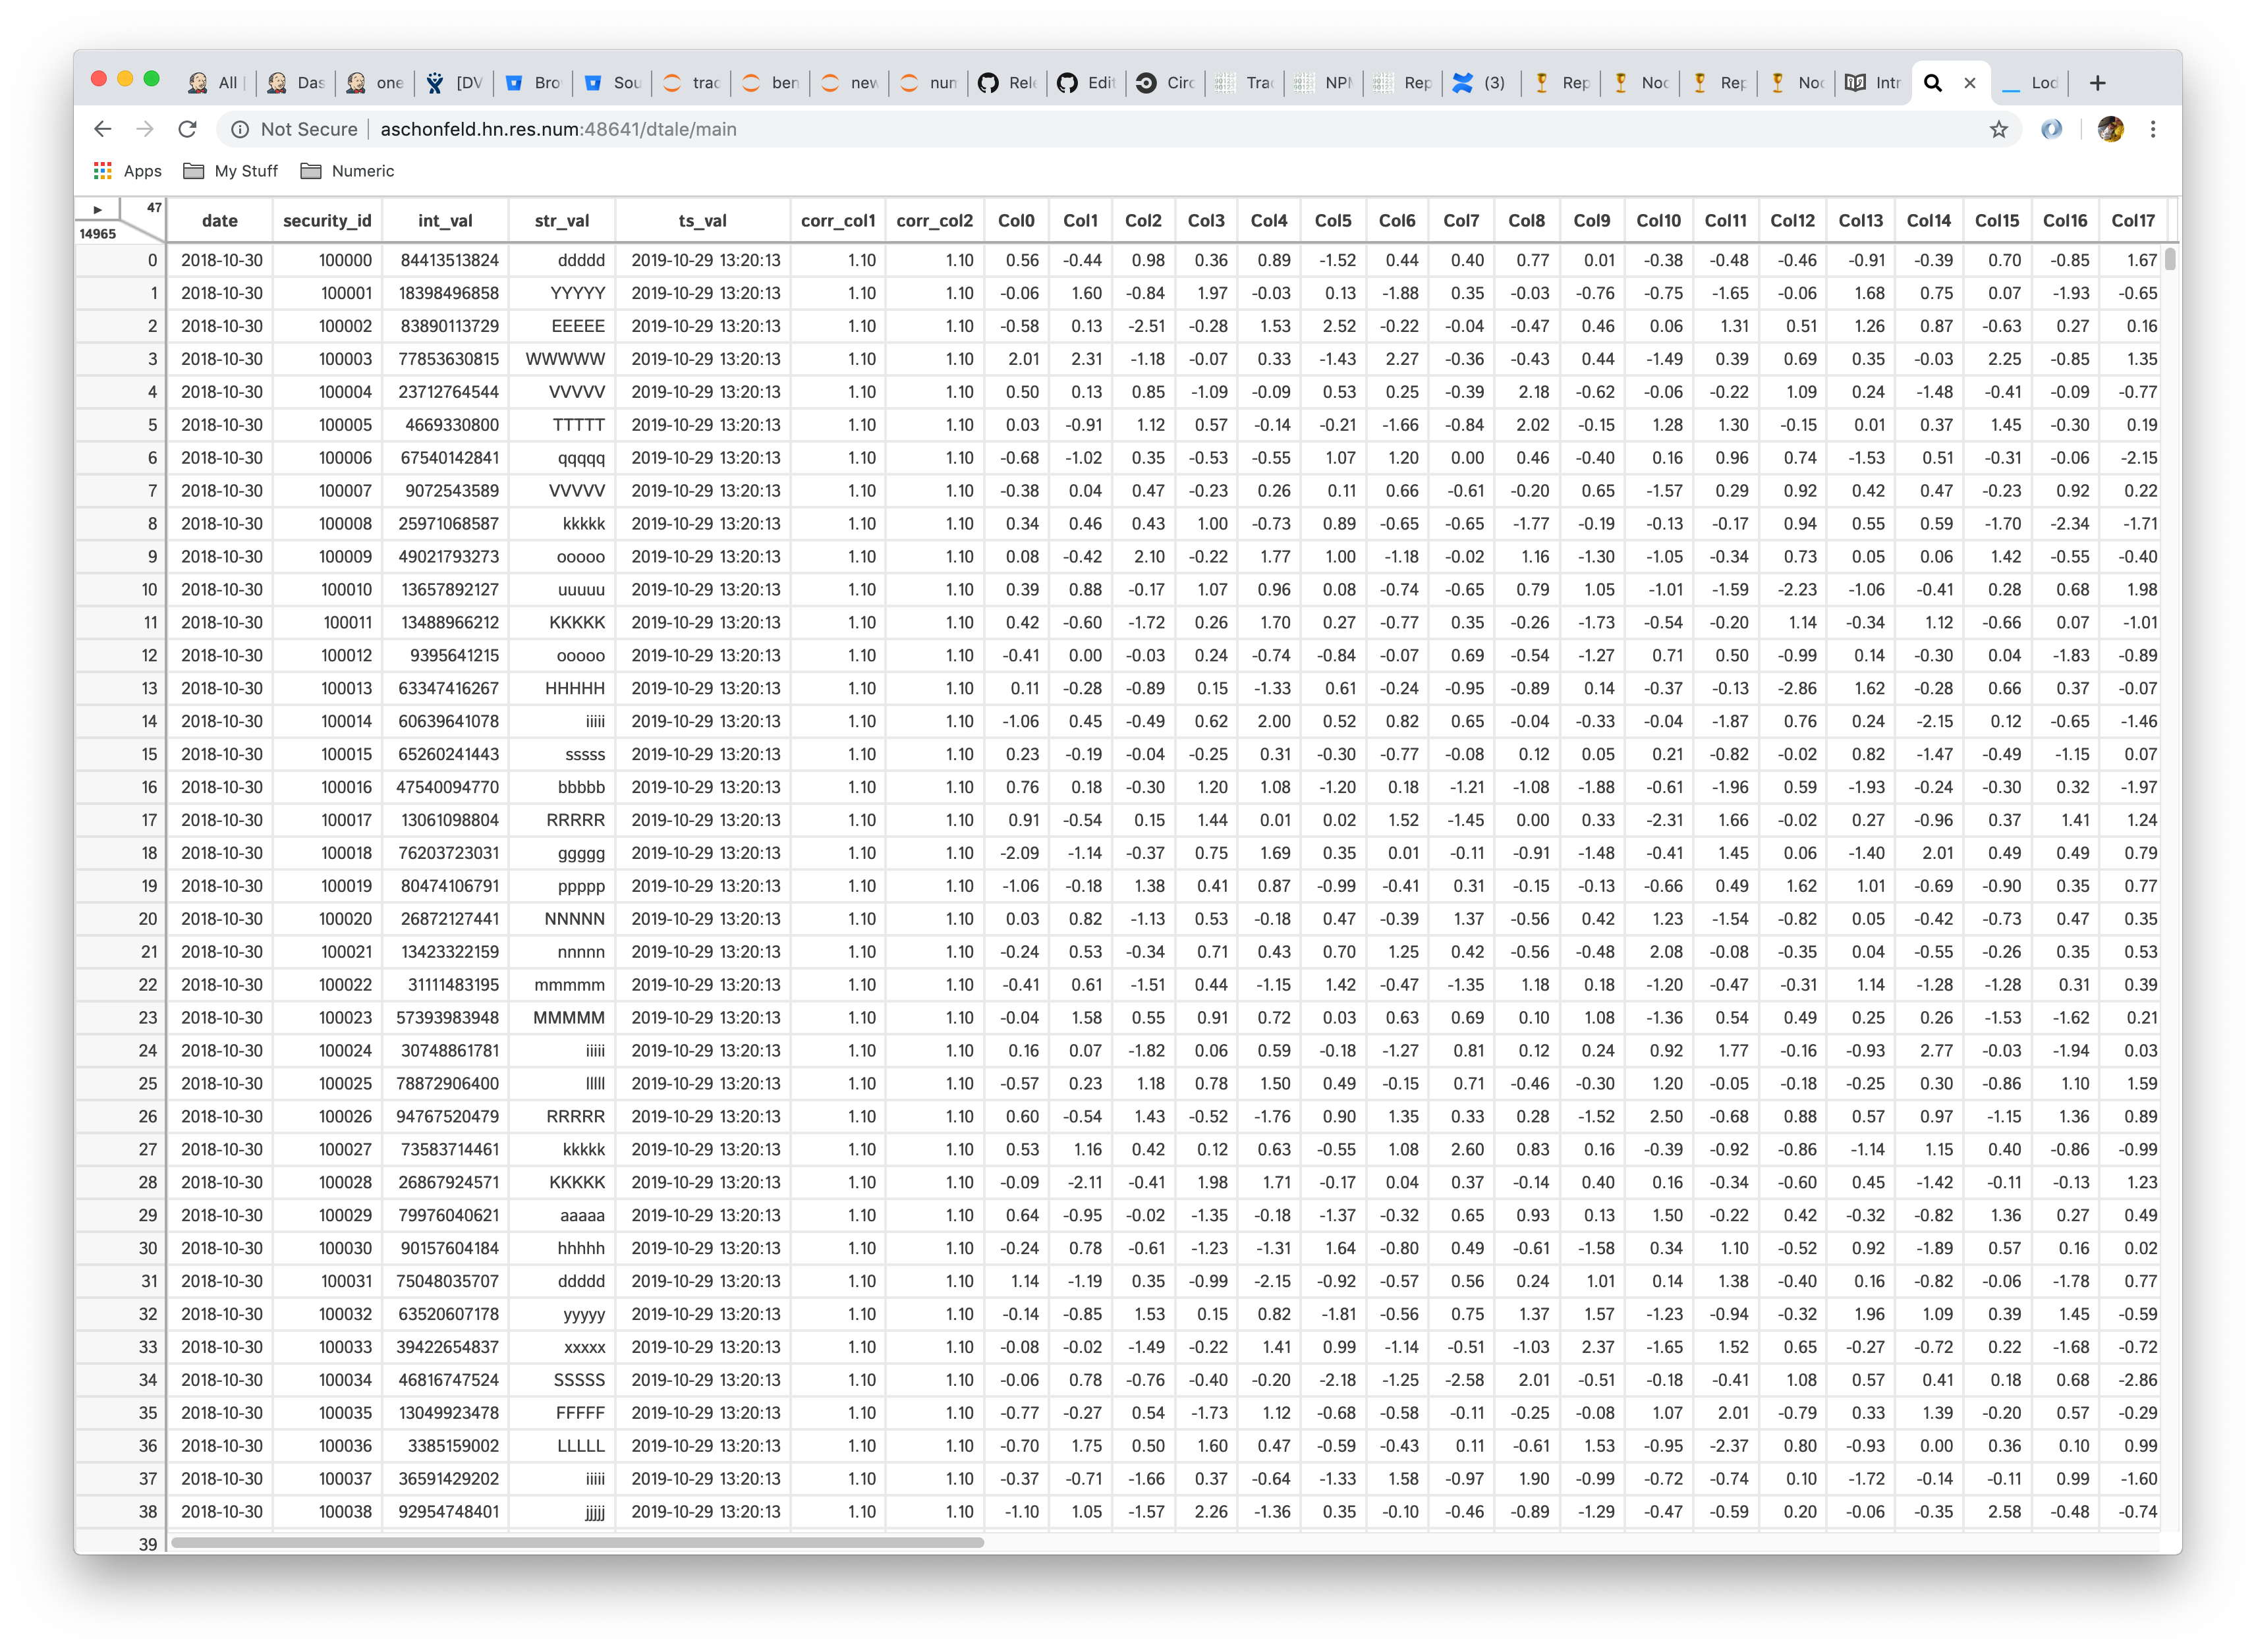
Dimensions/Main Menu
The information in the upper right-hand corner gives grid dimensions 
- lower-left => row count
- upper-right => column count
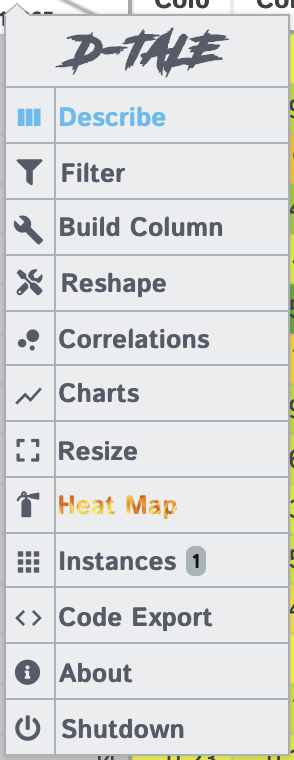
- clicking the triangle displays the menu of standard functions (click outside menu to close it)
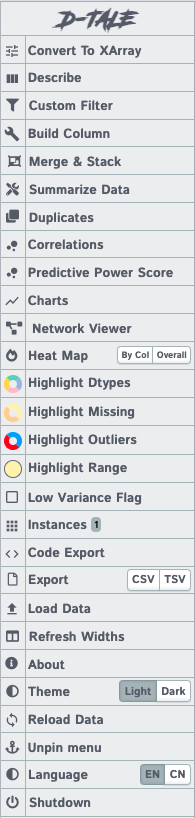
Main Menu Functions
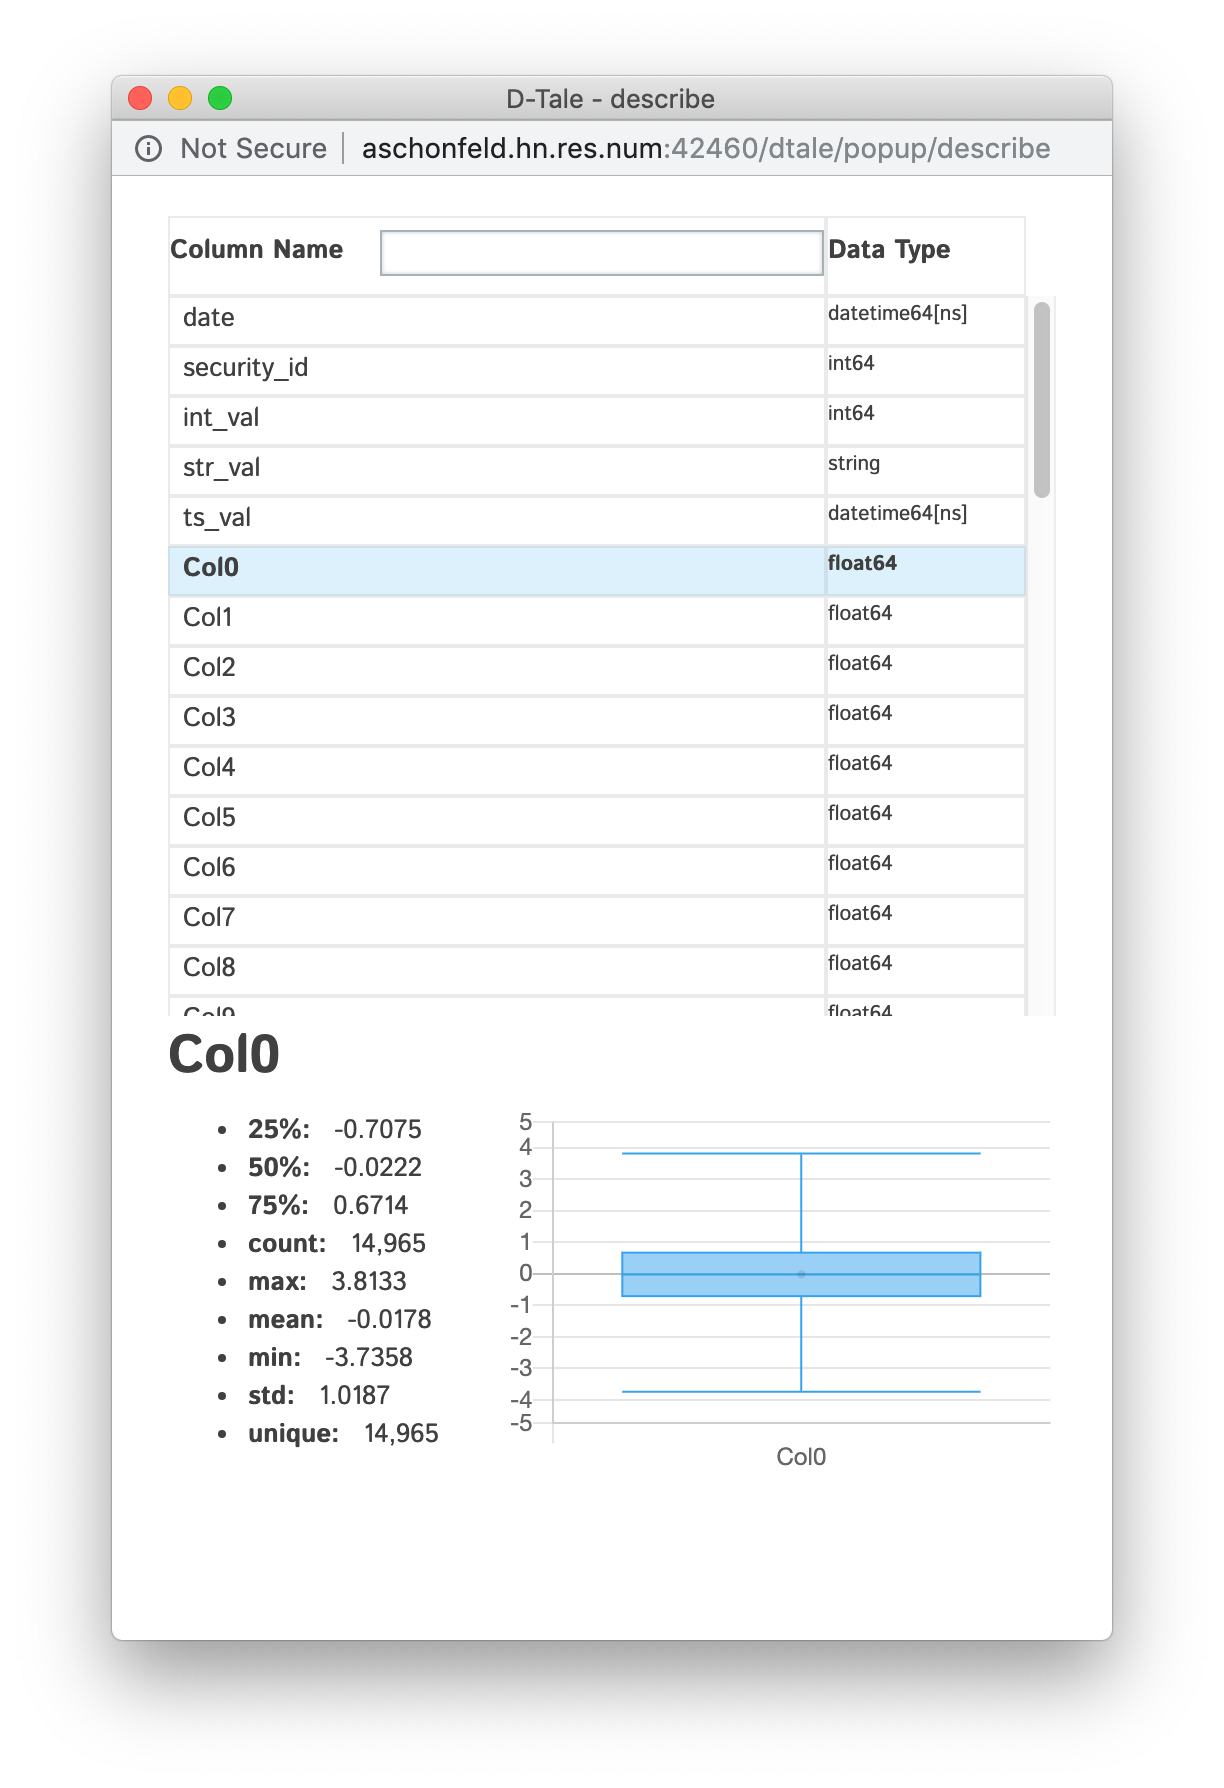
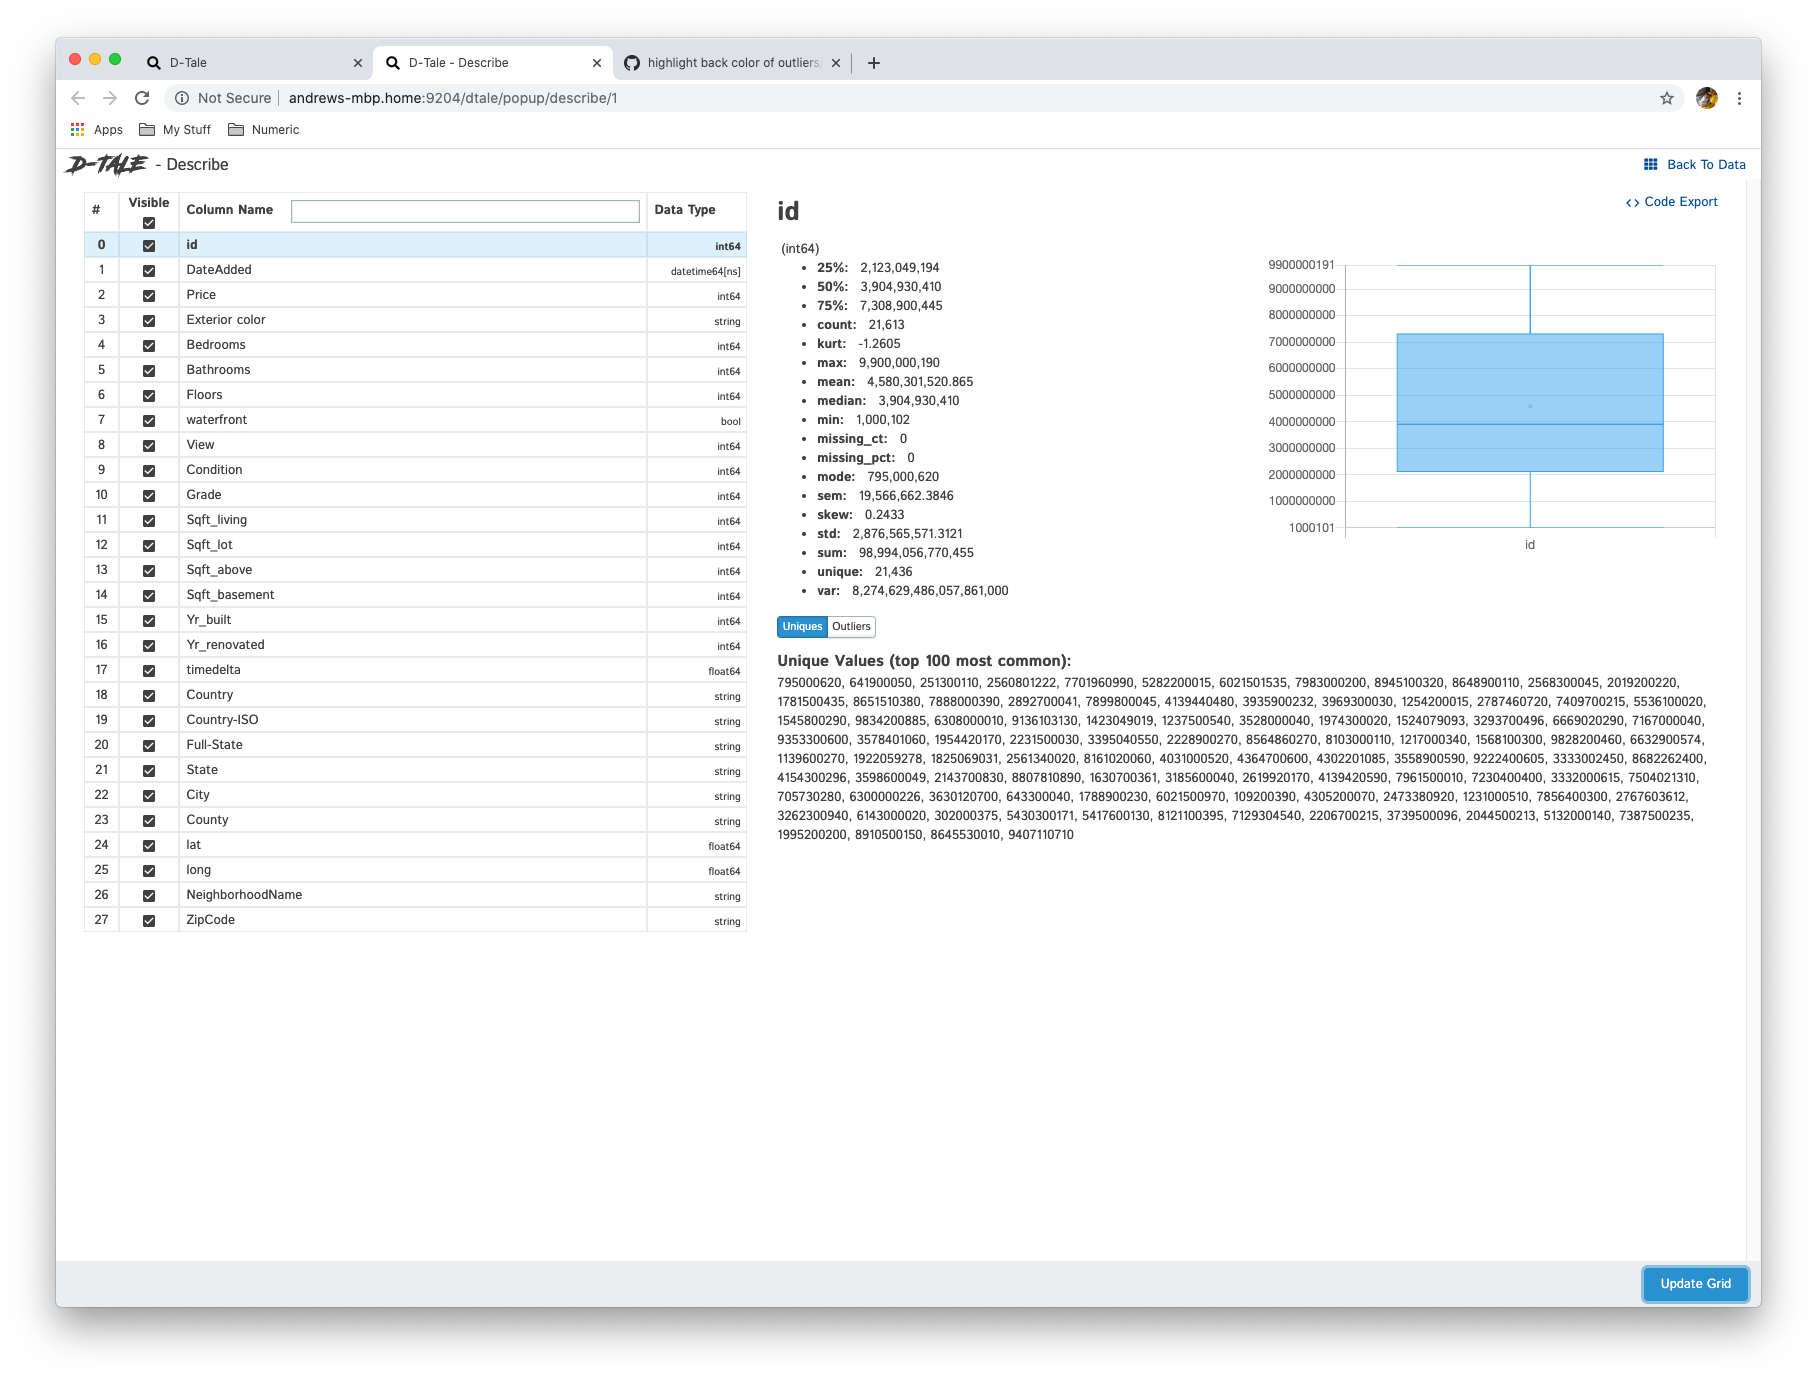
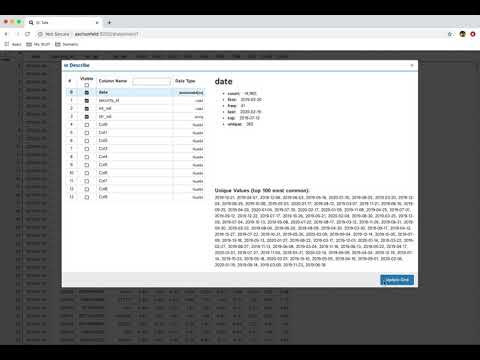
Describe
View all the columns & their data types as well as individual details of each column
| Data Type | Display | Notes |
|---|---|---|
| date | 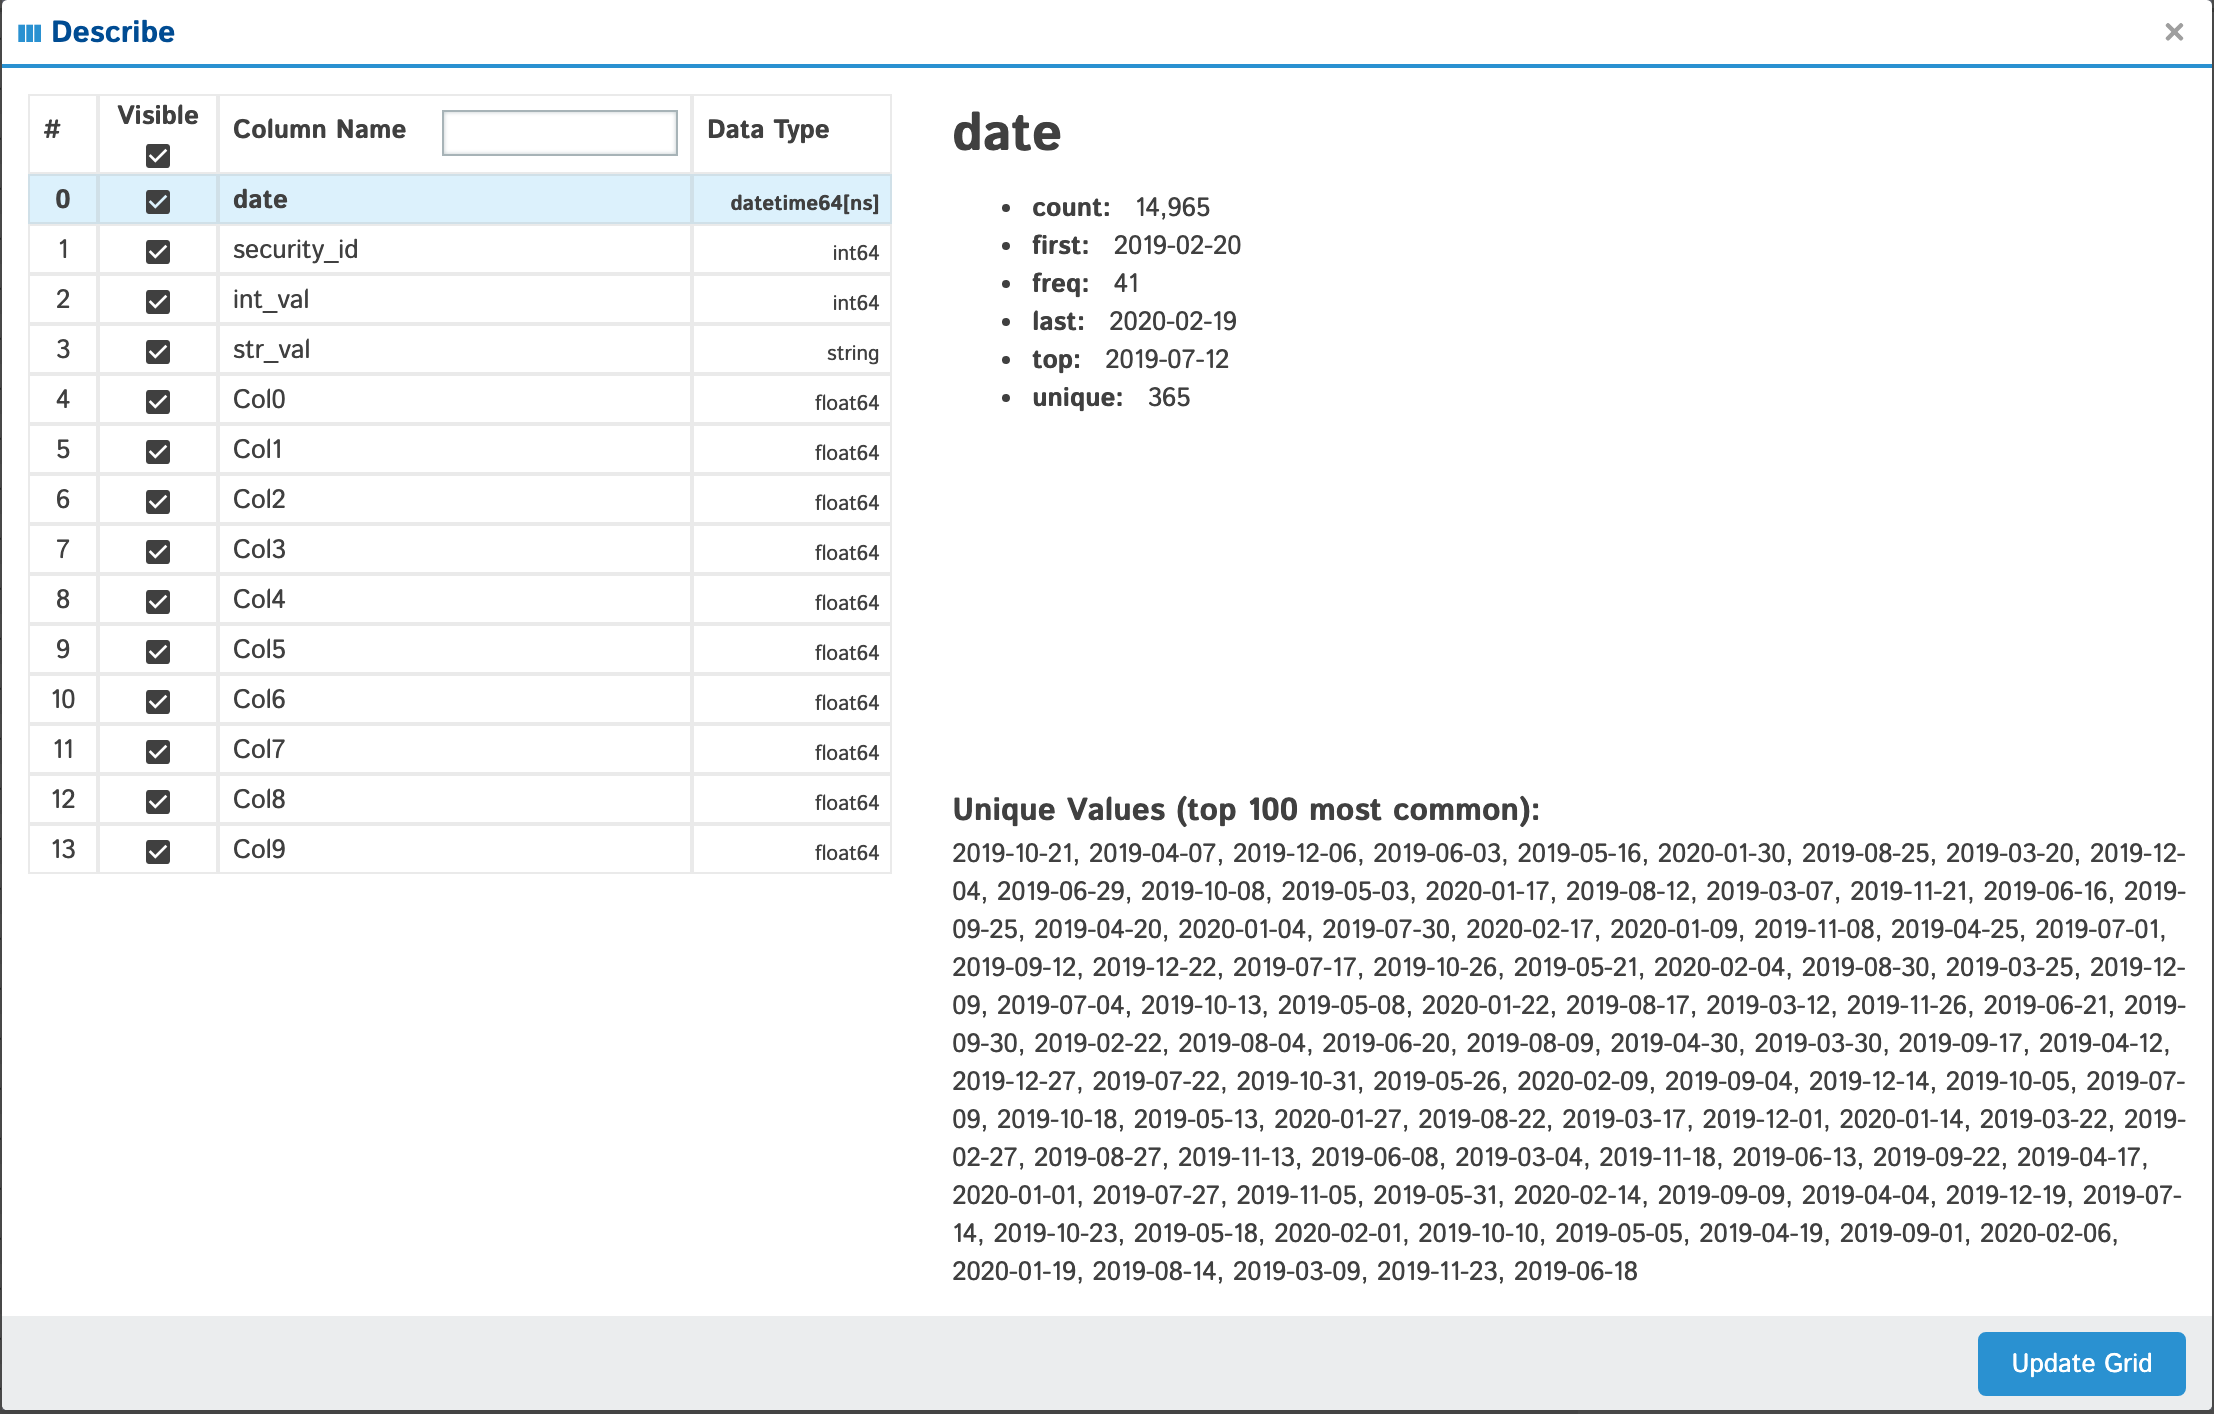 |
|
| string |  |
If you have less than or equal to 100 unique values they will be displayed at the bottom of your popup |
| int | 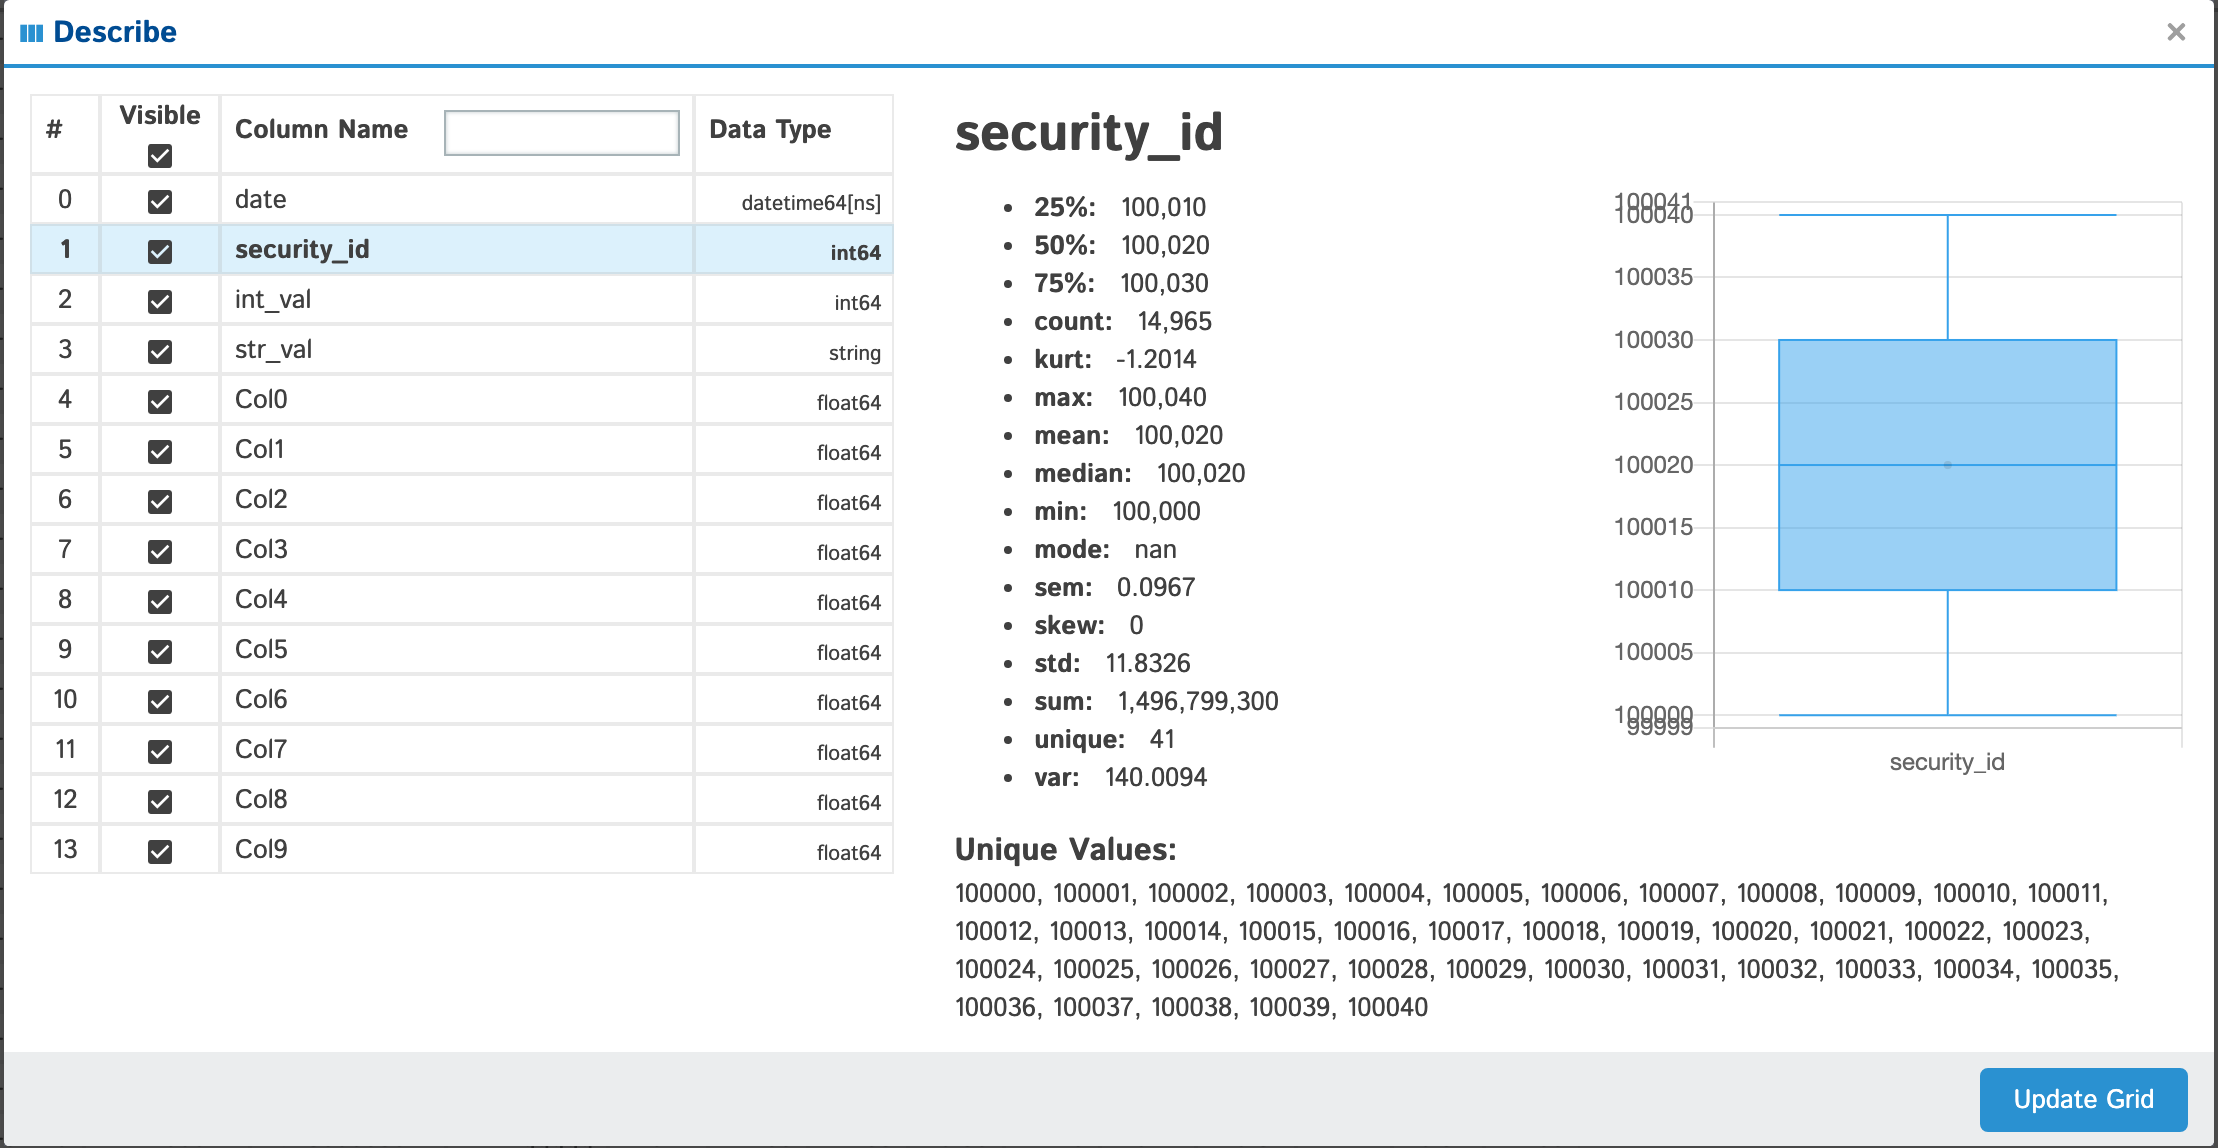 |
Anything with standard numeric classifications (min, max, 25%, 50%, 75%) will have a nice boxplot with the mean (if it exists) displayed as an outlier if you look closely. |
| float | 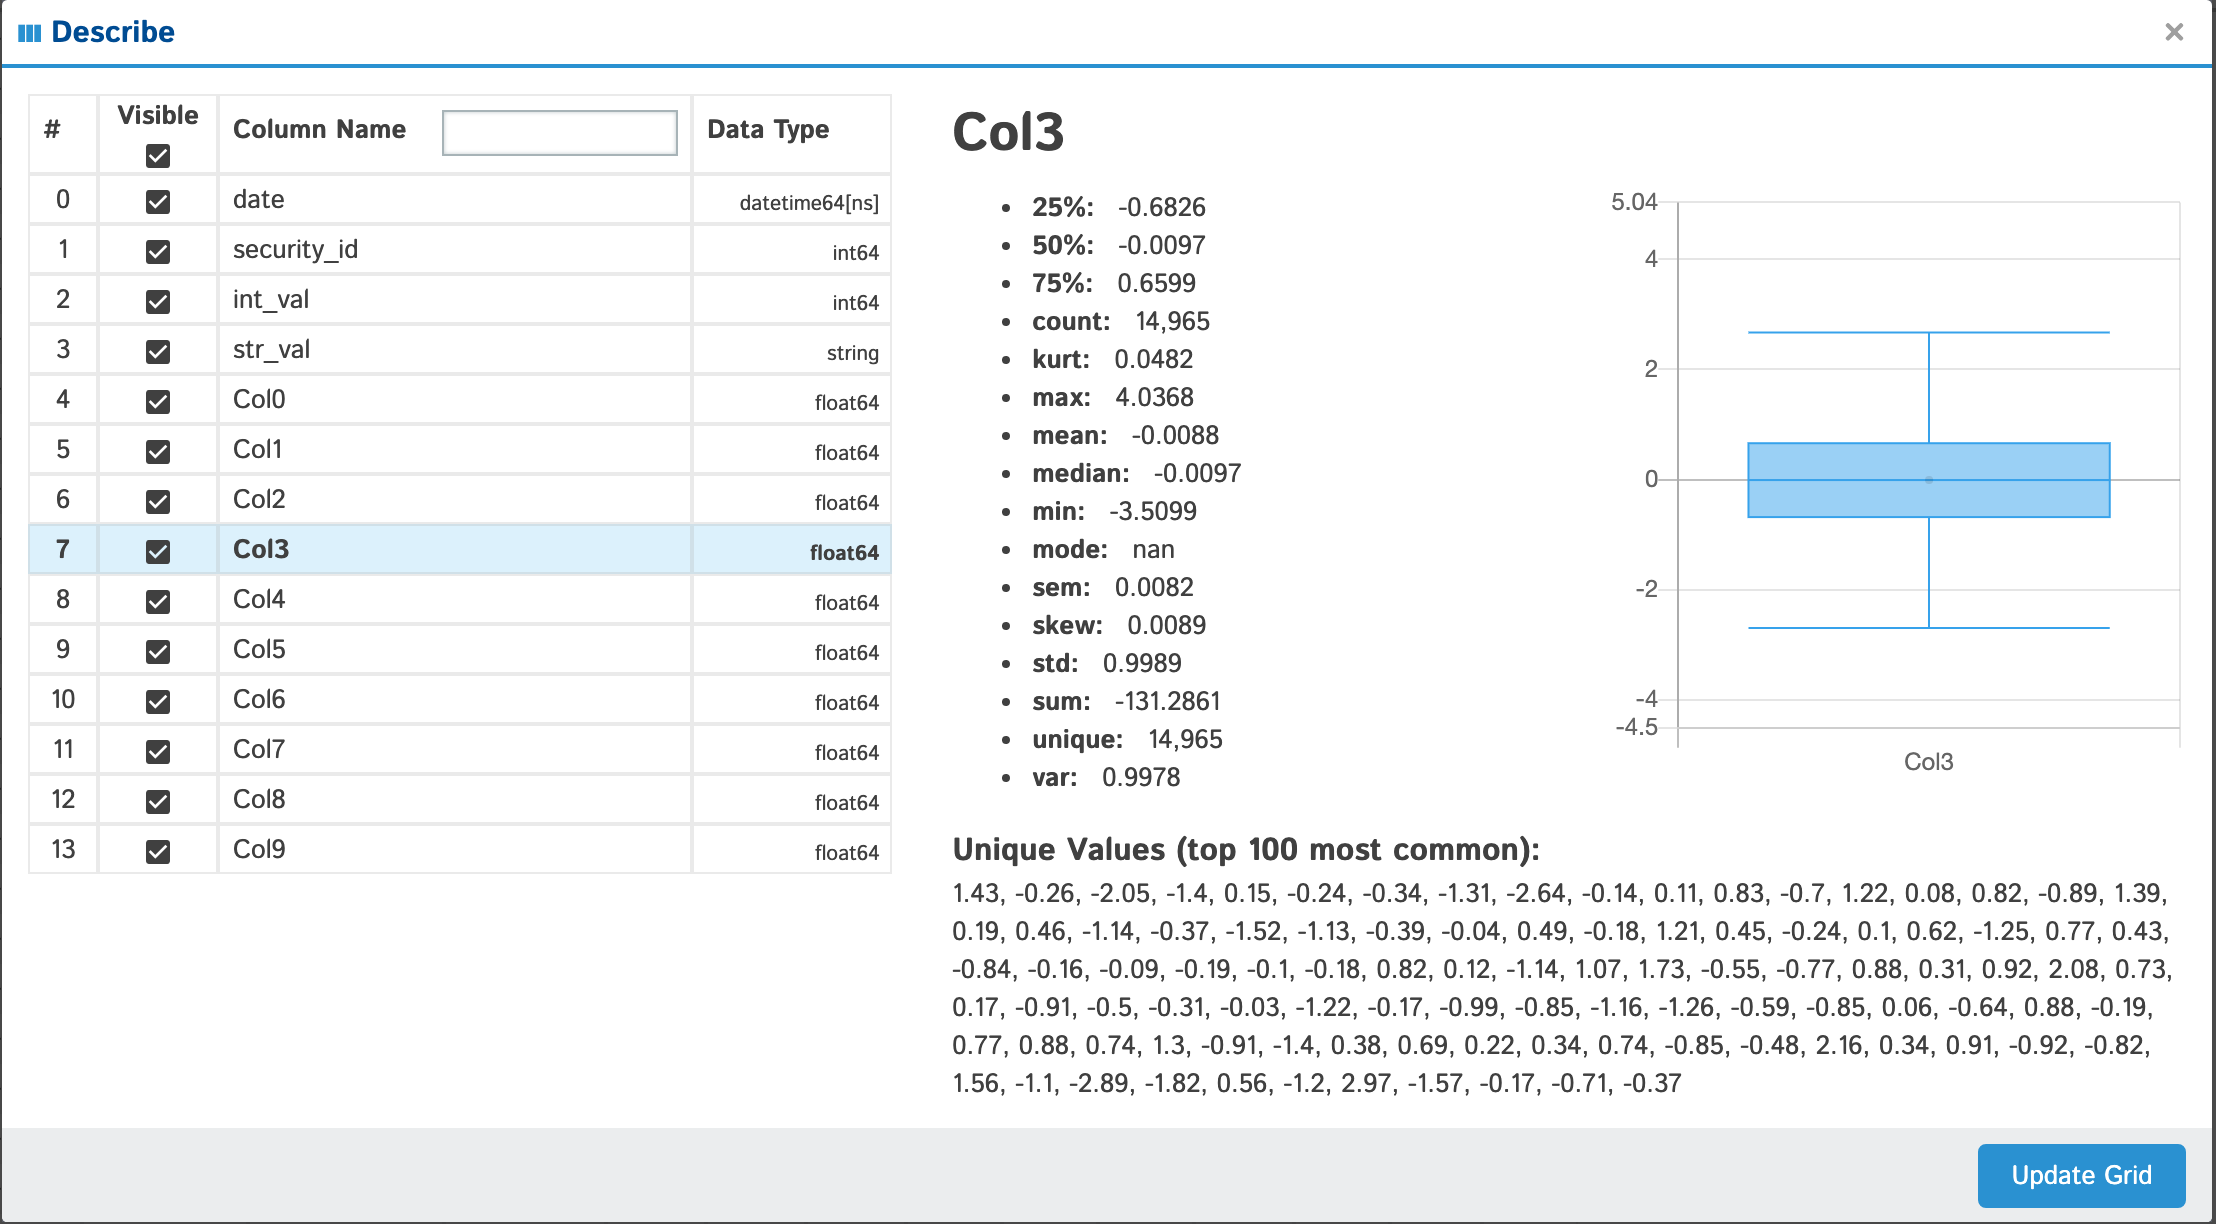 |
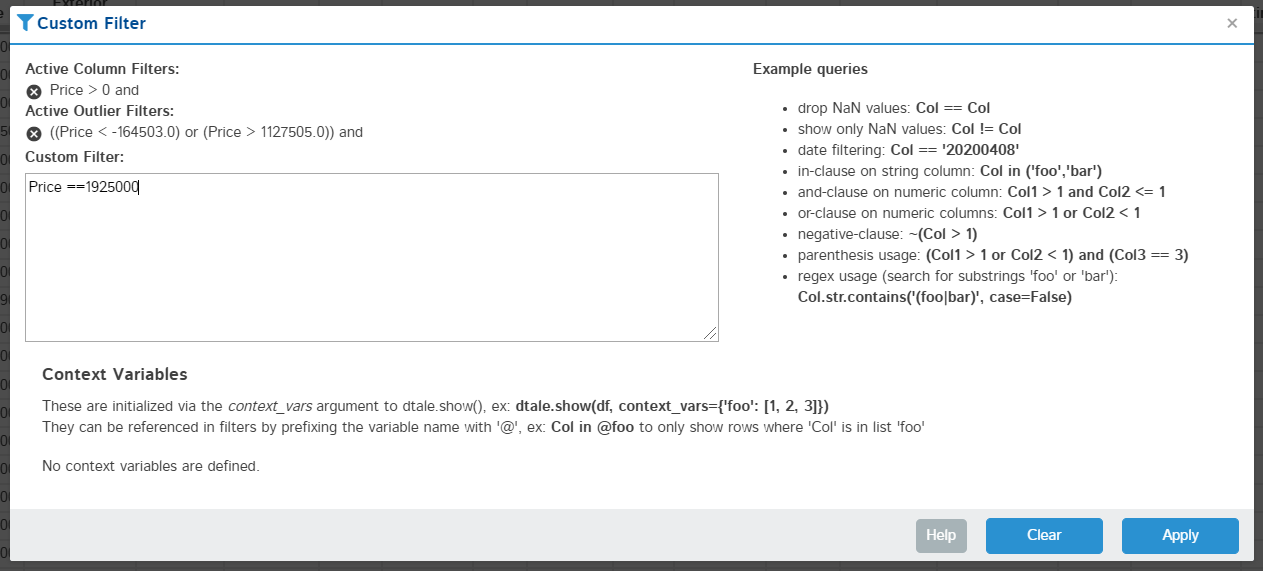
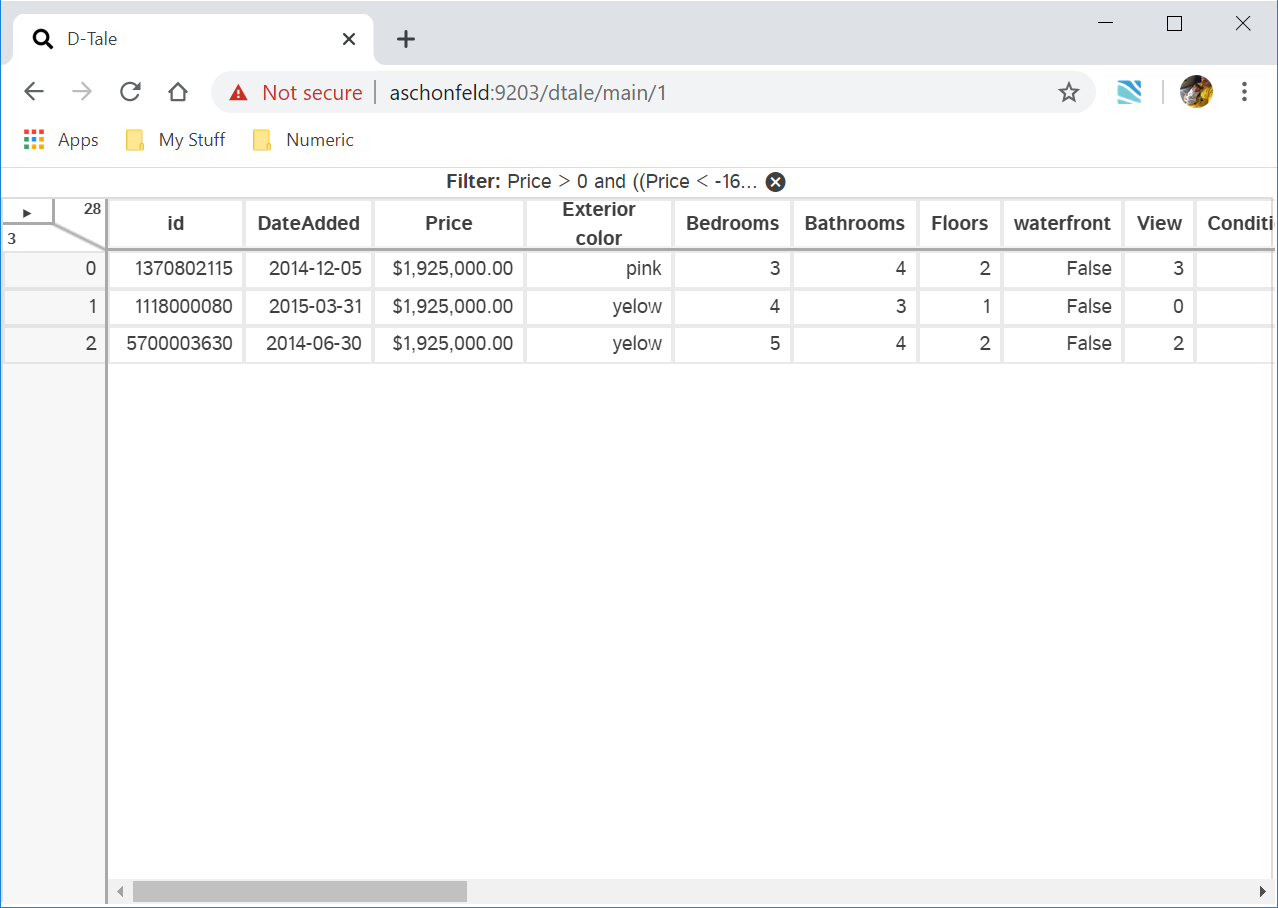
Filter
Apply a simple pandas query to your data (link to pandas documentation included in popup)
Context Variables are user-defined values passed in via the context_variables argument to dtale.show(); they can be referenced in filters by prefixing the variable name with ‘@’.
For example, here is how you can use context variables in a pandas query:
import pandas as pd

df = pd.DataFrame([
  dict(name='Joe', age=7),
  dict(name='Bob', age=23),
  dict(name='Ann', age=45),
  dict(name='Cat', age=88),
])
two_oldest_ages = df['age'].nlargest(2)
df.query('age in @two_oldest_ages')
And here is how you would pass that context variable to D-Tale: dtale.show(df, context_variables=dict(two_oldest_ages=two_oldest_ages))
Here’s some nice documentation on the performance of pandas queries
| Editing | Result |
|---|---|
 |
 |
Building Columns

This video shows you how to build the following:
- Numeric: adding/subtracting two columns or columns with static values
- Bins: bucketing values using pandas cut & qcut as well as assigning custom labels
- Dates: retrieving date properties (hour, weekday, month…) as well as conversions (month end)
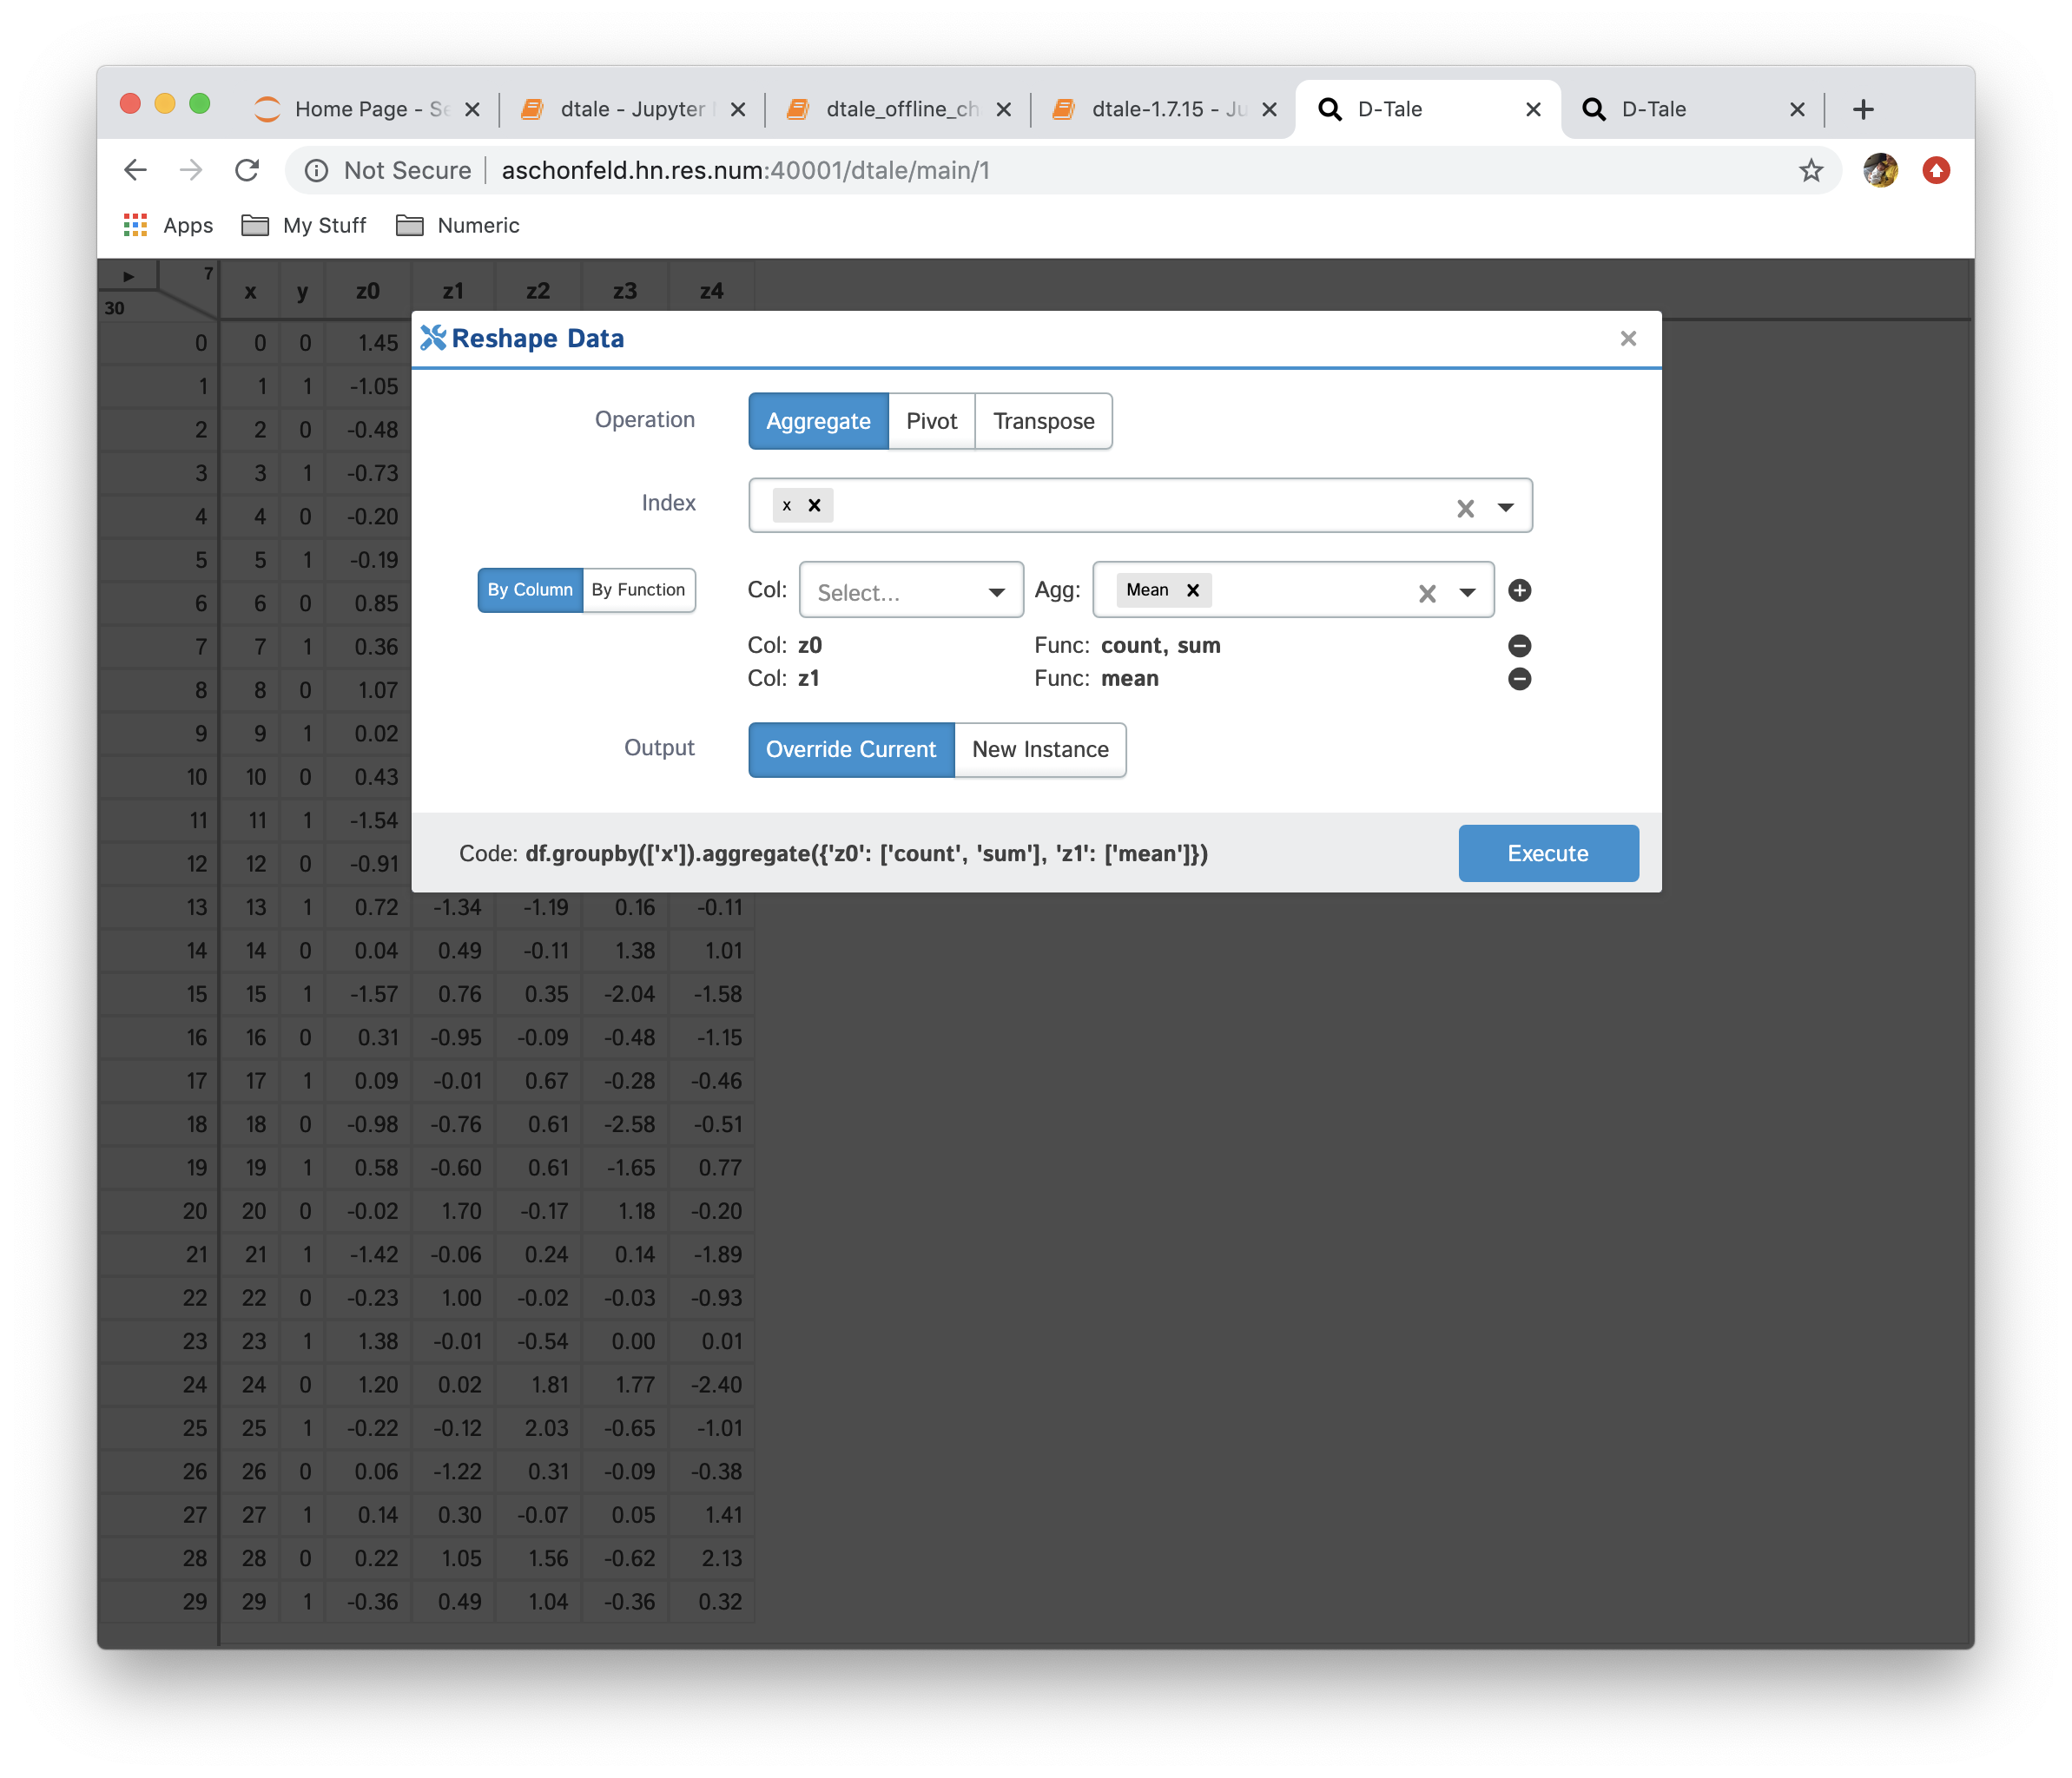
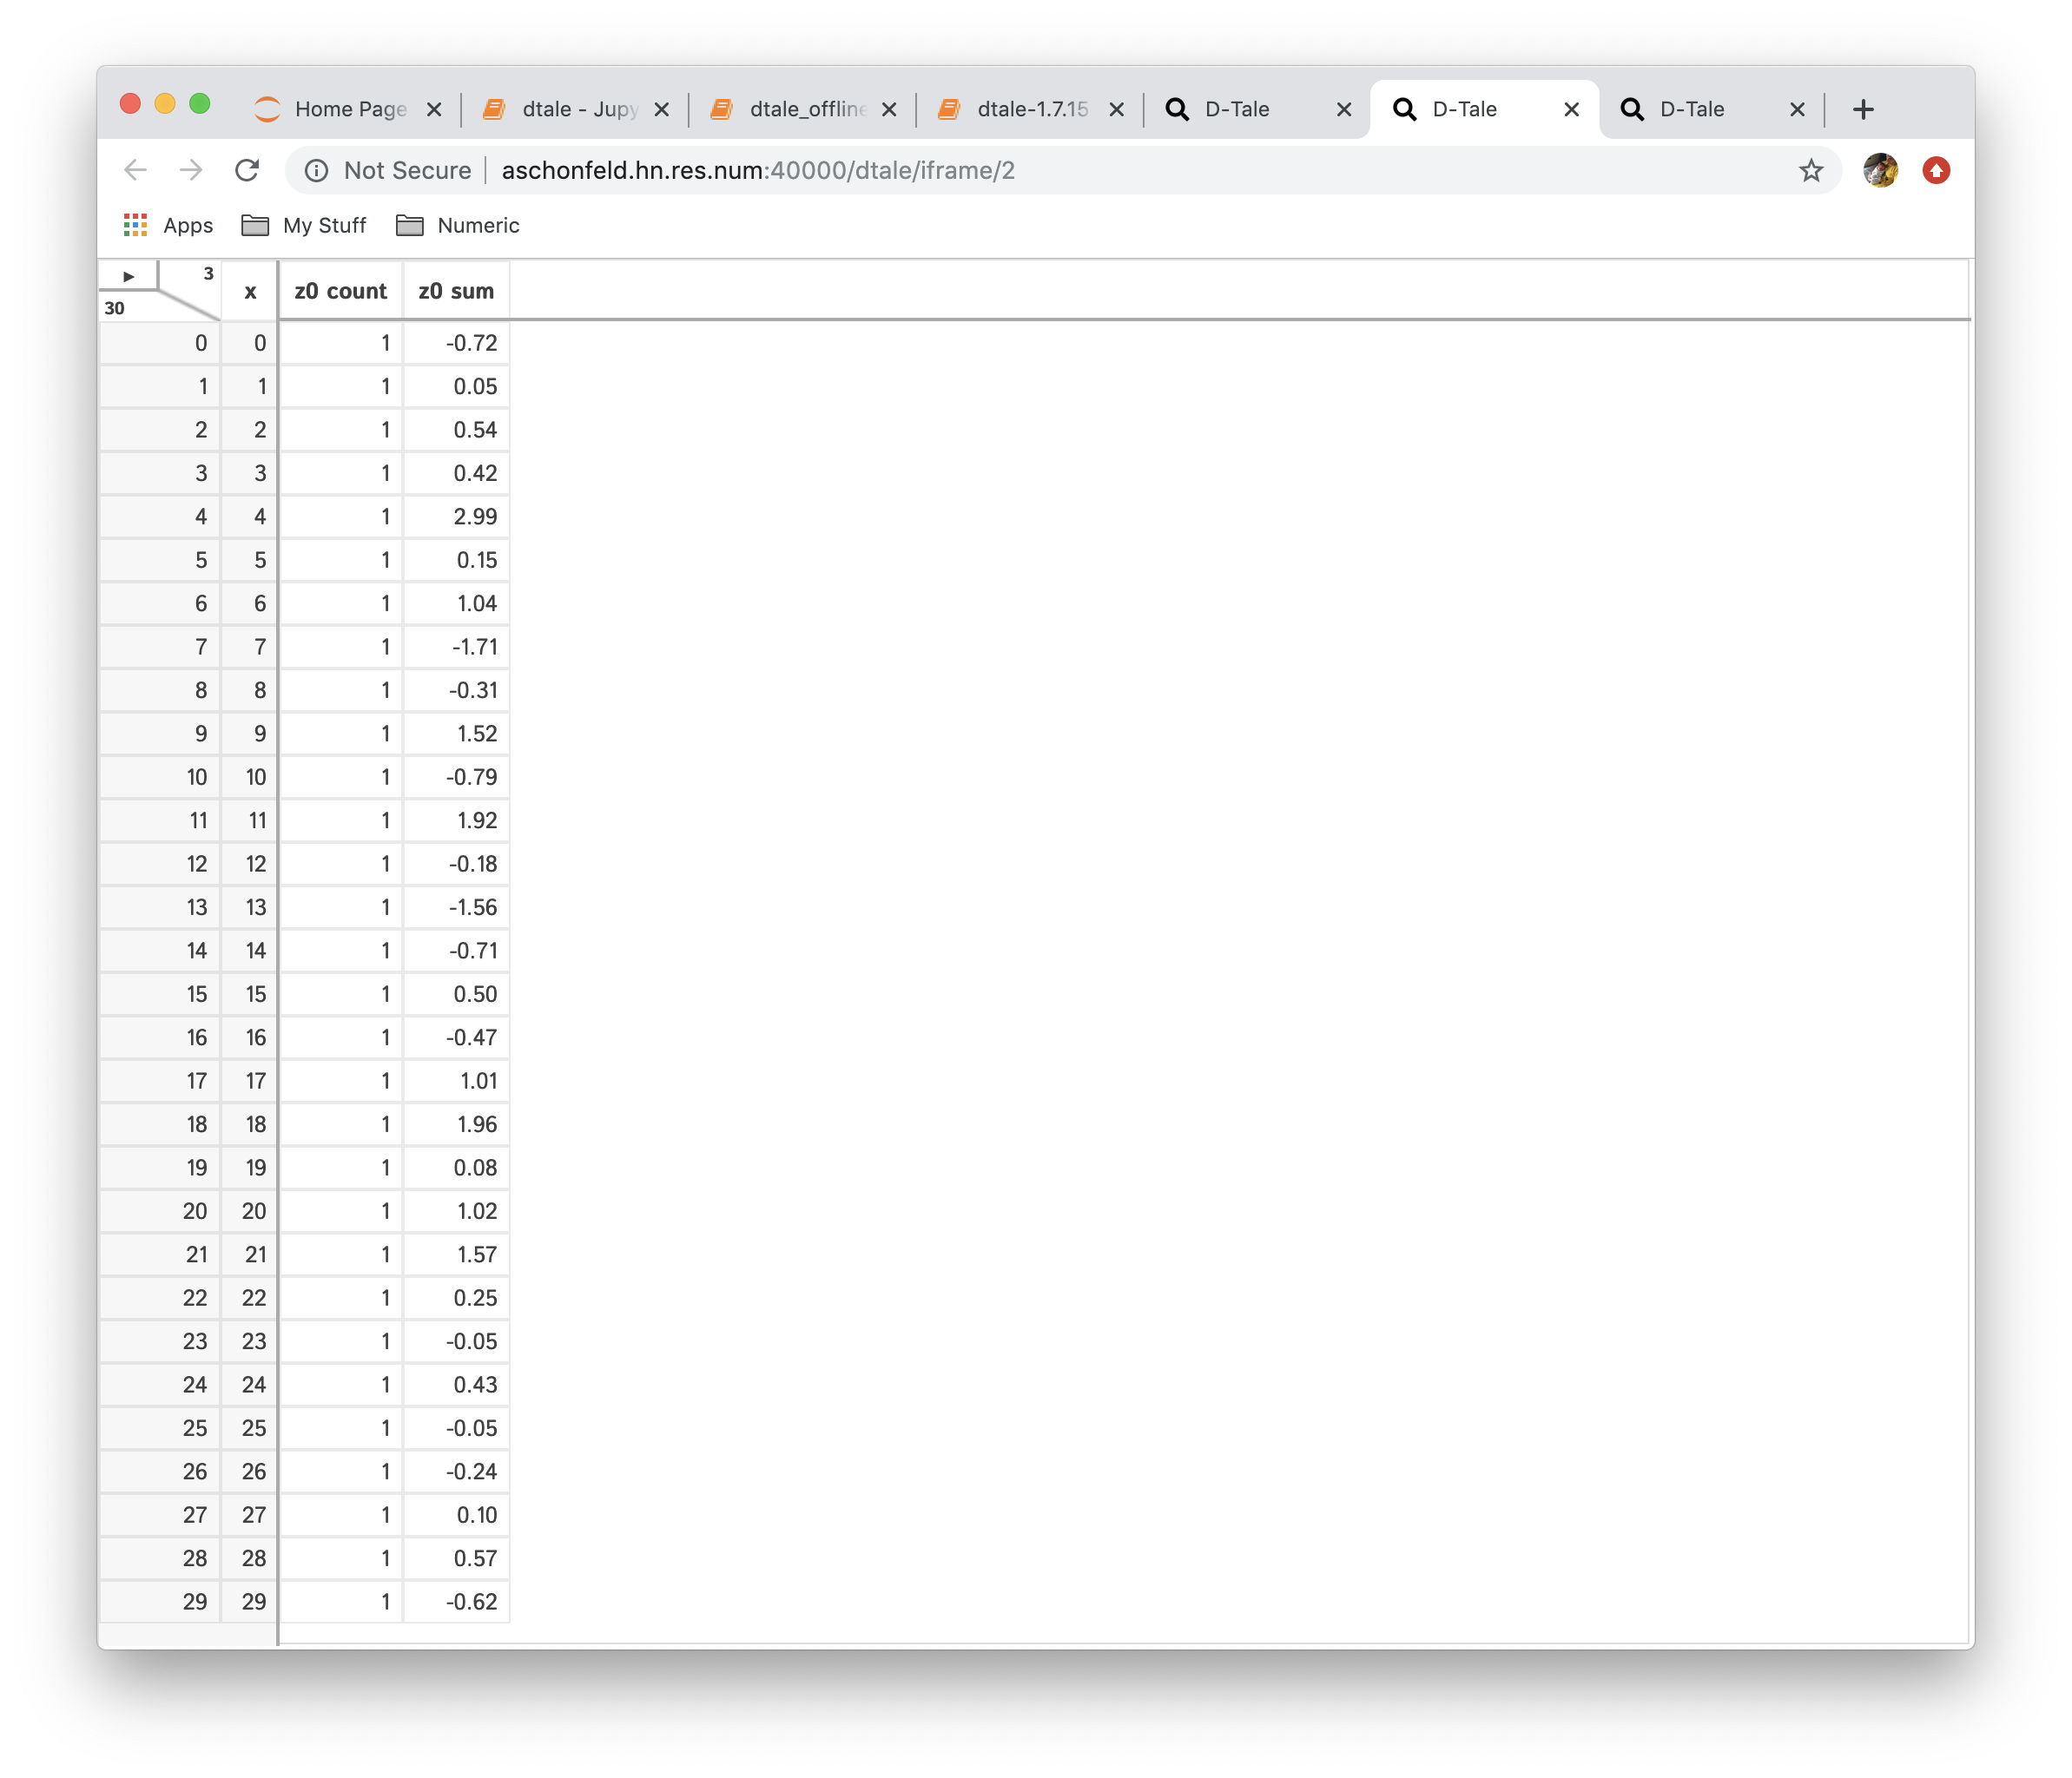
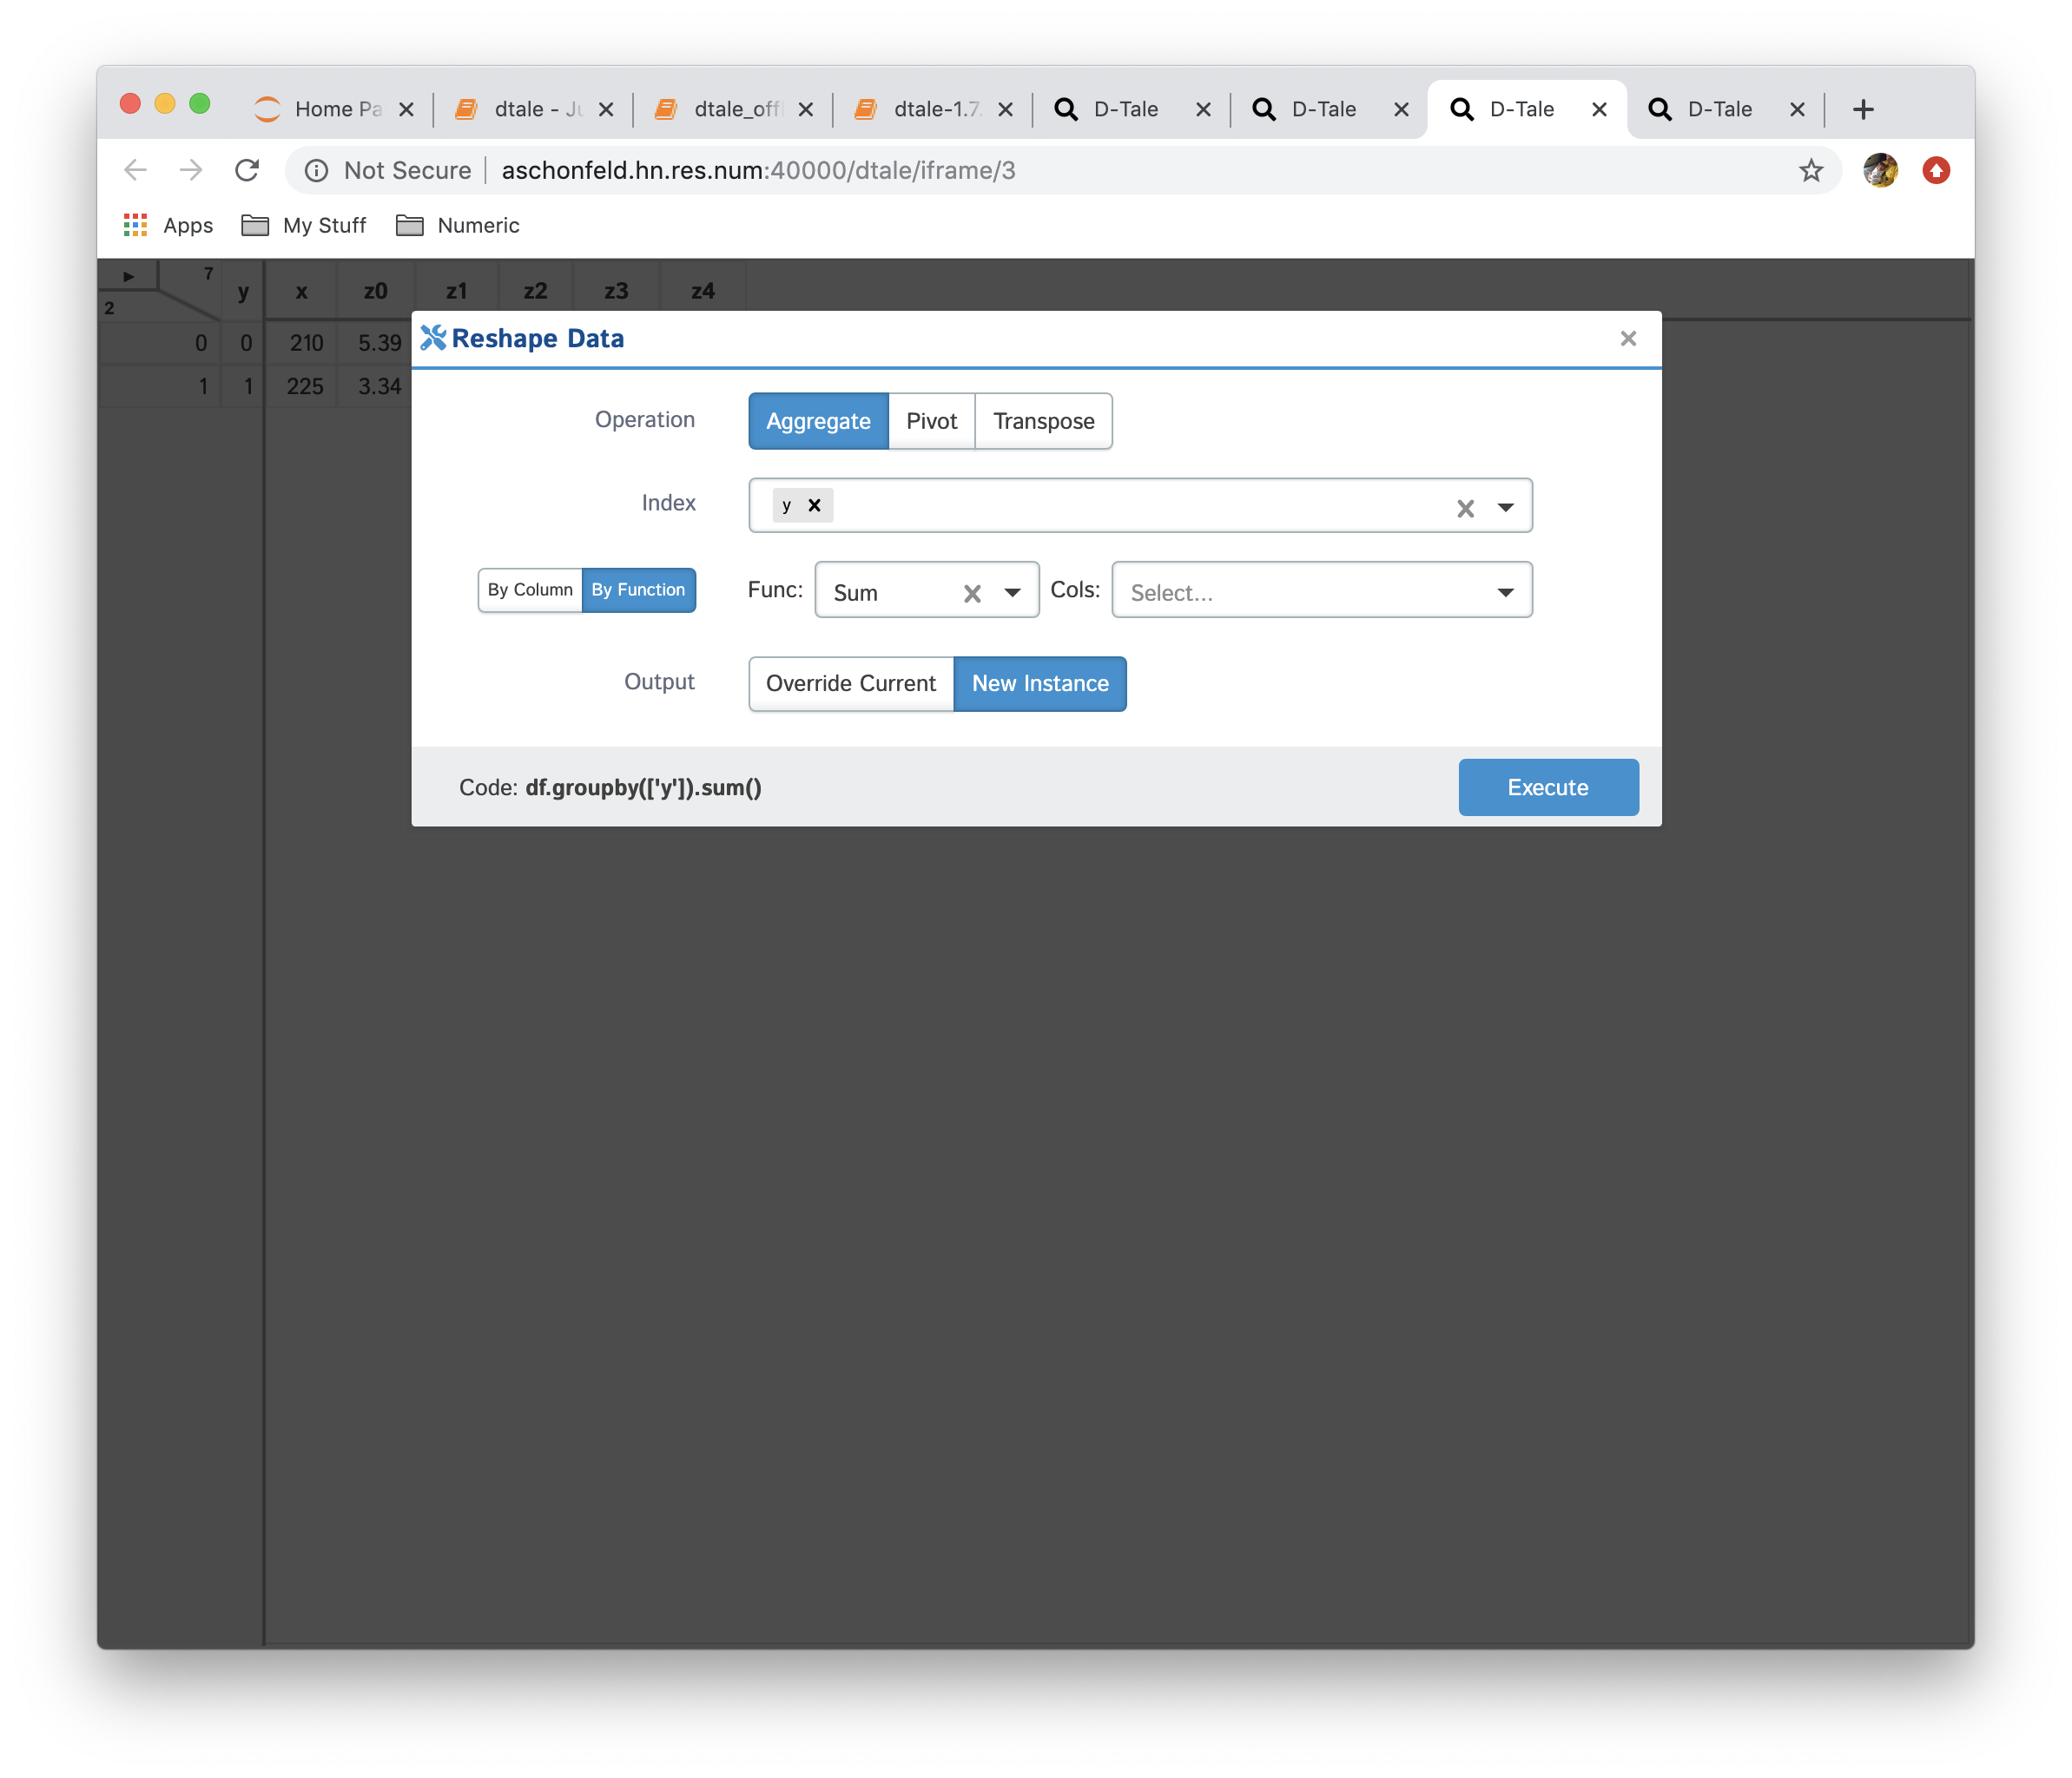
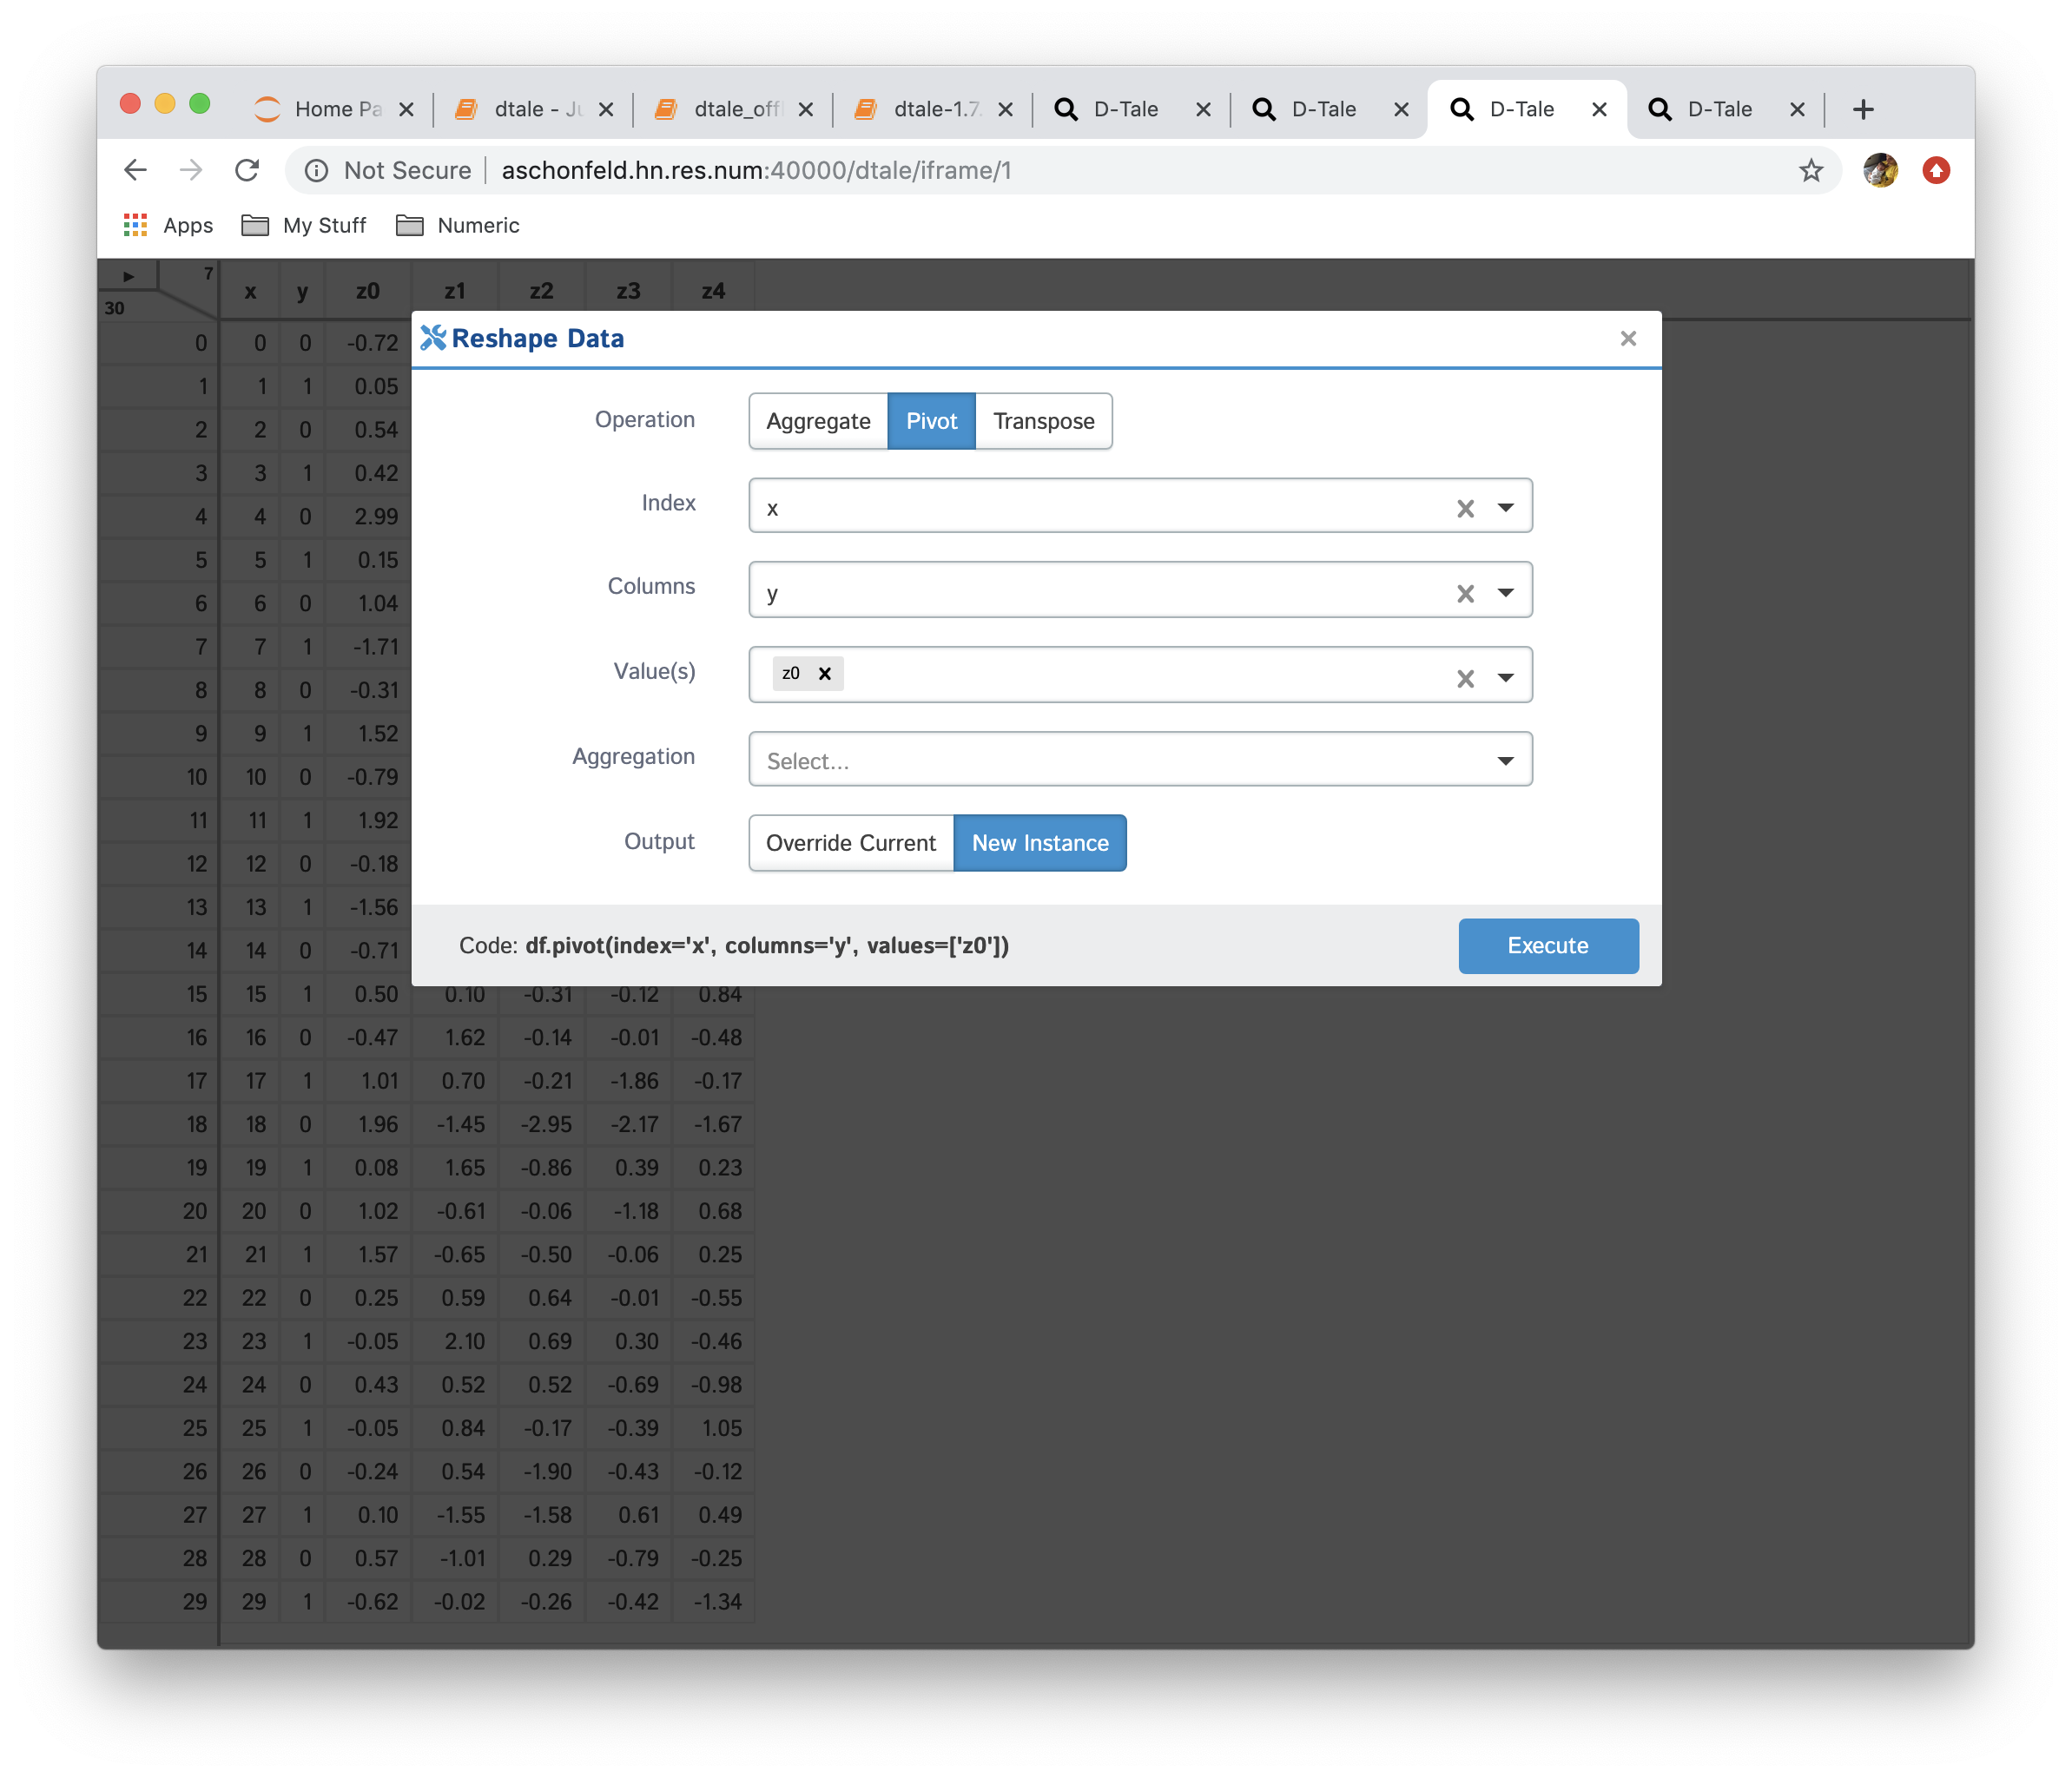
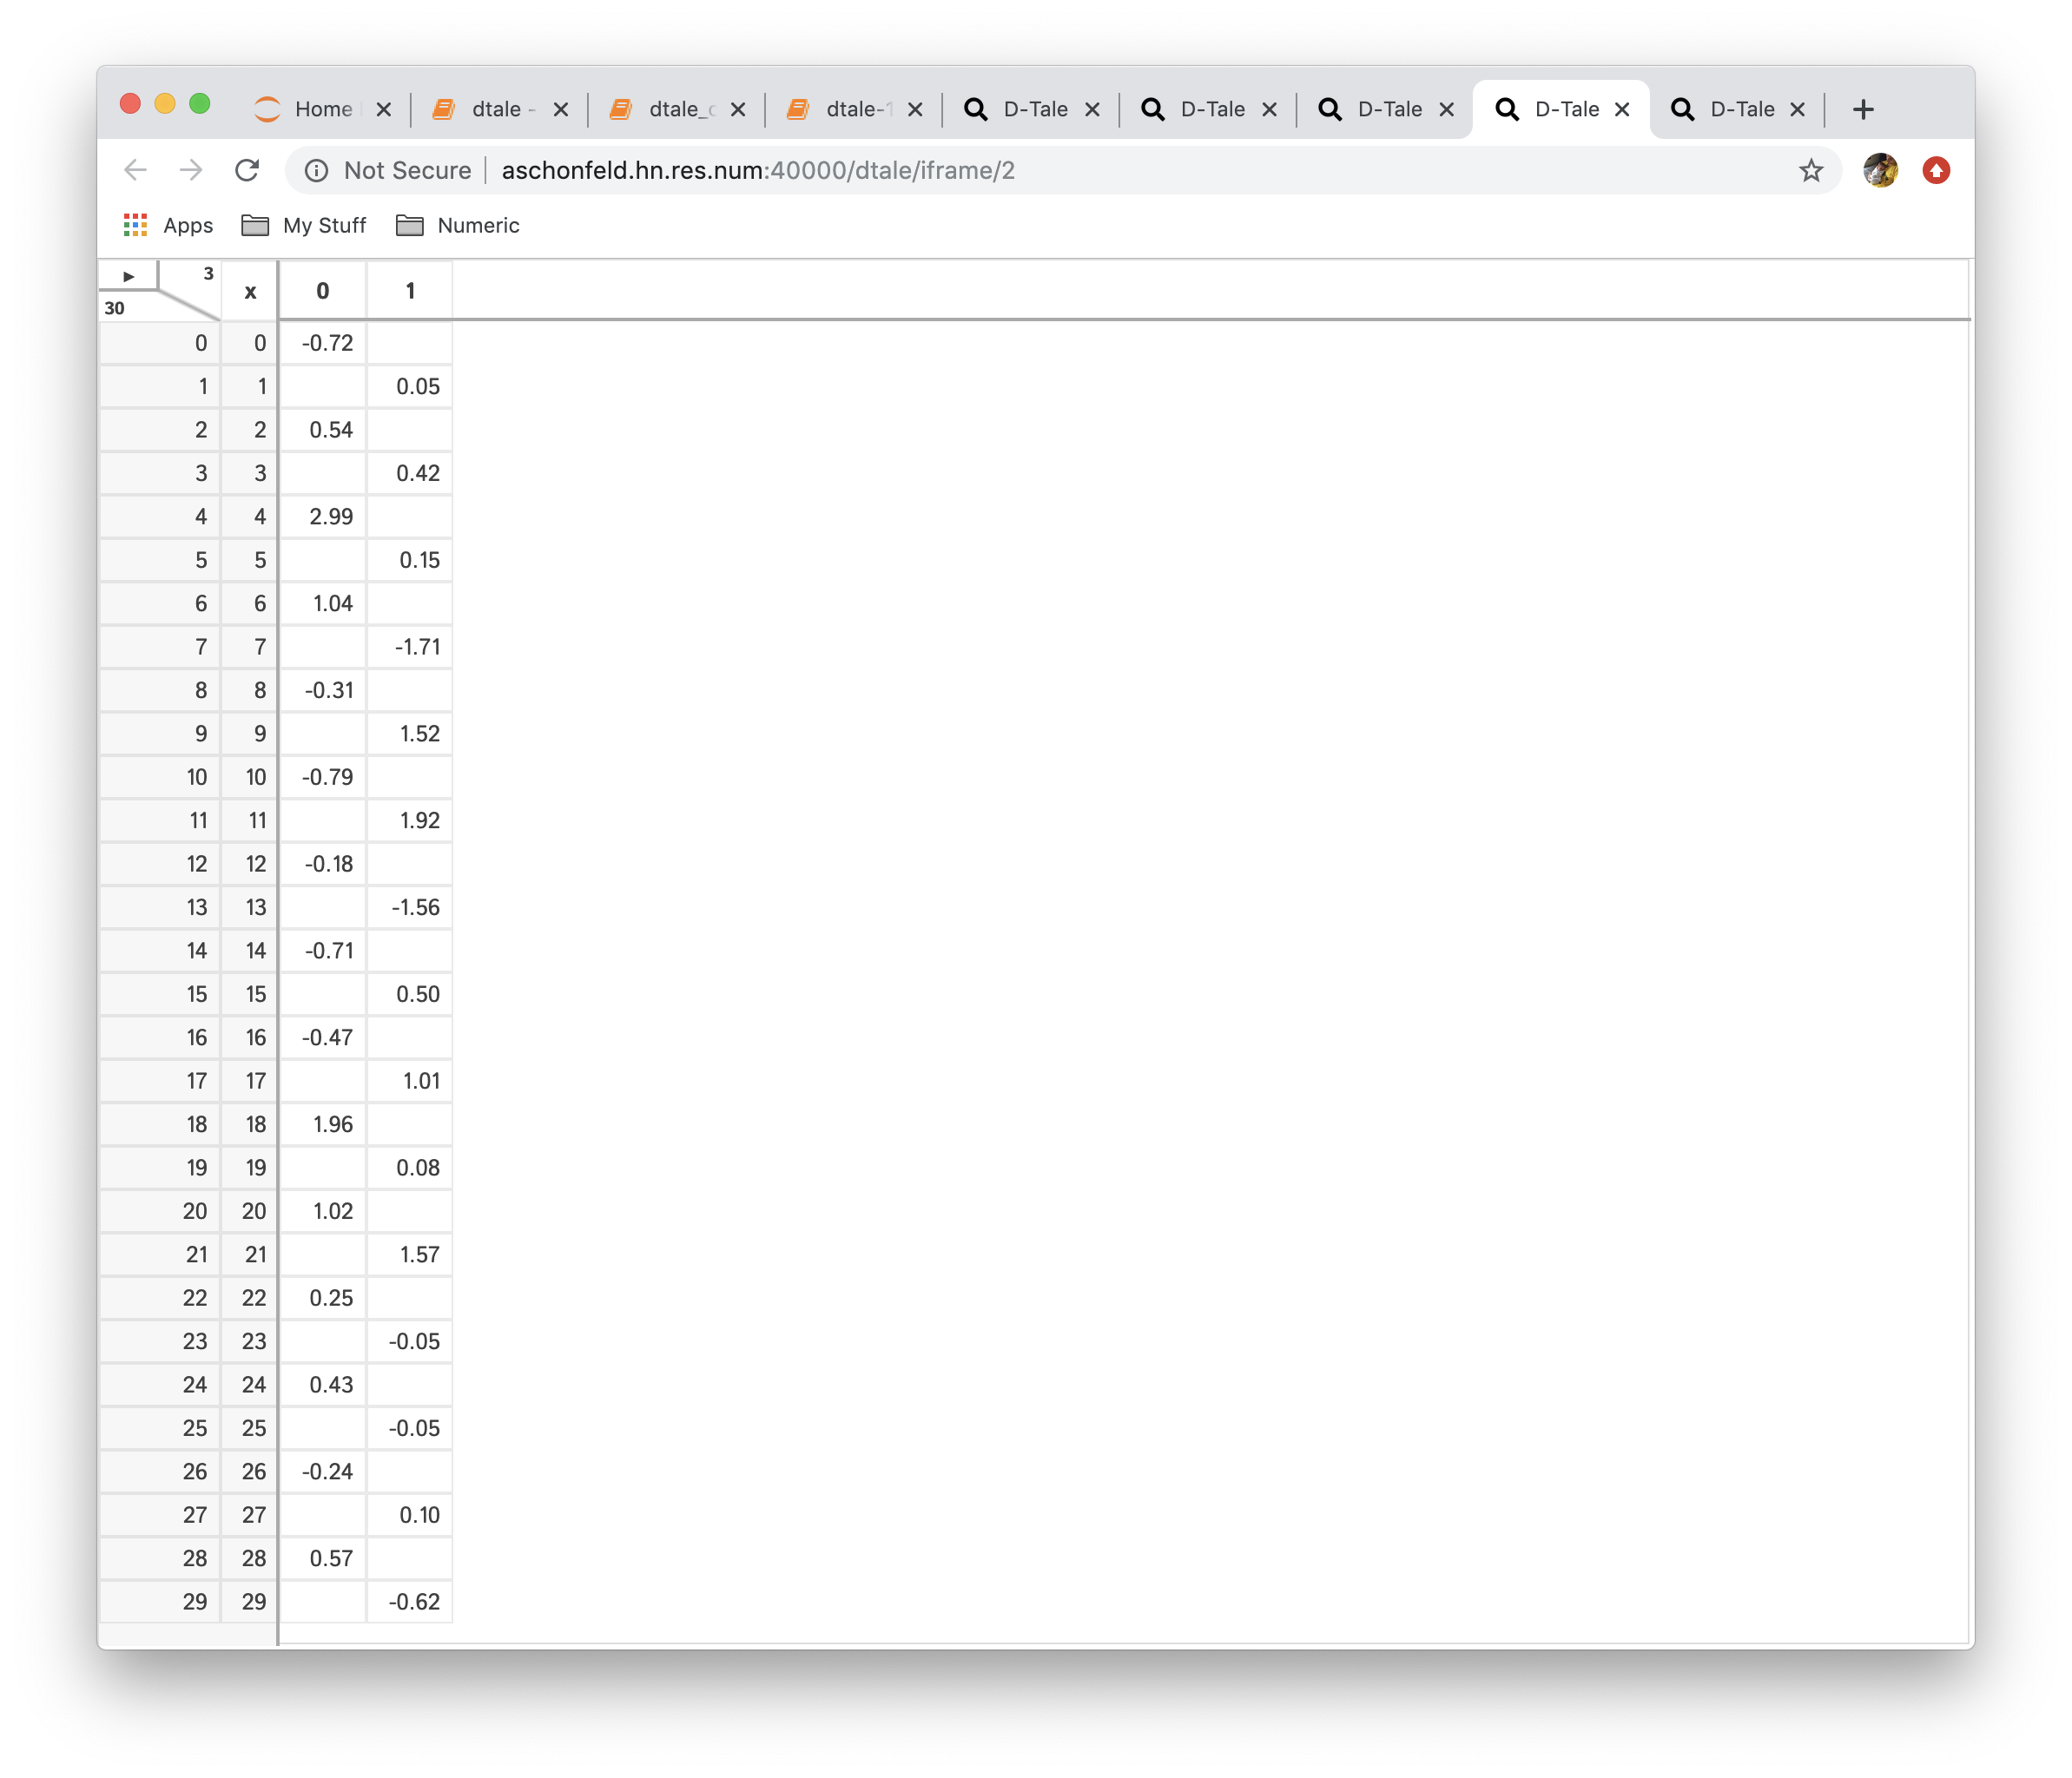
Reshape
This is very powerful functionality which allows users to create a new data from currently loaded data. The operations currently available are:
- Aggregation: consolidate data by running different aggregations on columns by a specific index
- Pivot: this is simple wrapper around pandas.Dataframe.pivot and pandas.pivot_table
- Transpose: transpose your data on a index (be careful dataframes can get very wide if your index has many unique values)
| Function | Data |
|---|---|
| No Reshaping | 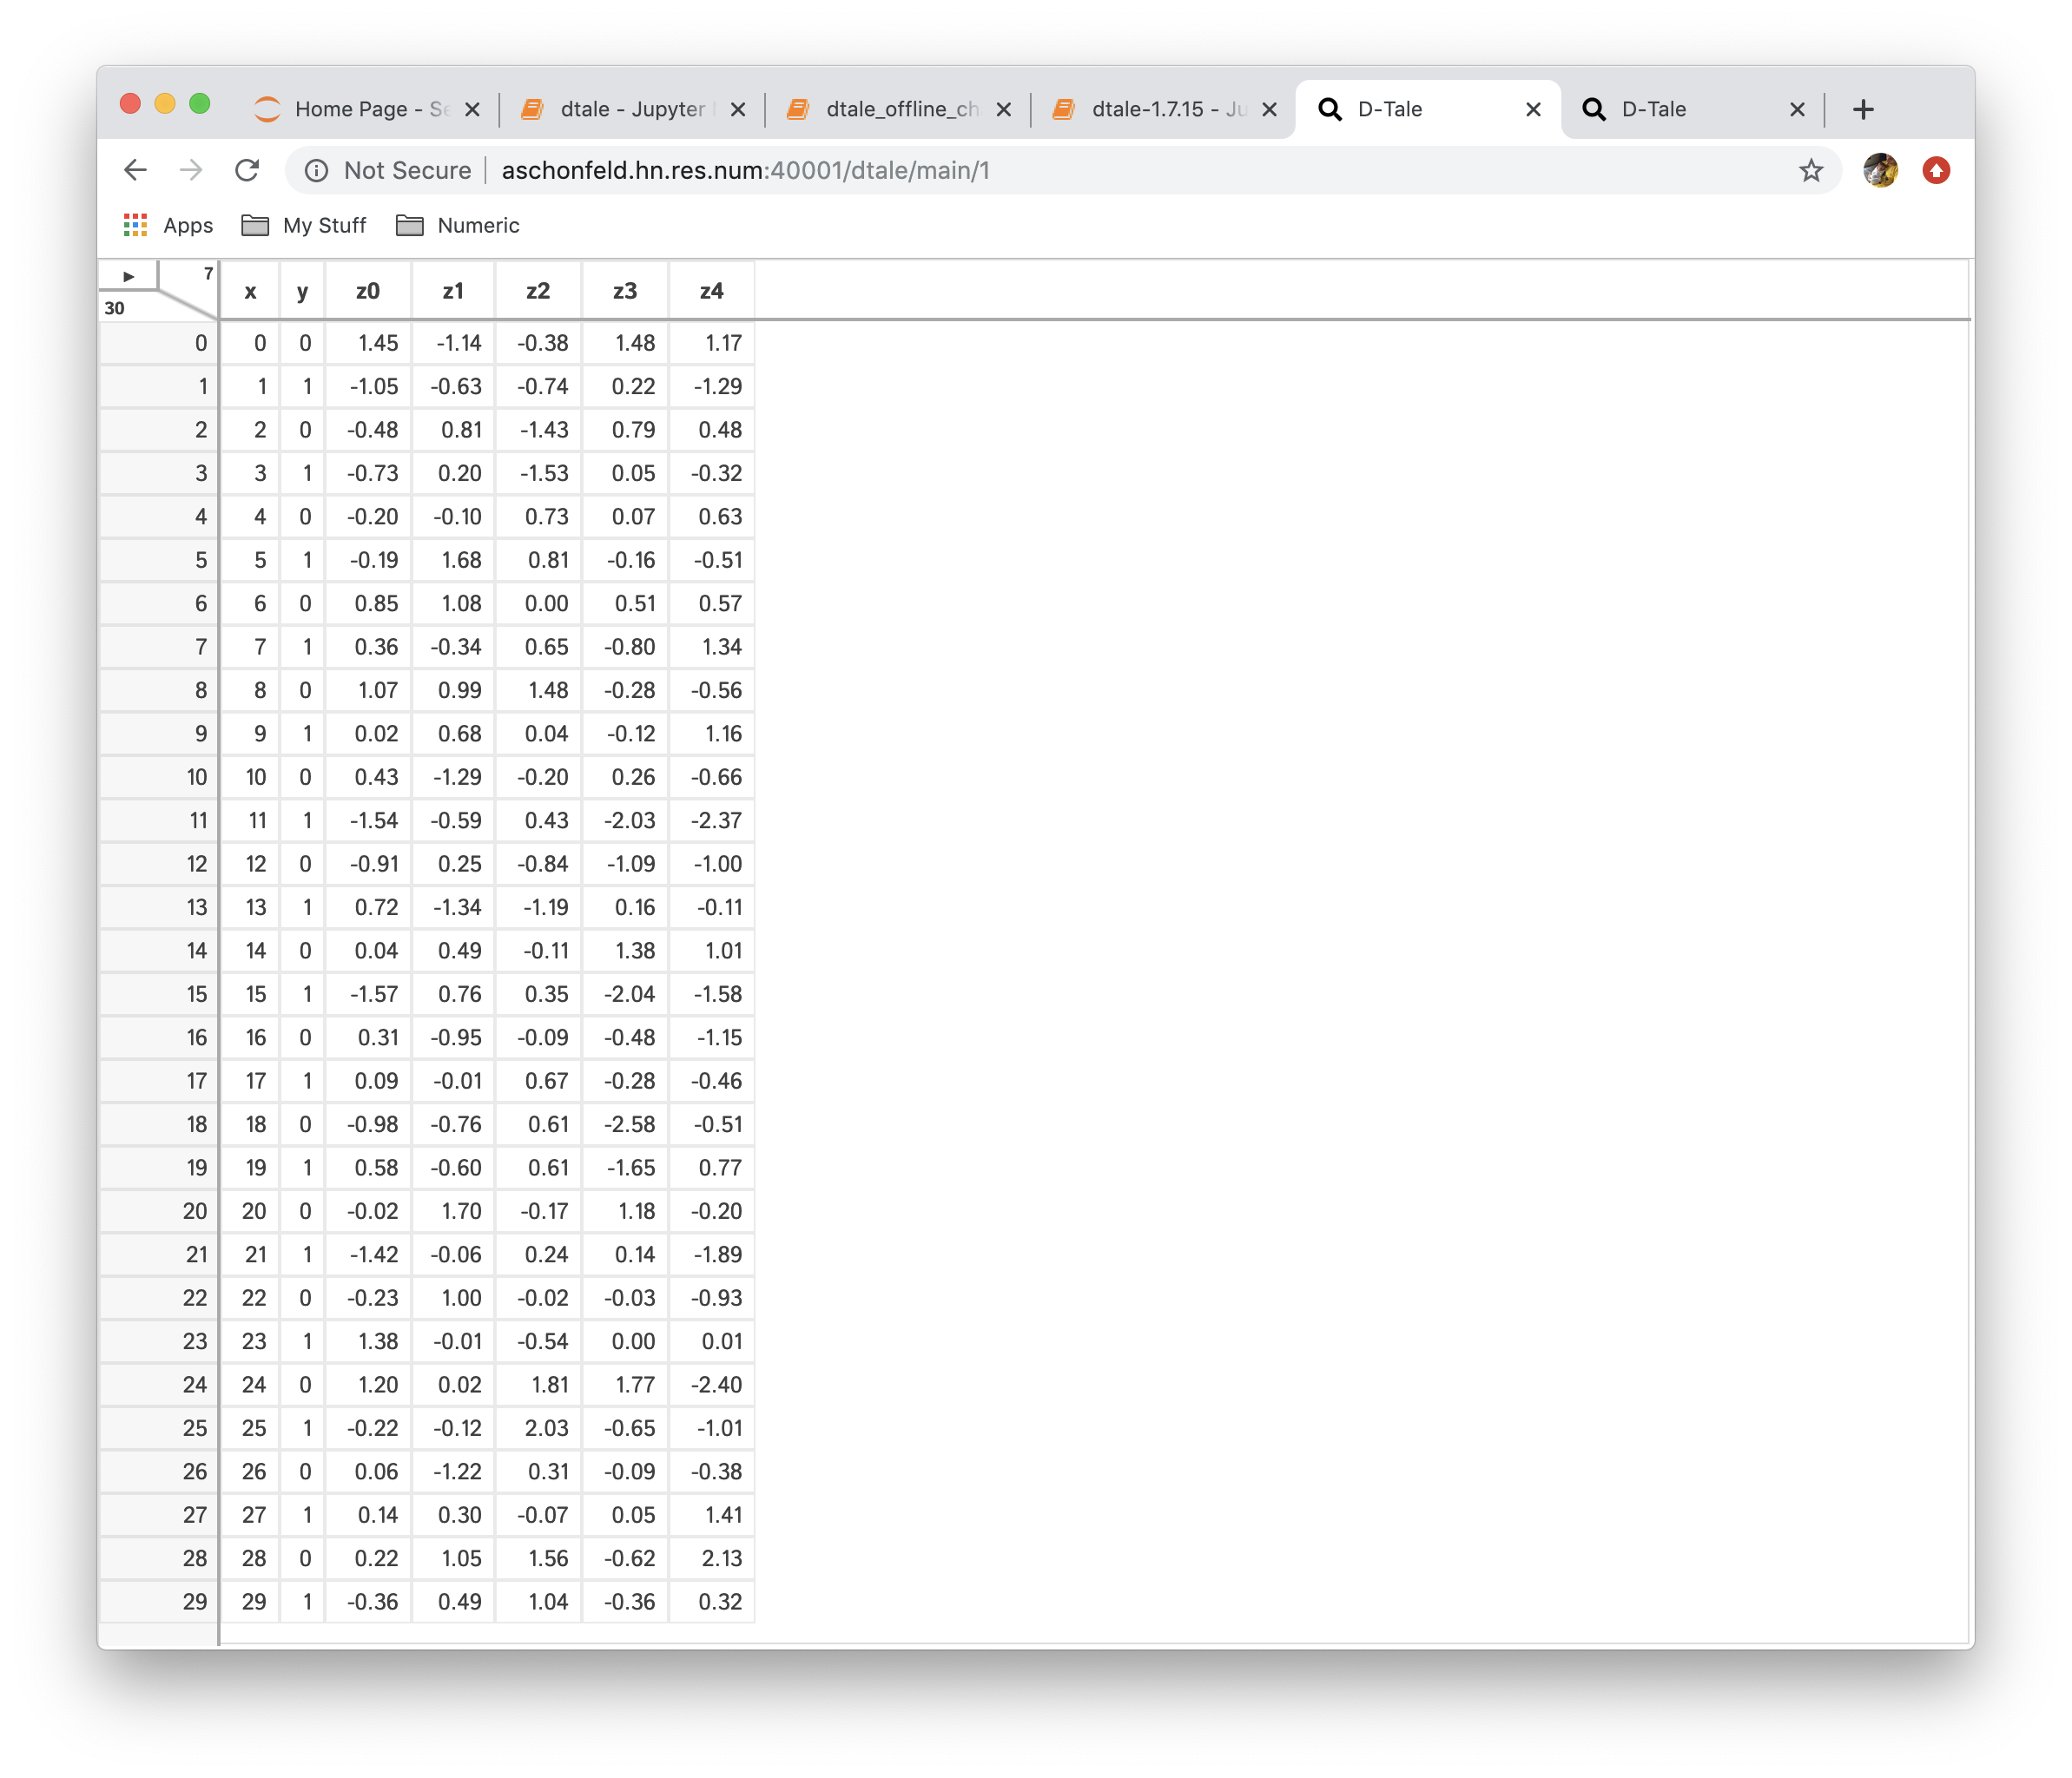 |
 |
 |
 |
 |
 |
 |
Charts
Build custom charts based off your data(powered by plotly/dash).
- The Charts will open in a tab because of the fact there is so much functionality offered there you’ll probably want to be able to reference the main grid data in the original tab
- To build a chart you must pick a value for X & Y inputs which effectively drive what data is along the X & Y axes
- If you are working with a 3-Dimensional chart (heatmap, 3D Scatter, Surface) you’ll need to enter a value for the Z axis as well
- Once you have entered all the required axes a chart will be built
- If your data along the x-axis (or combination of x & y in the case of 3D charts) has duplicates you have three options:
- Specify a group, which will create series for each group
- Specify an aggregation, you can choose from one of the following: Count, First, Last, Mean, Median, Minimum, Maximum, Standard Deviation, Variance, Mean Absolute Deviation, Product of All Items, Sum, Rolling
- Specifying a “Rolling” aggregation will also require a Window & a Computation (Correlation, Count, Covariance, Kurtosis, Maximum, Mean, Median, Minimum, Skew, Standard Deviation, Sum or Variance)
- For heatmaps you will also have access to the “Correlation” aggregation since viewing correlation matrices in heatmaps is very useful. This aggregation is not supported elsewhere
- Specify both a group & an aggregation
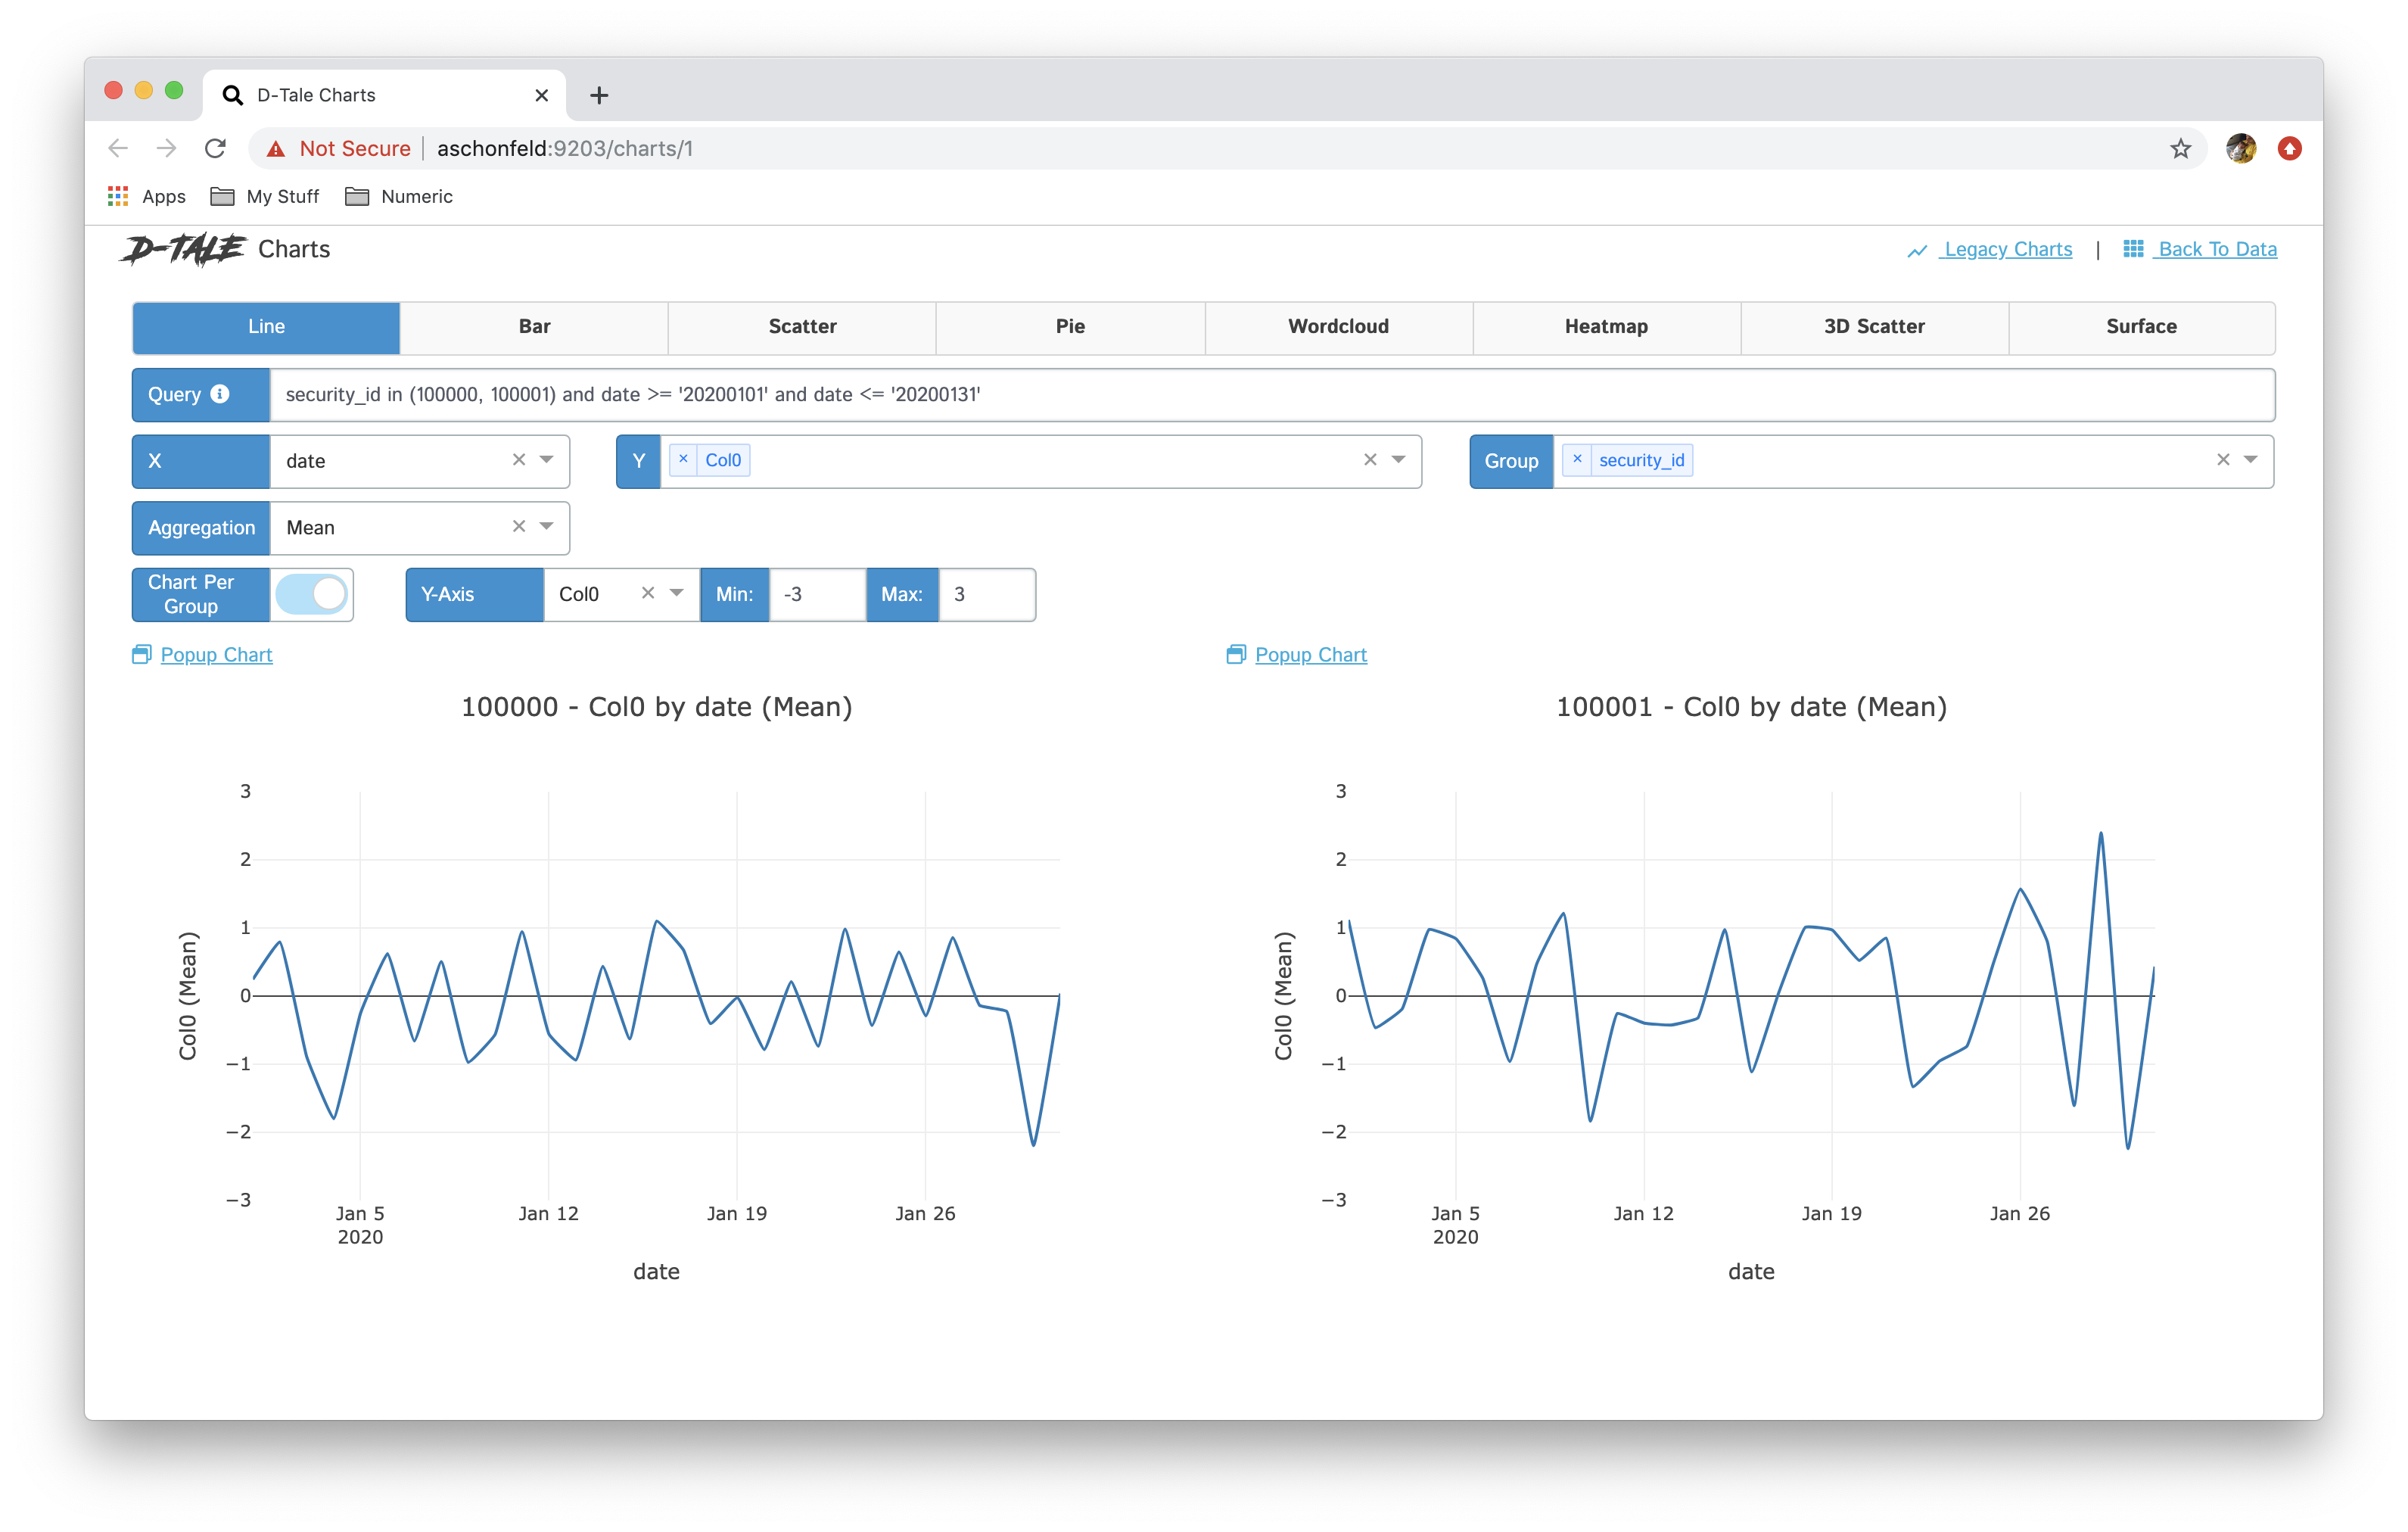
- You now have the ability to toggle between different chart types: line, bar, pie, wordcloud, heatmap, 3D scatter & surface
- If you have specified a group then you have the ability between showing all series in one chart and breaking each series out into its own chart “Chart per Group”
Here are some examples:
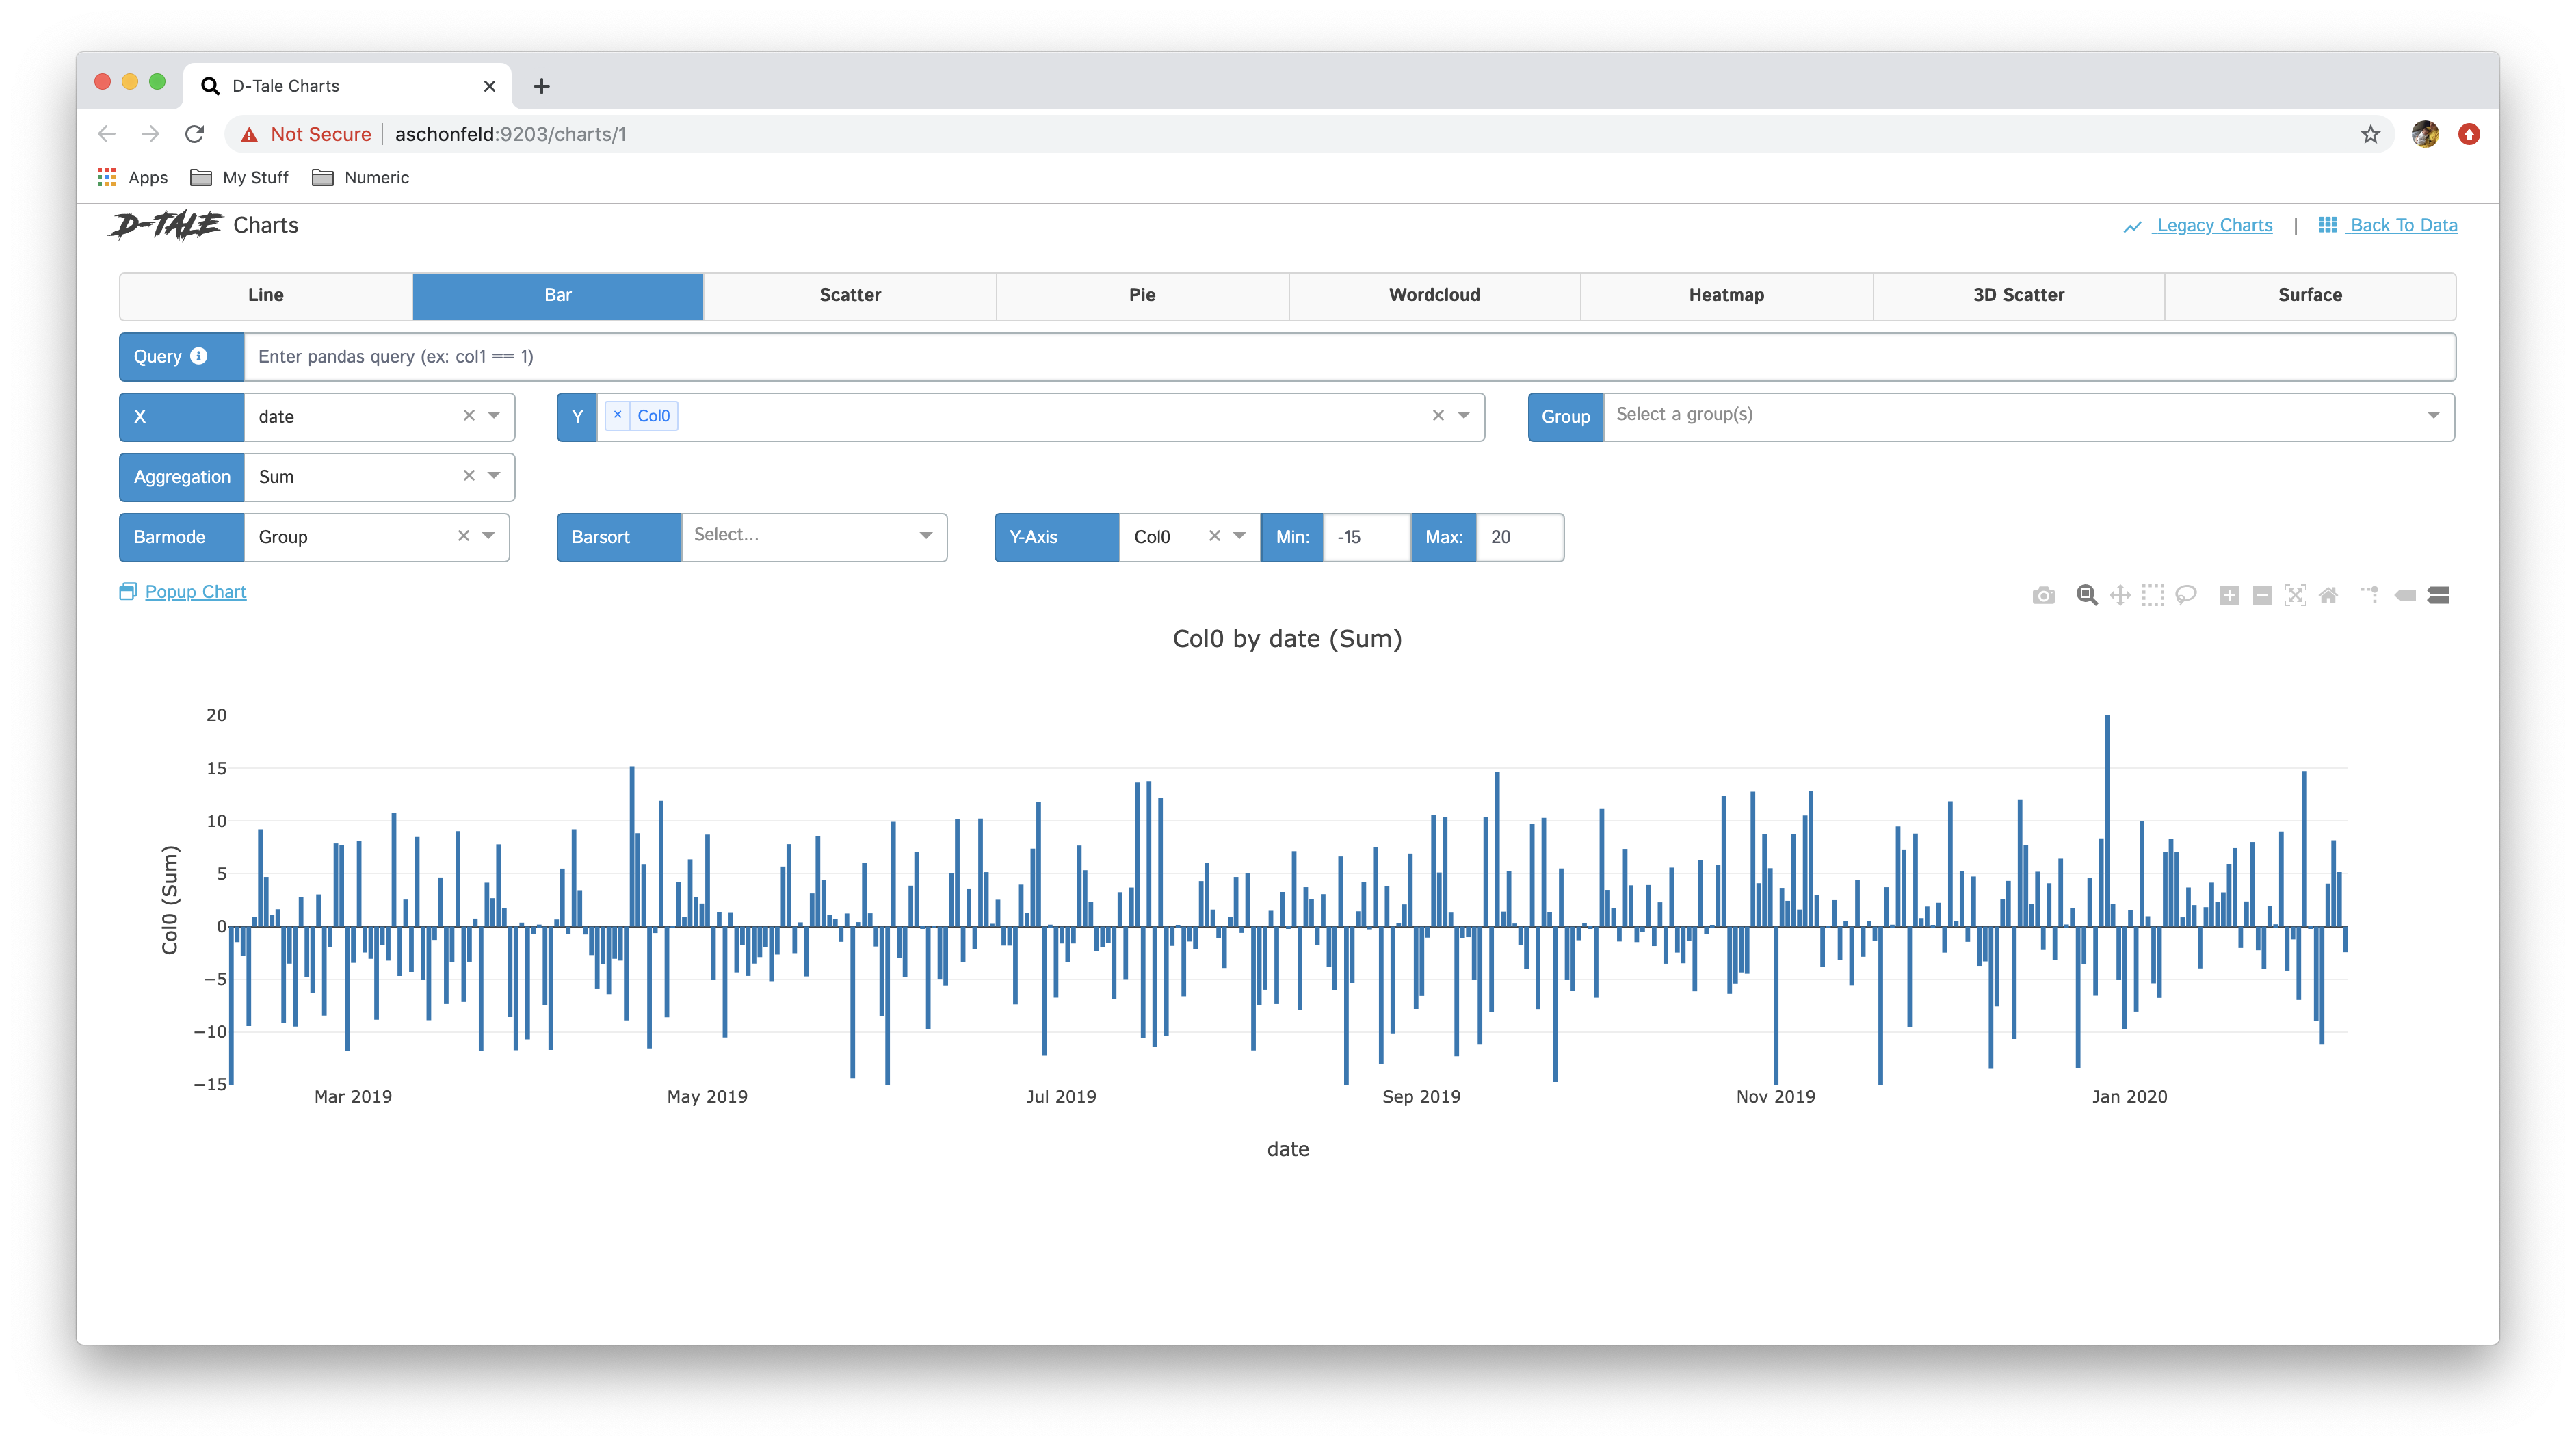
| Chart Type | Chart | Chart per Group |
|---|---|---|
| line | 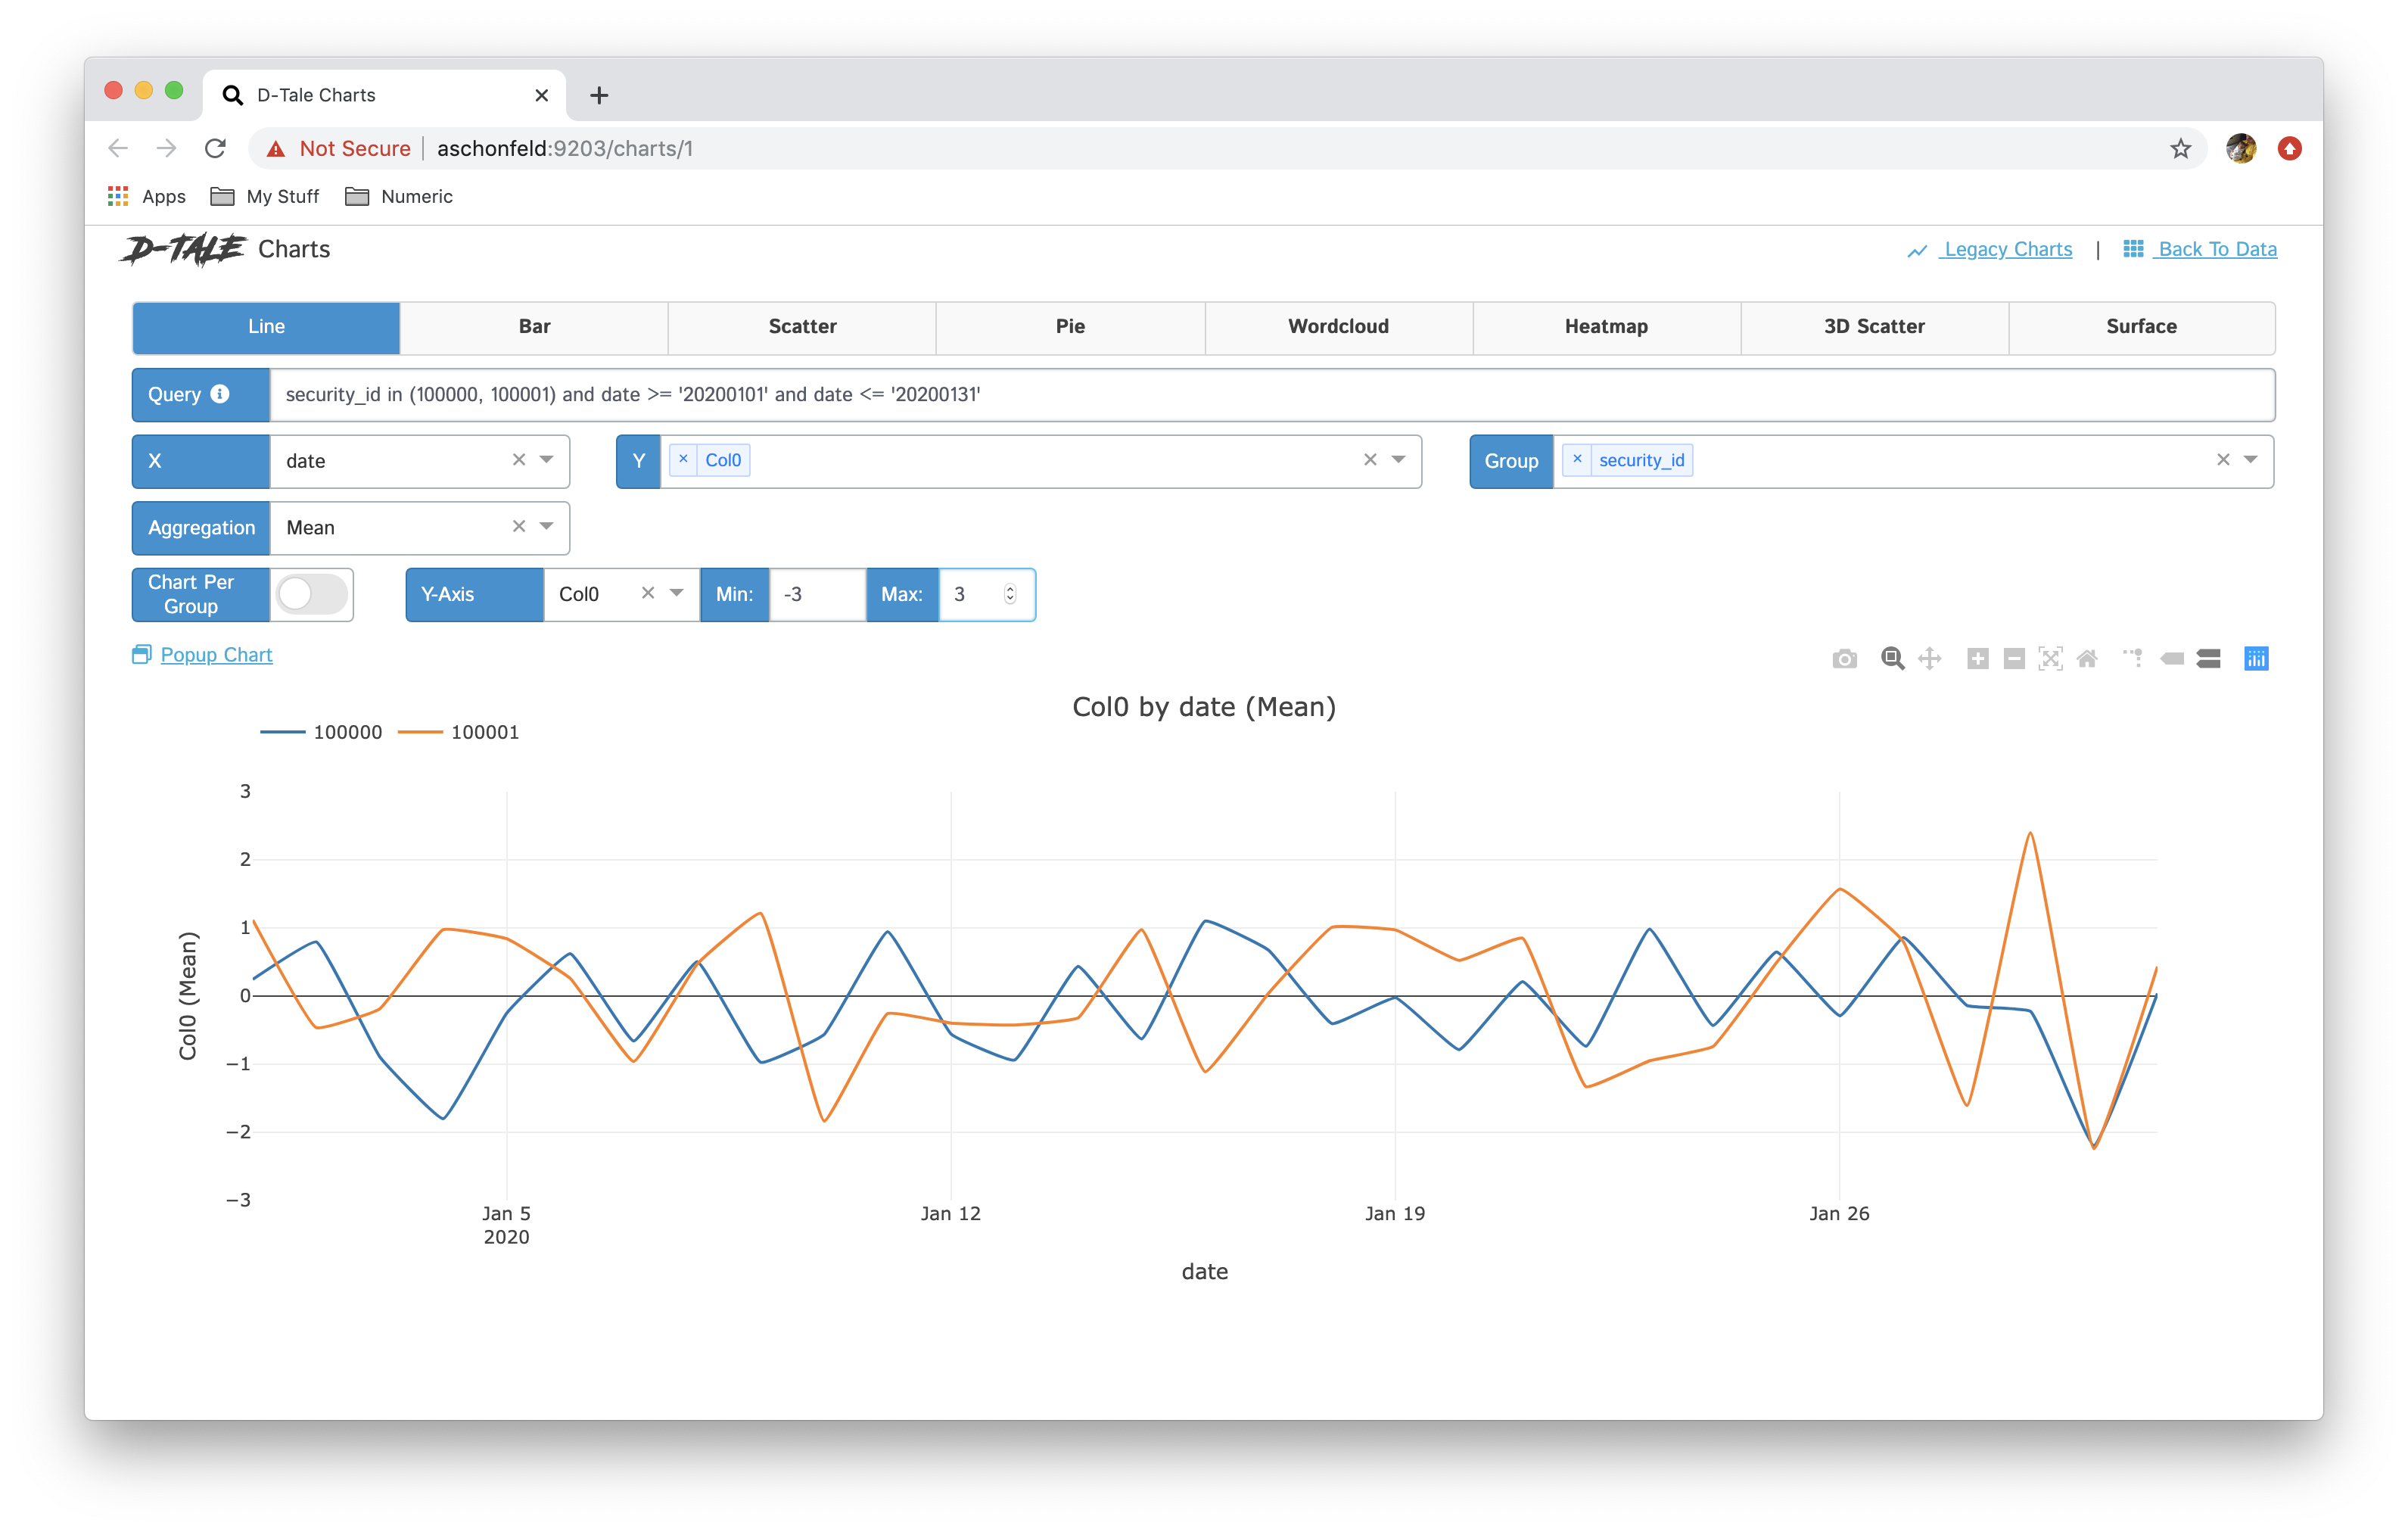 |
 |
| bar | 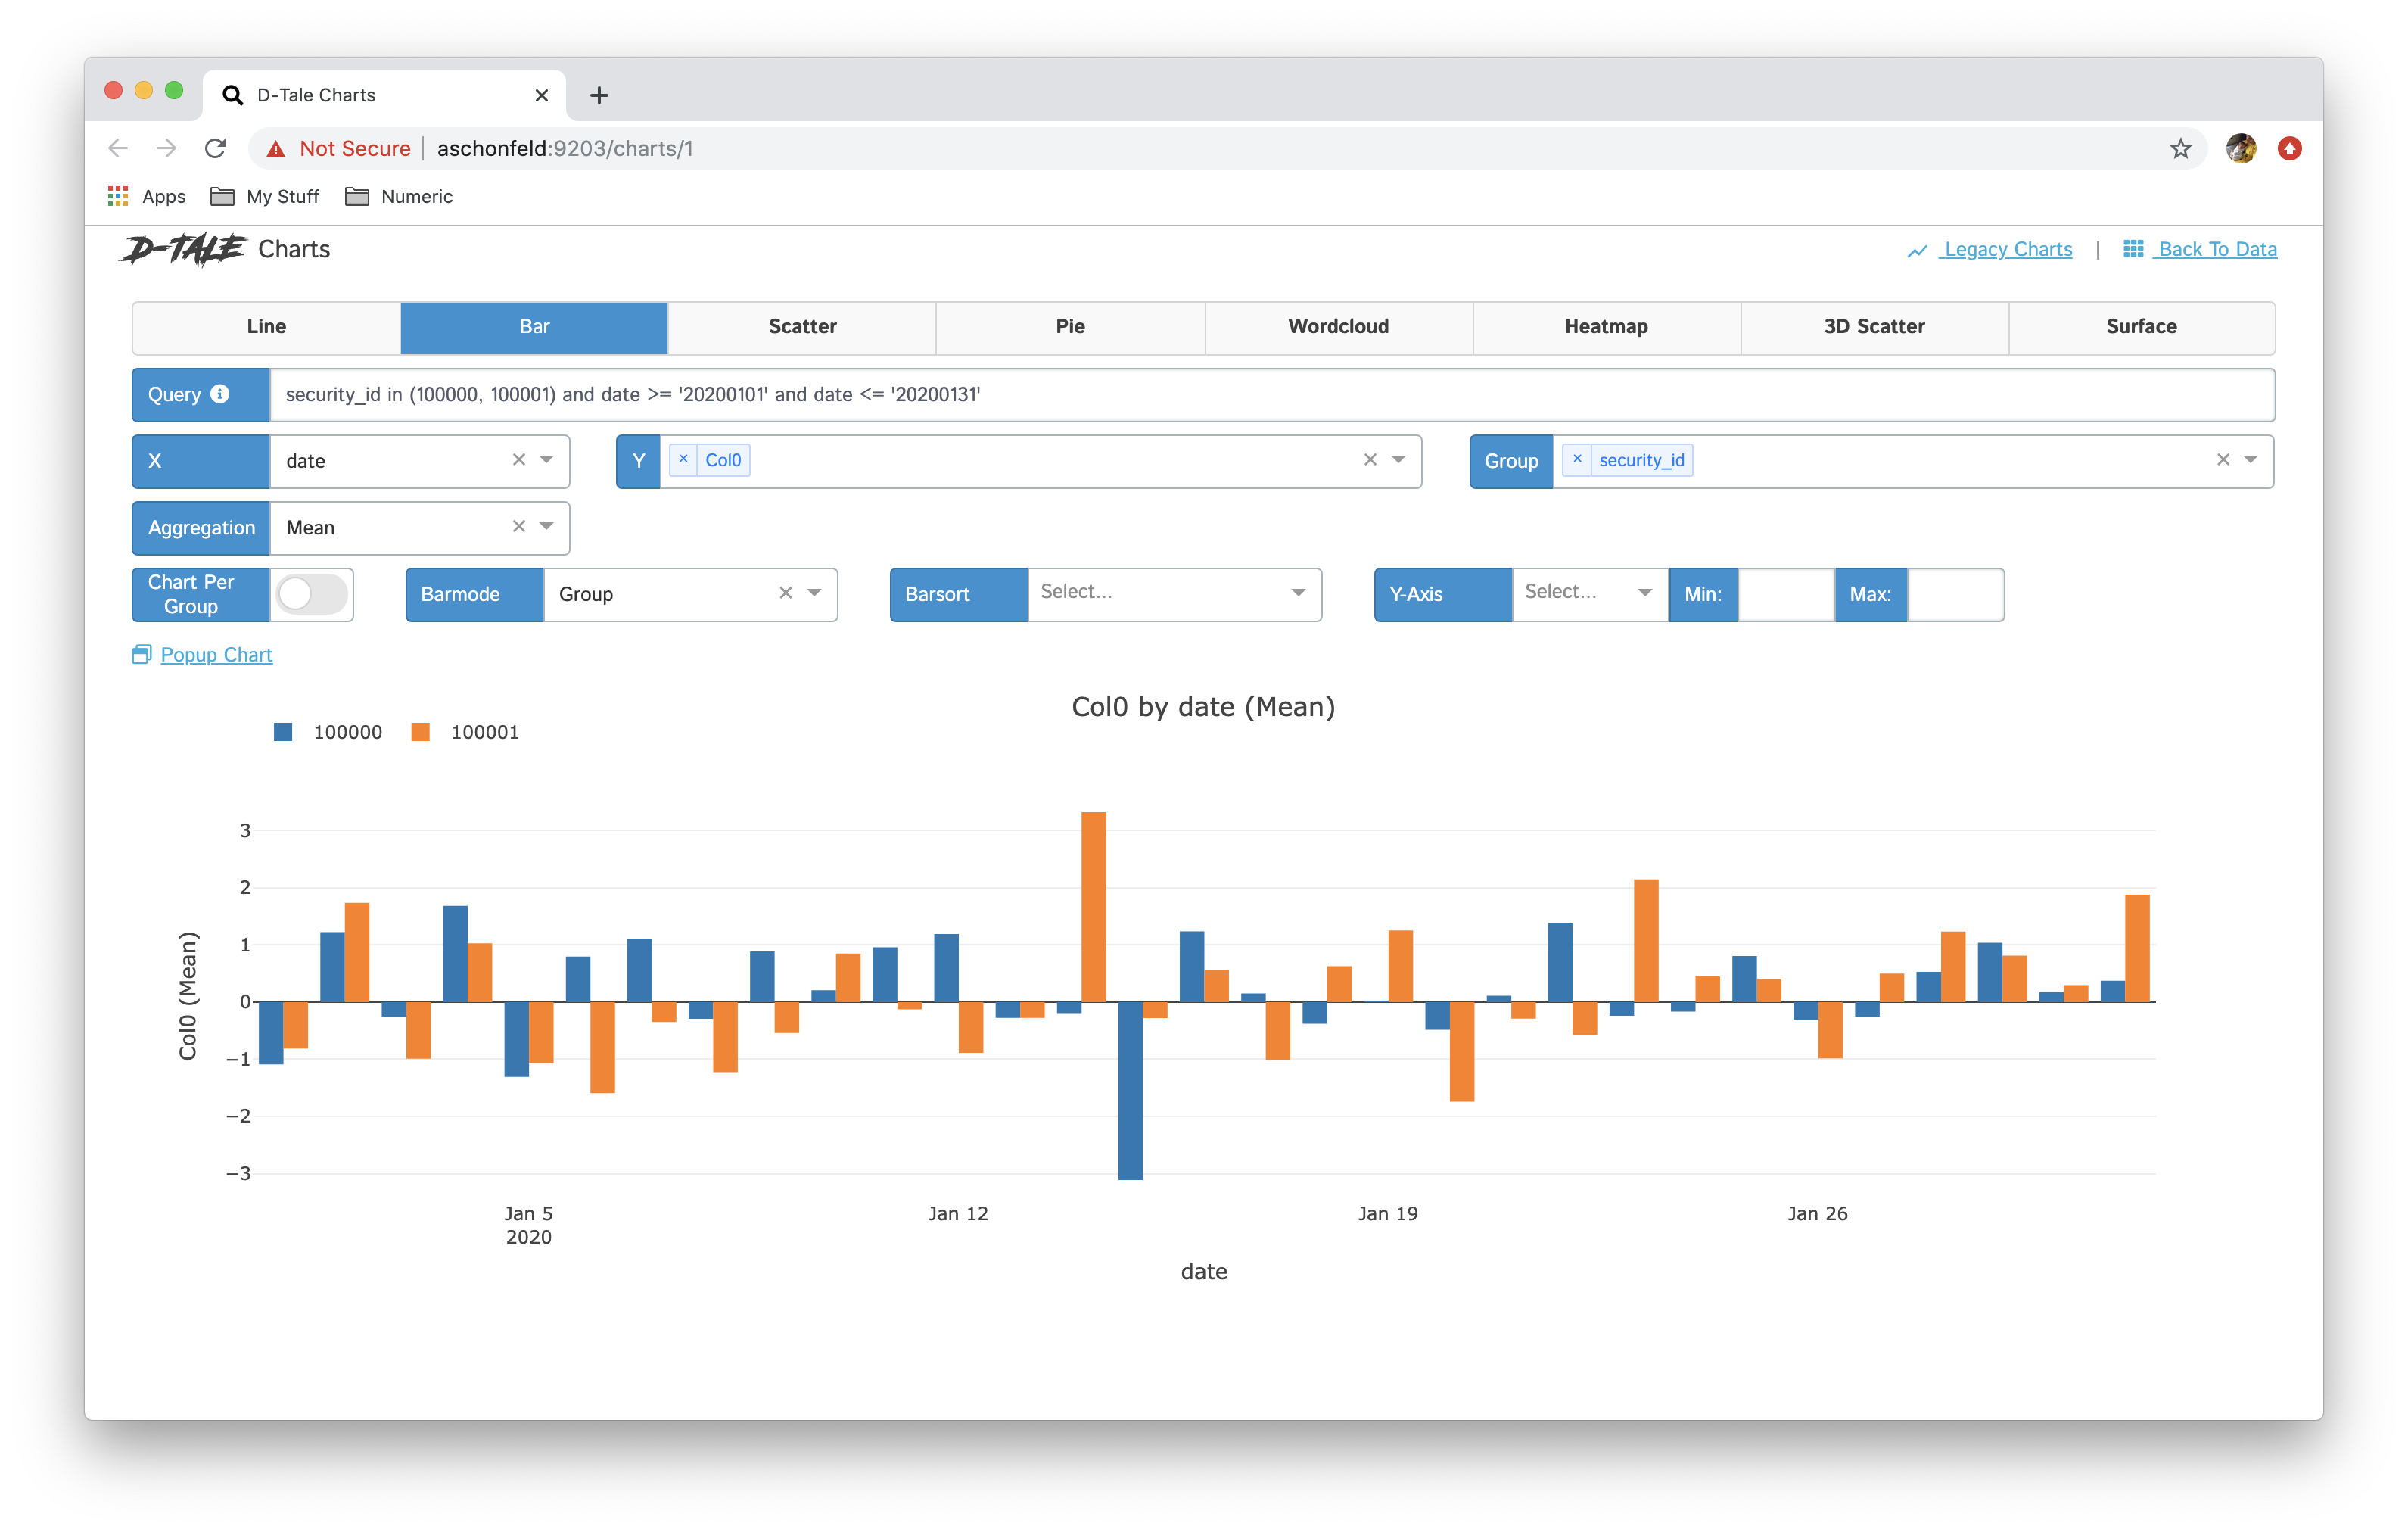 |
 |
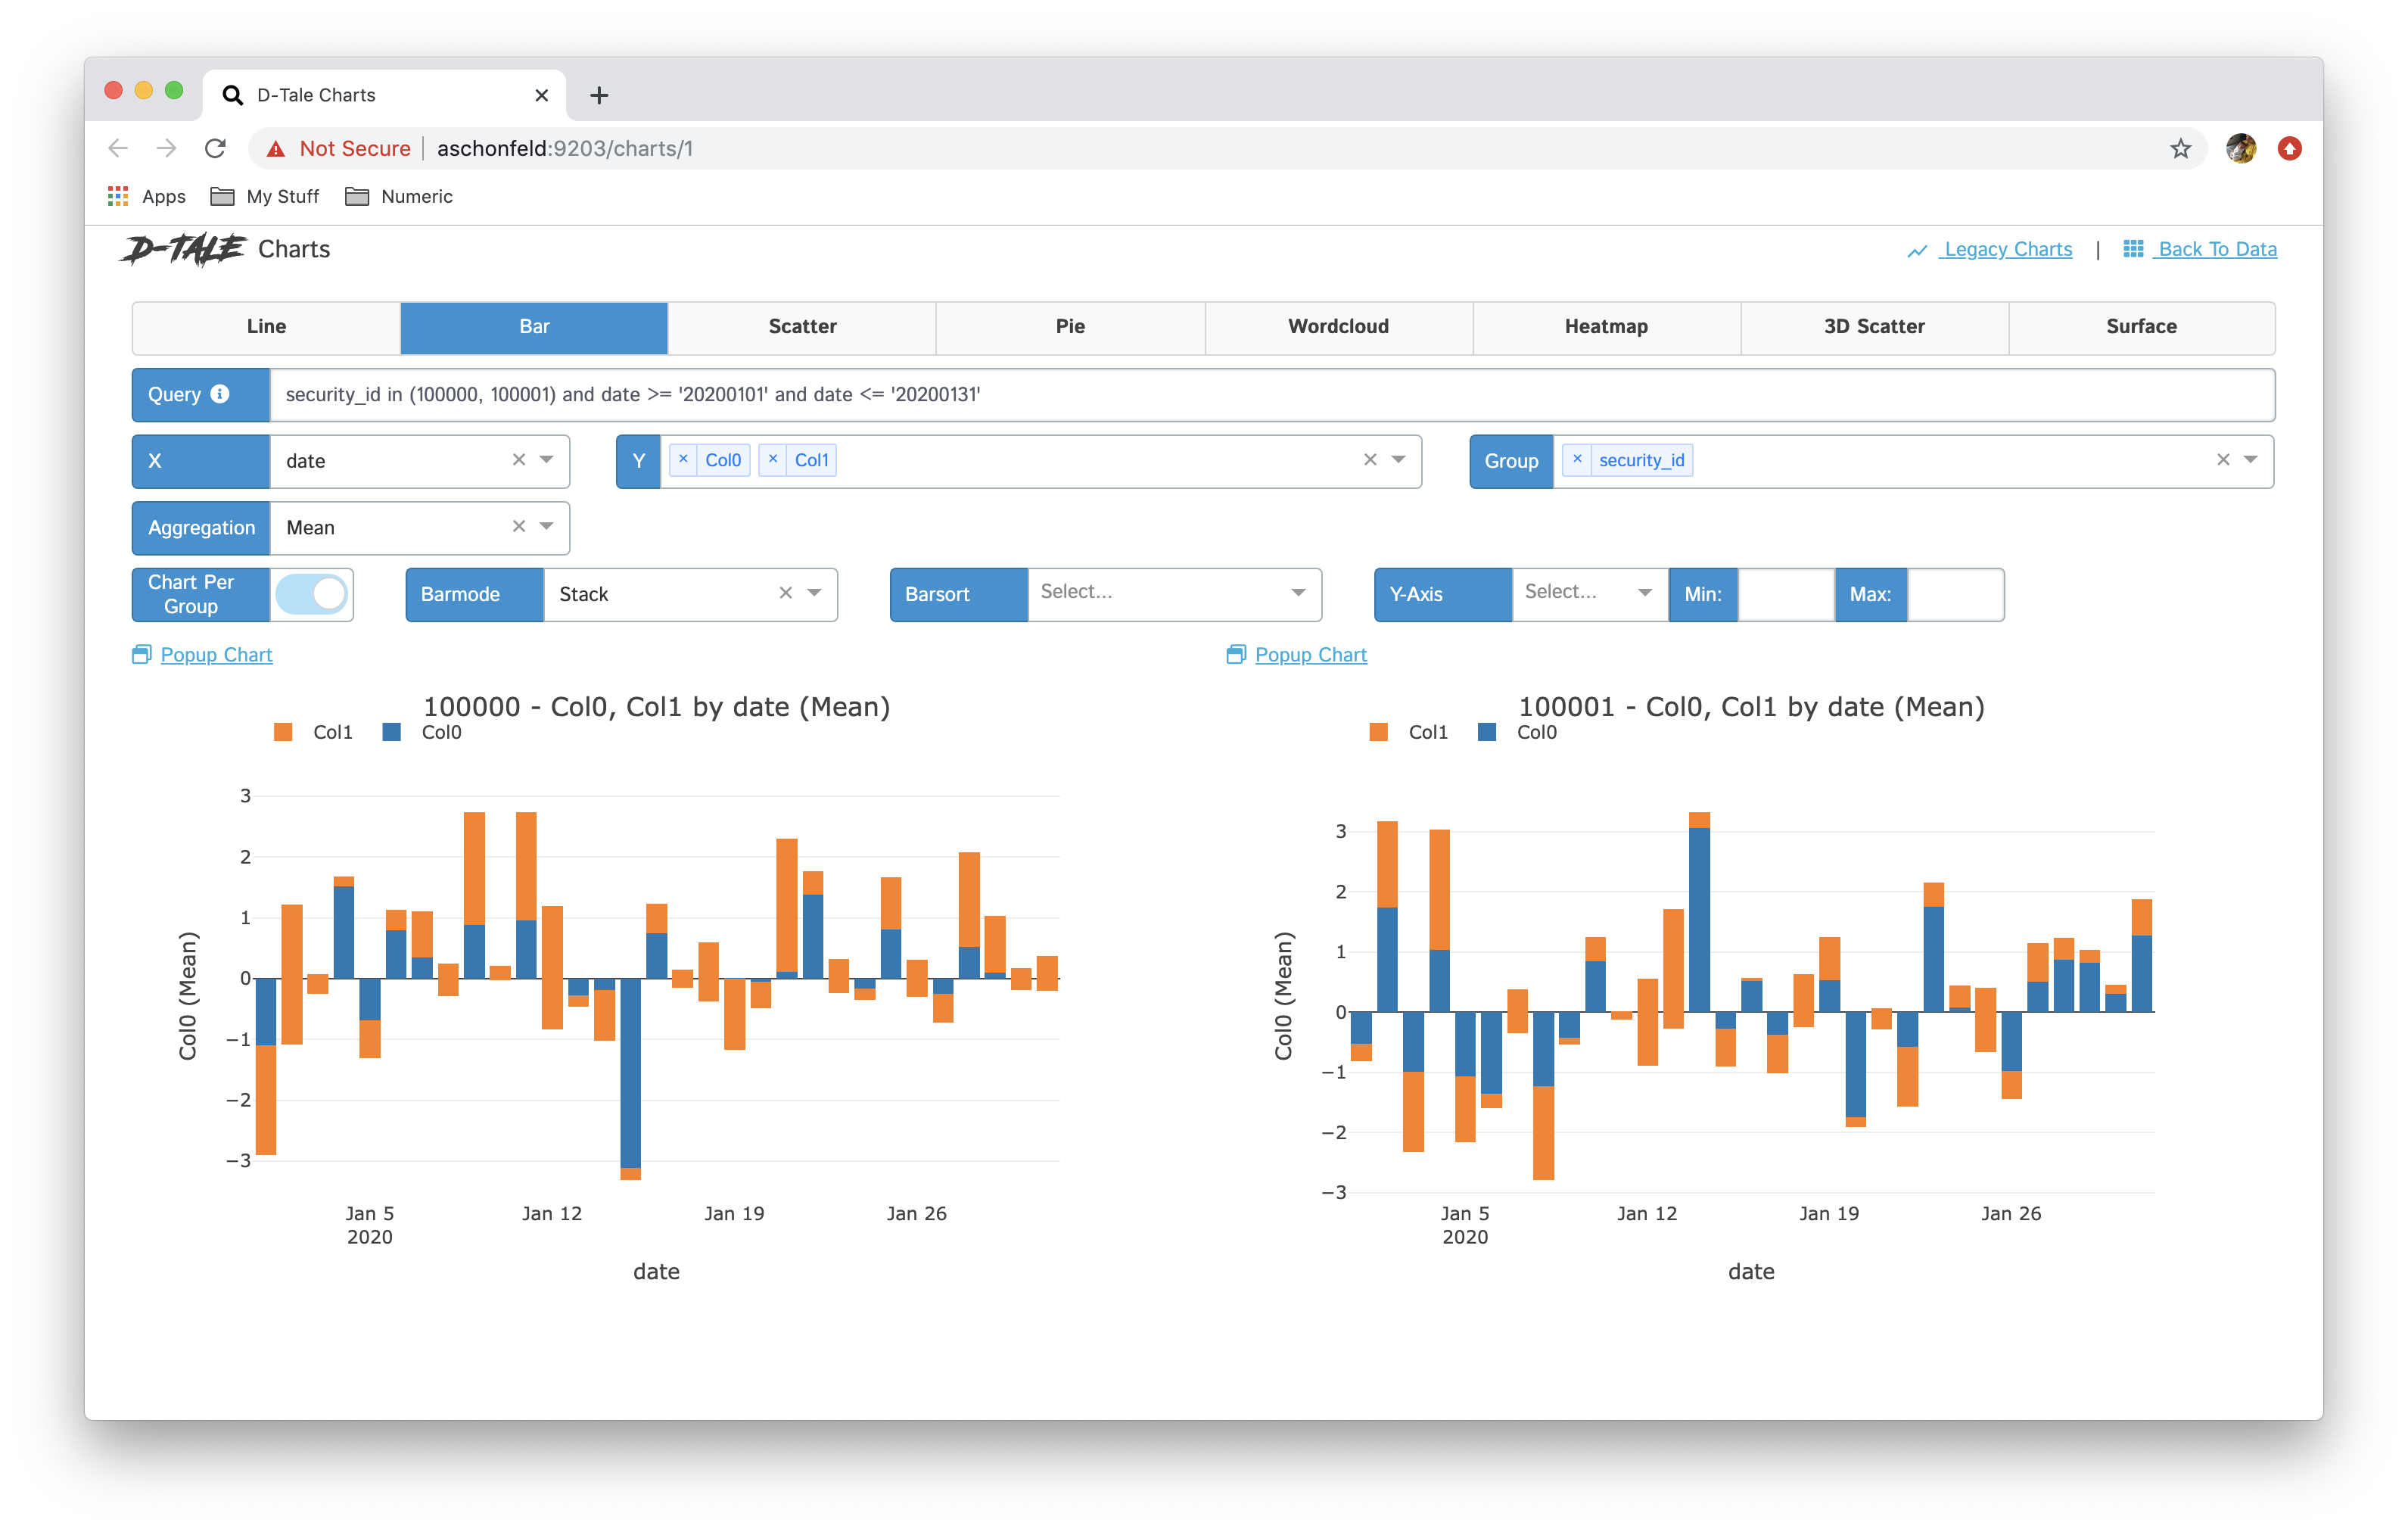
| stacked |  |
 |
| pie | 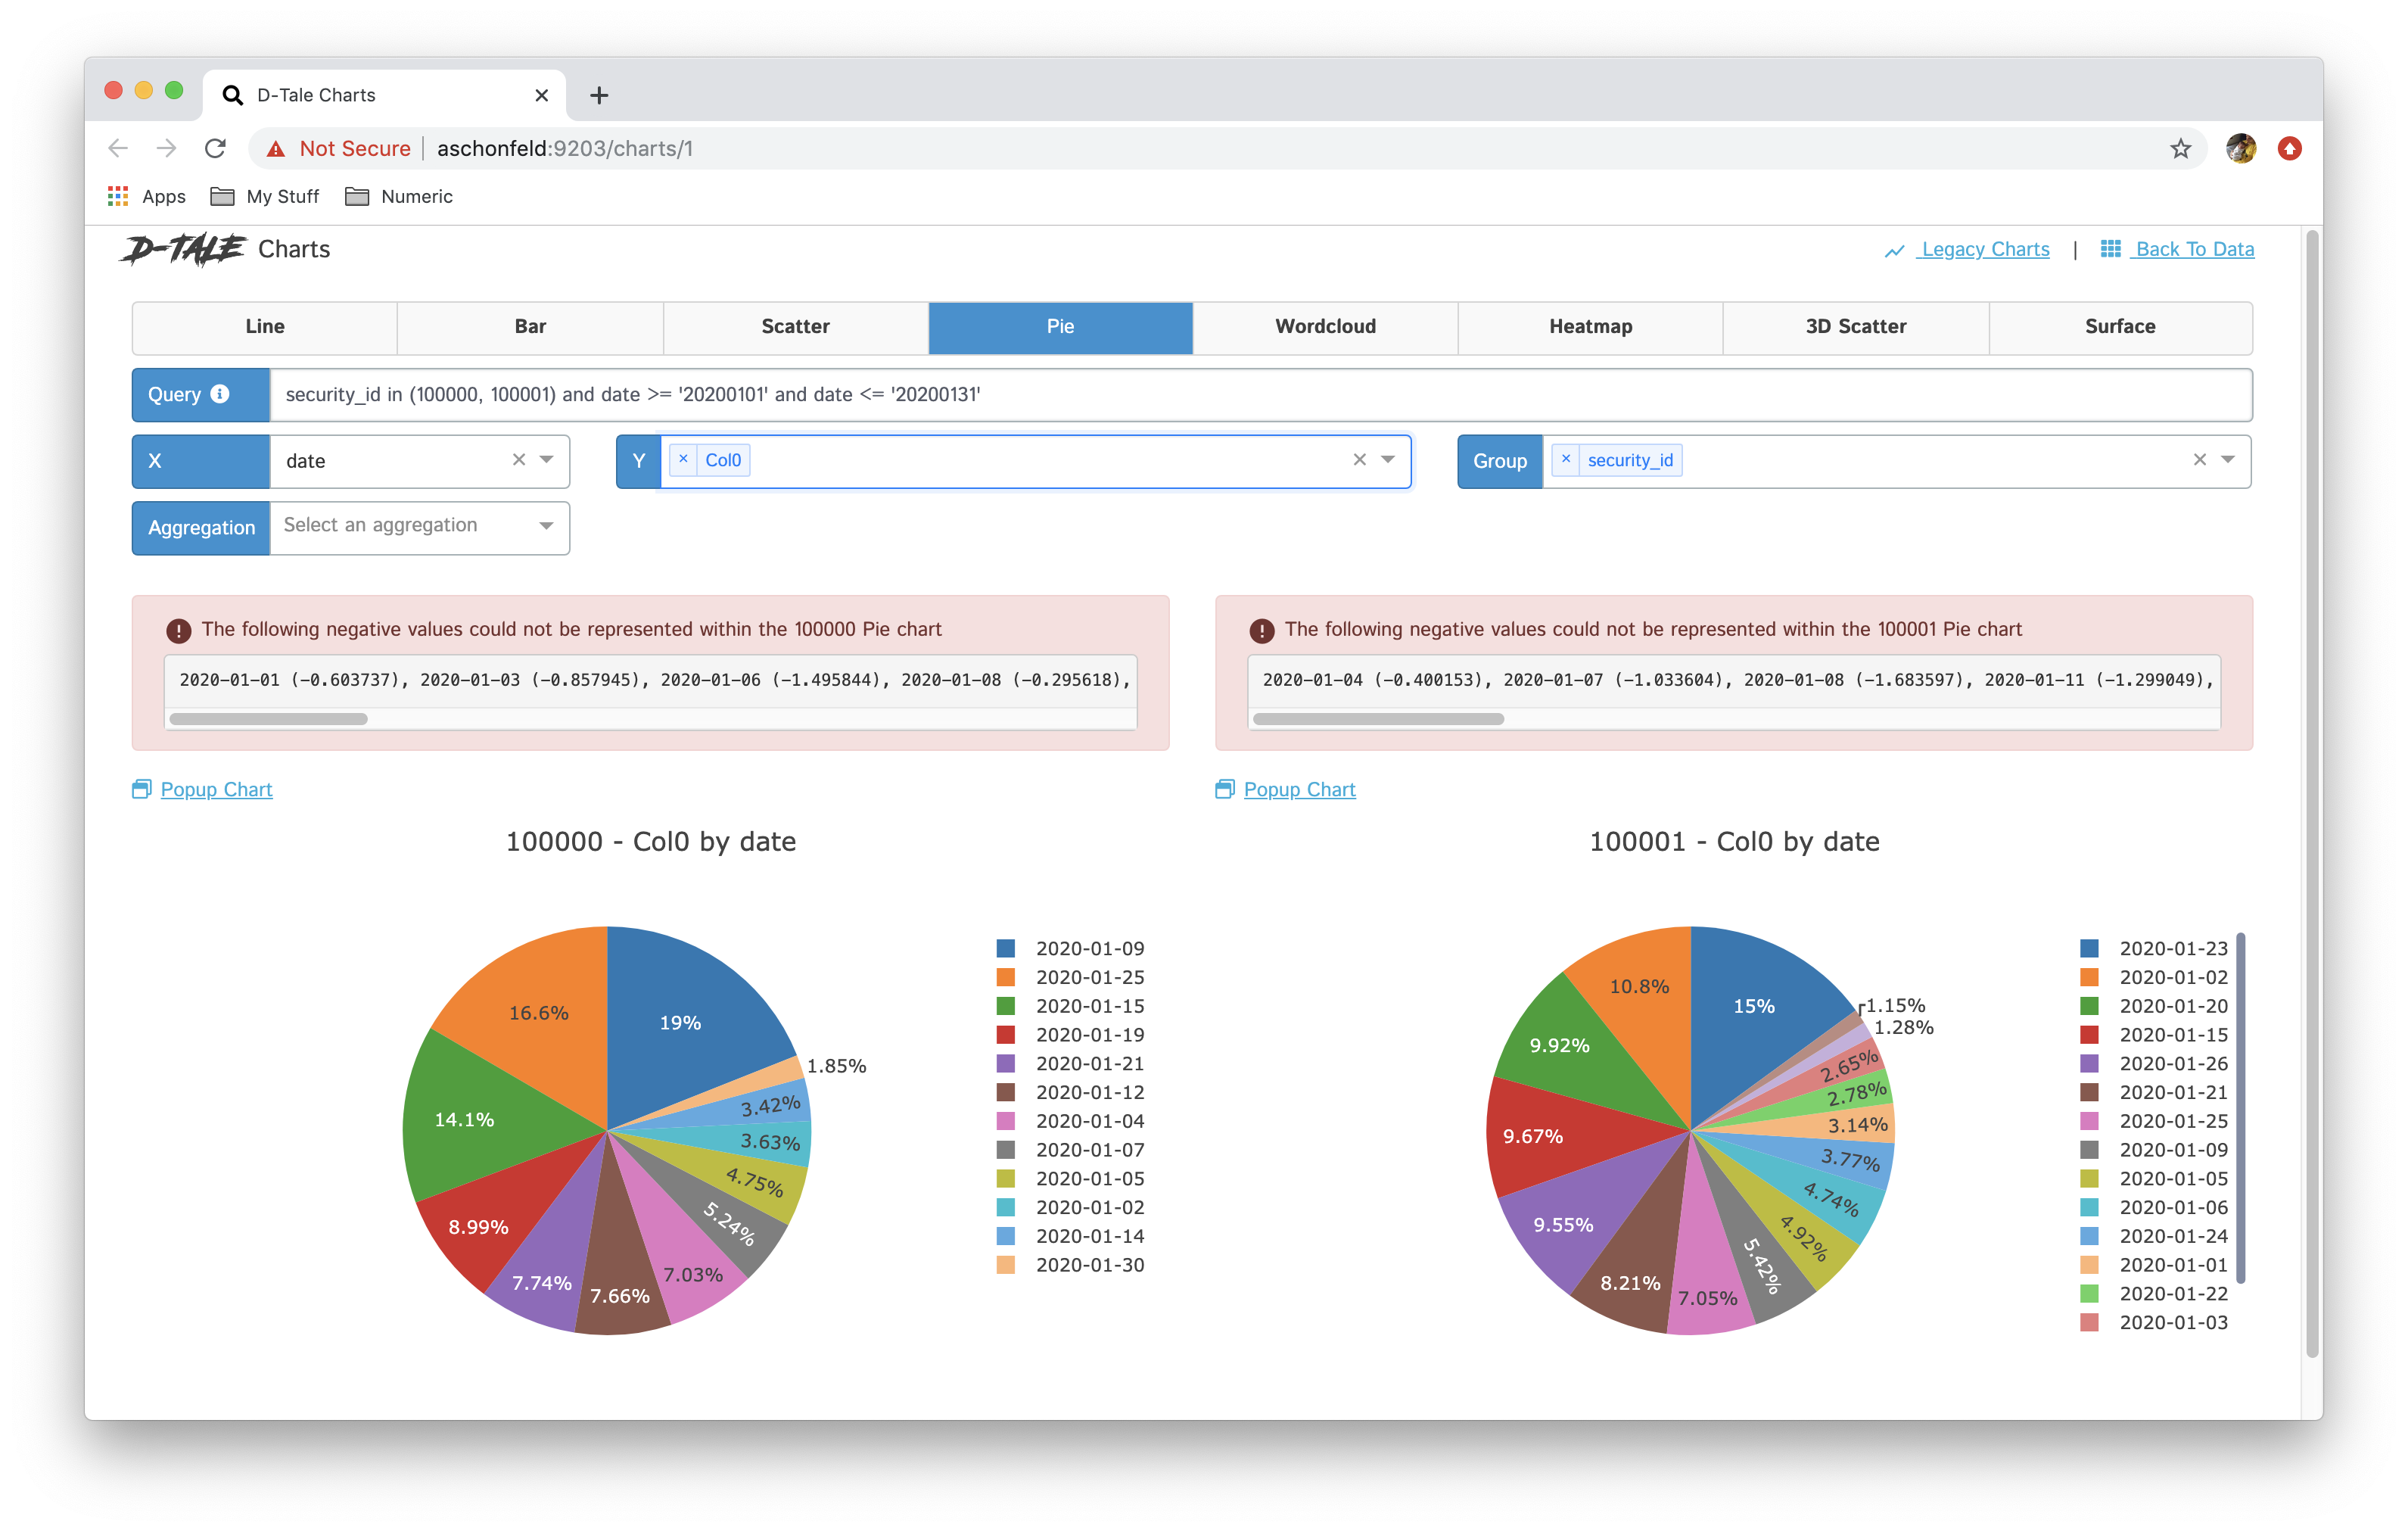 |
|
| wordcloud | 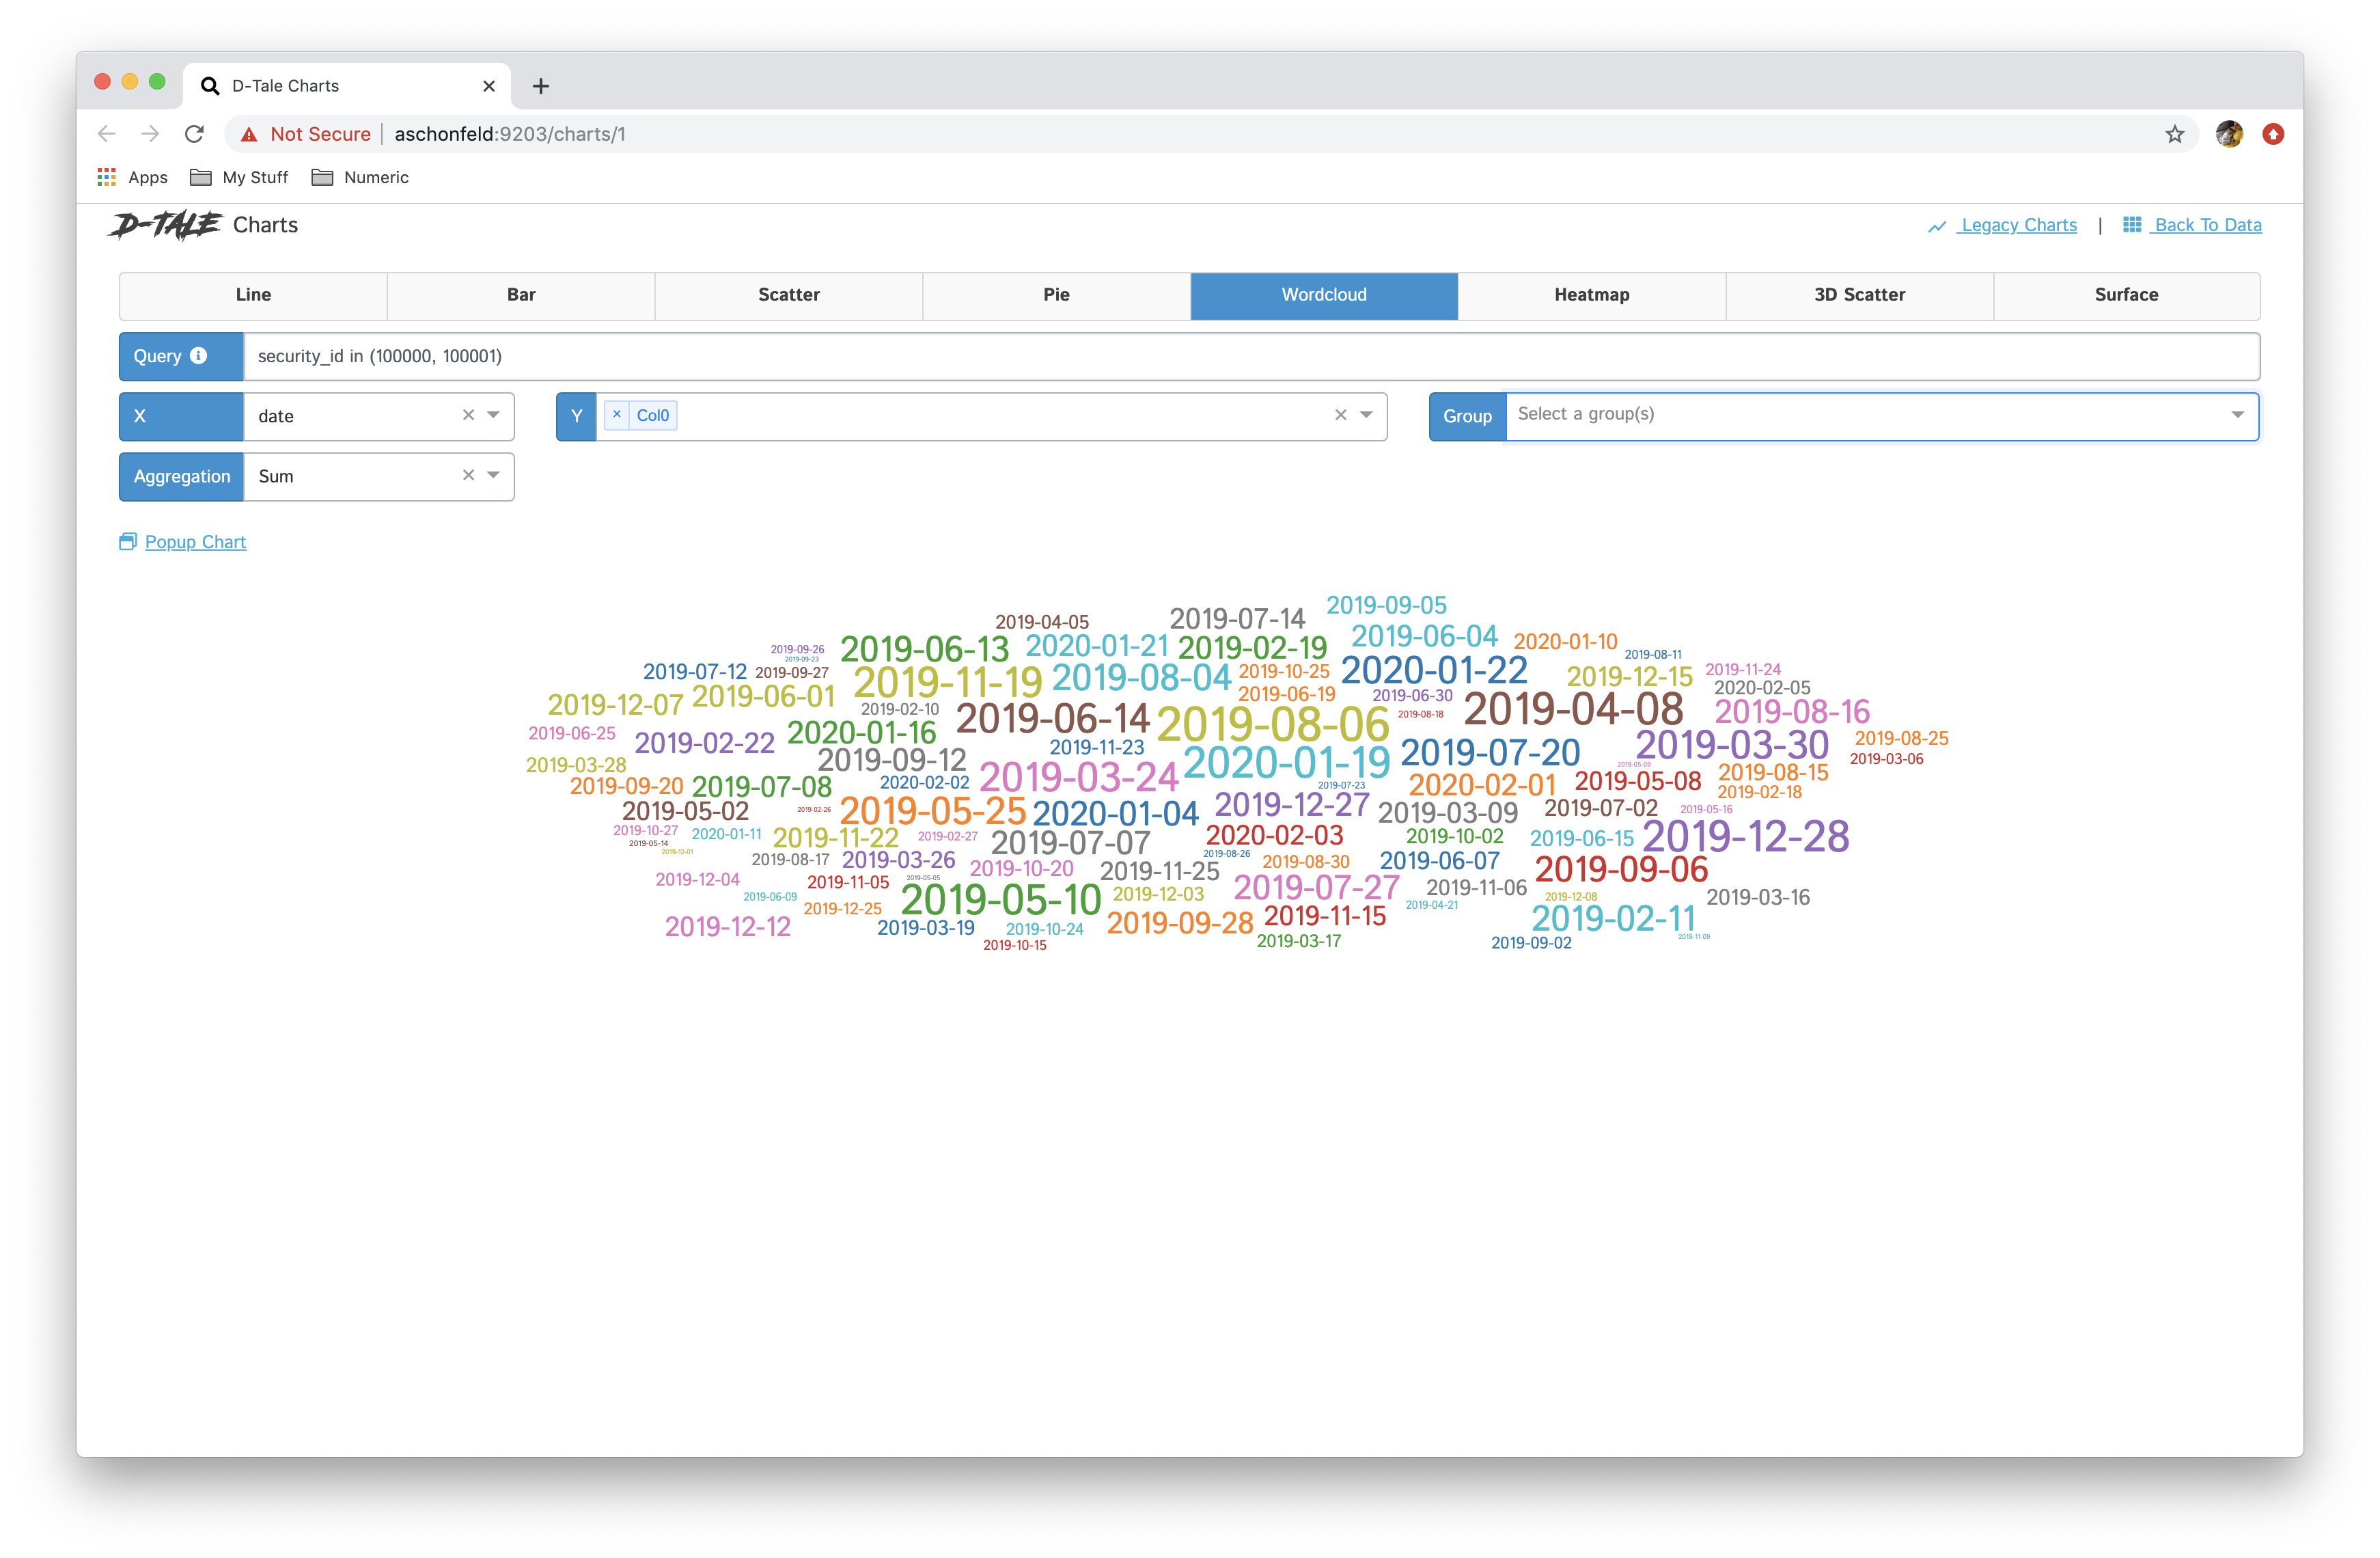 |
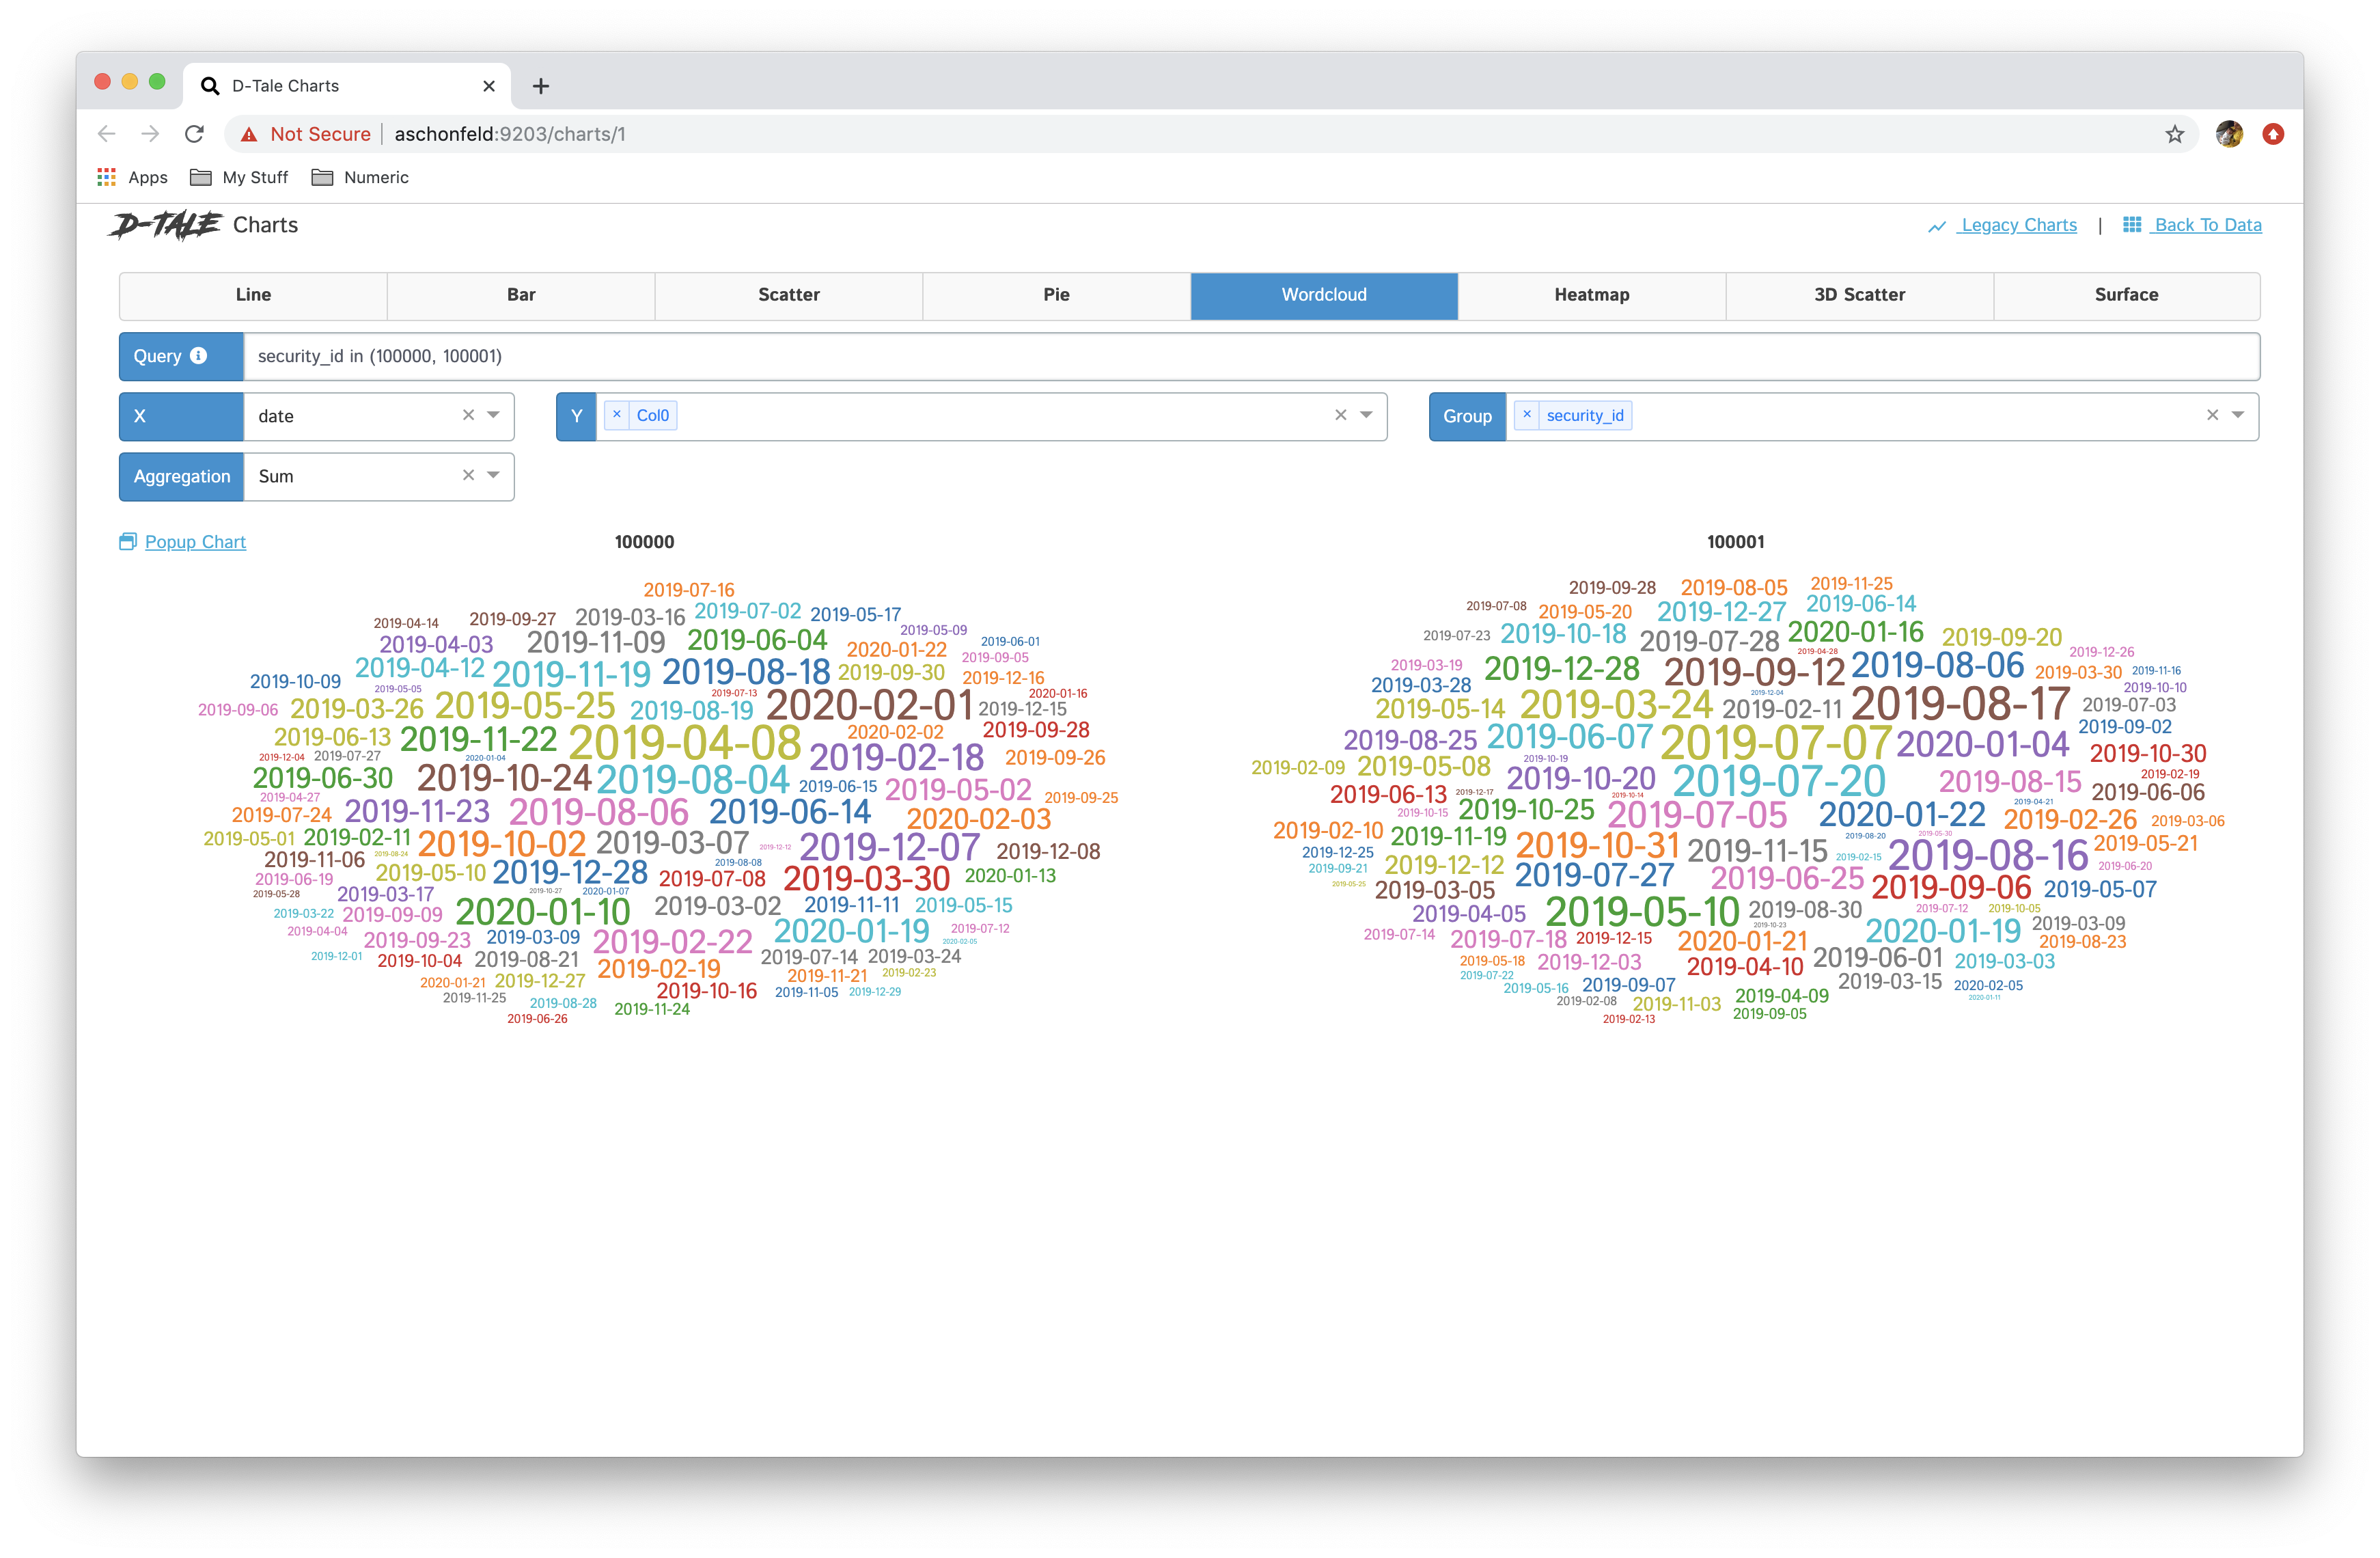 |
| heatmap |  |
|
| 3D scatter |  |
|
| surface | 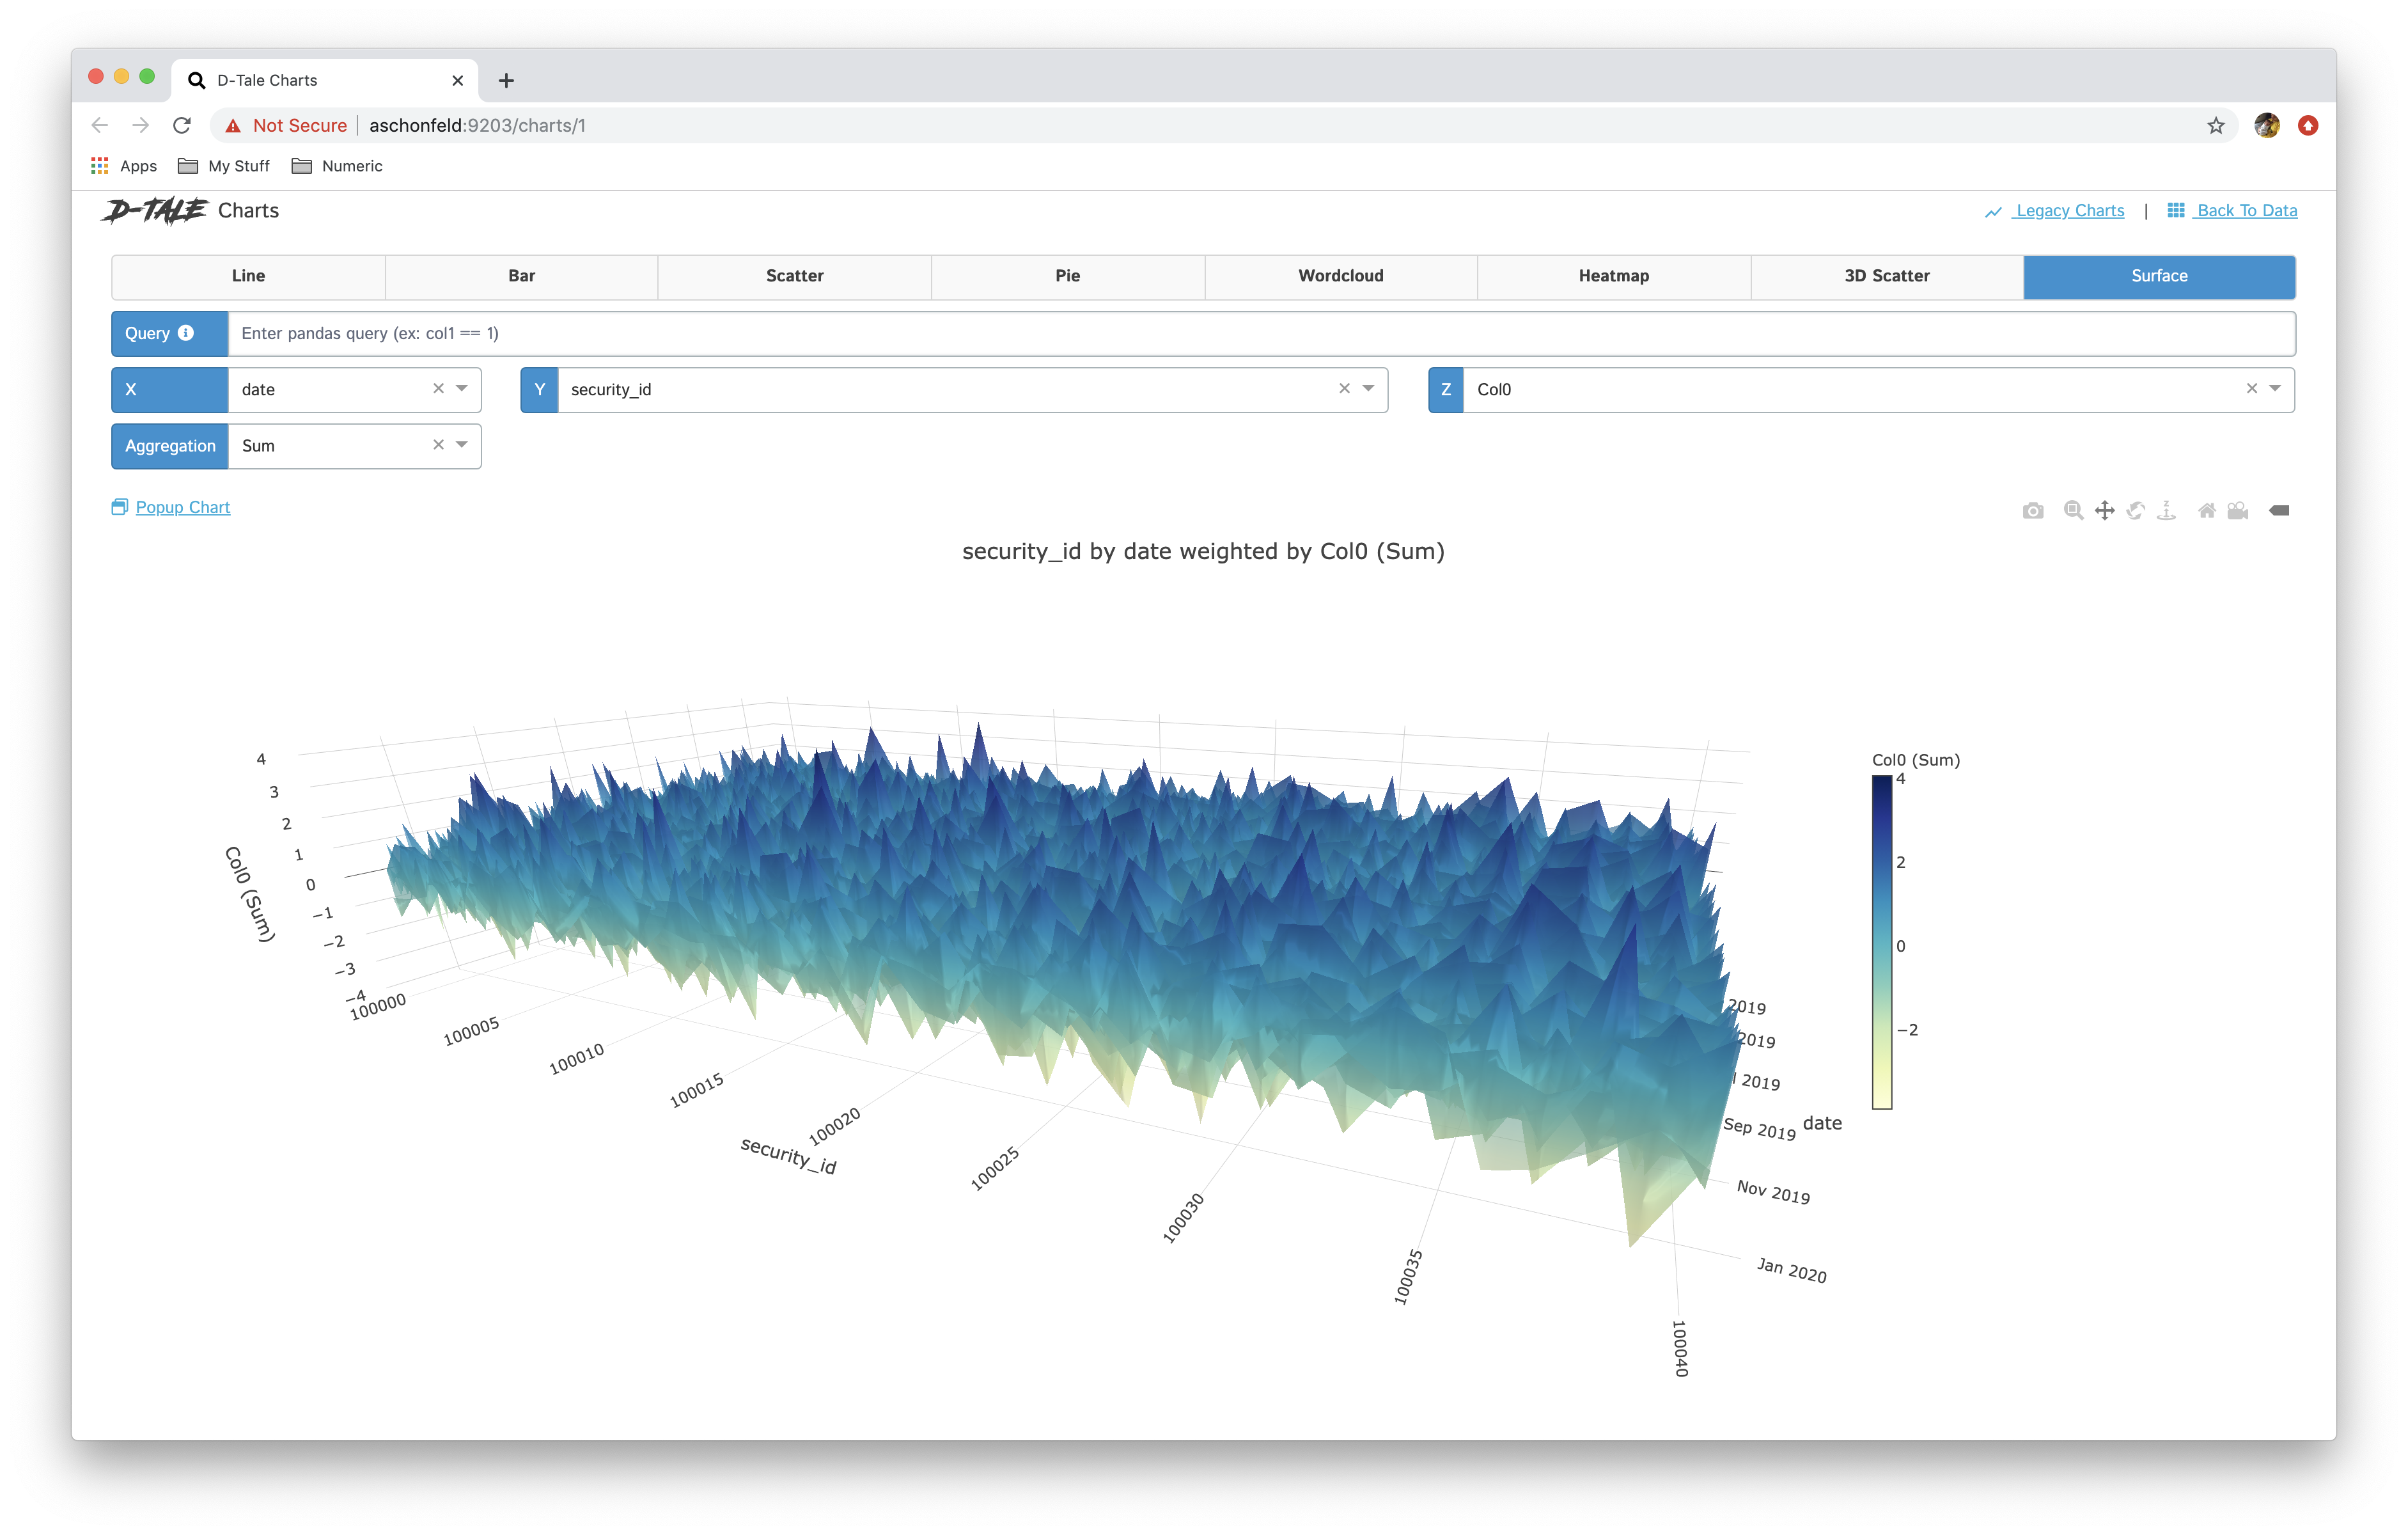 |
Selecting multiple columns for the Y-Axis will produce similar results to grouping in the sense that the chart will contain multiple series, but the difference is that for each column there will be a different Y-Axis associated with it in case the values contained within each column are on different scales.
| Multi Y-Axis | Editing Axis Ranges |
|---|---|
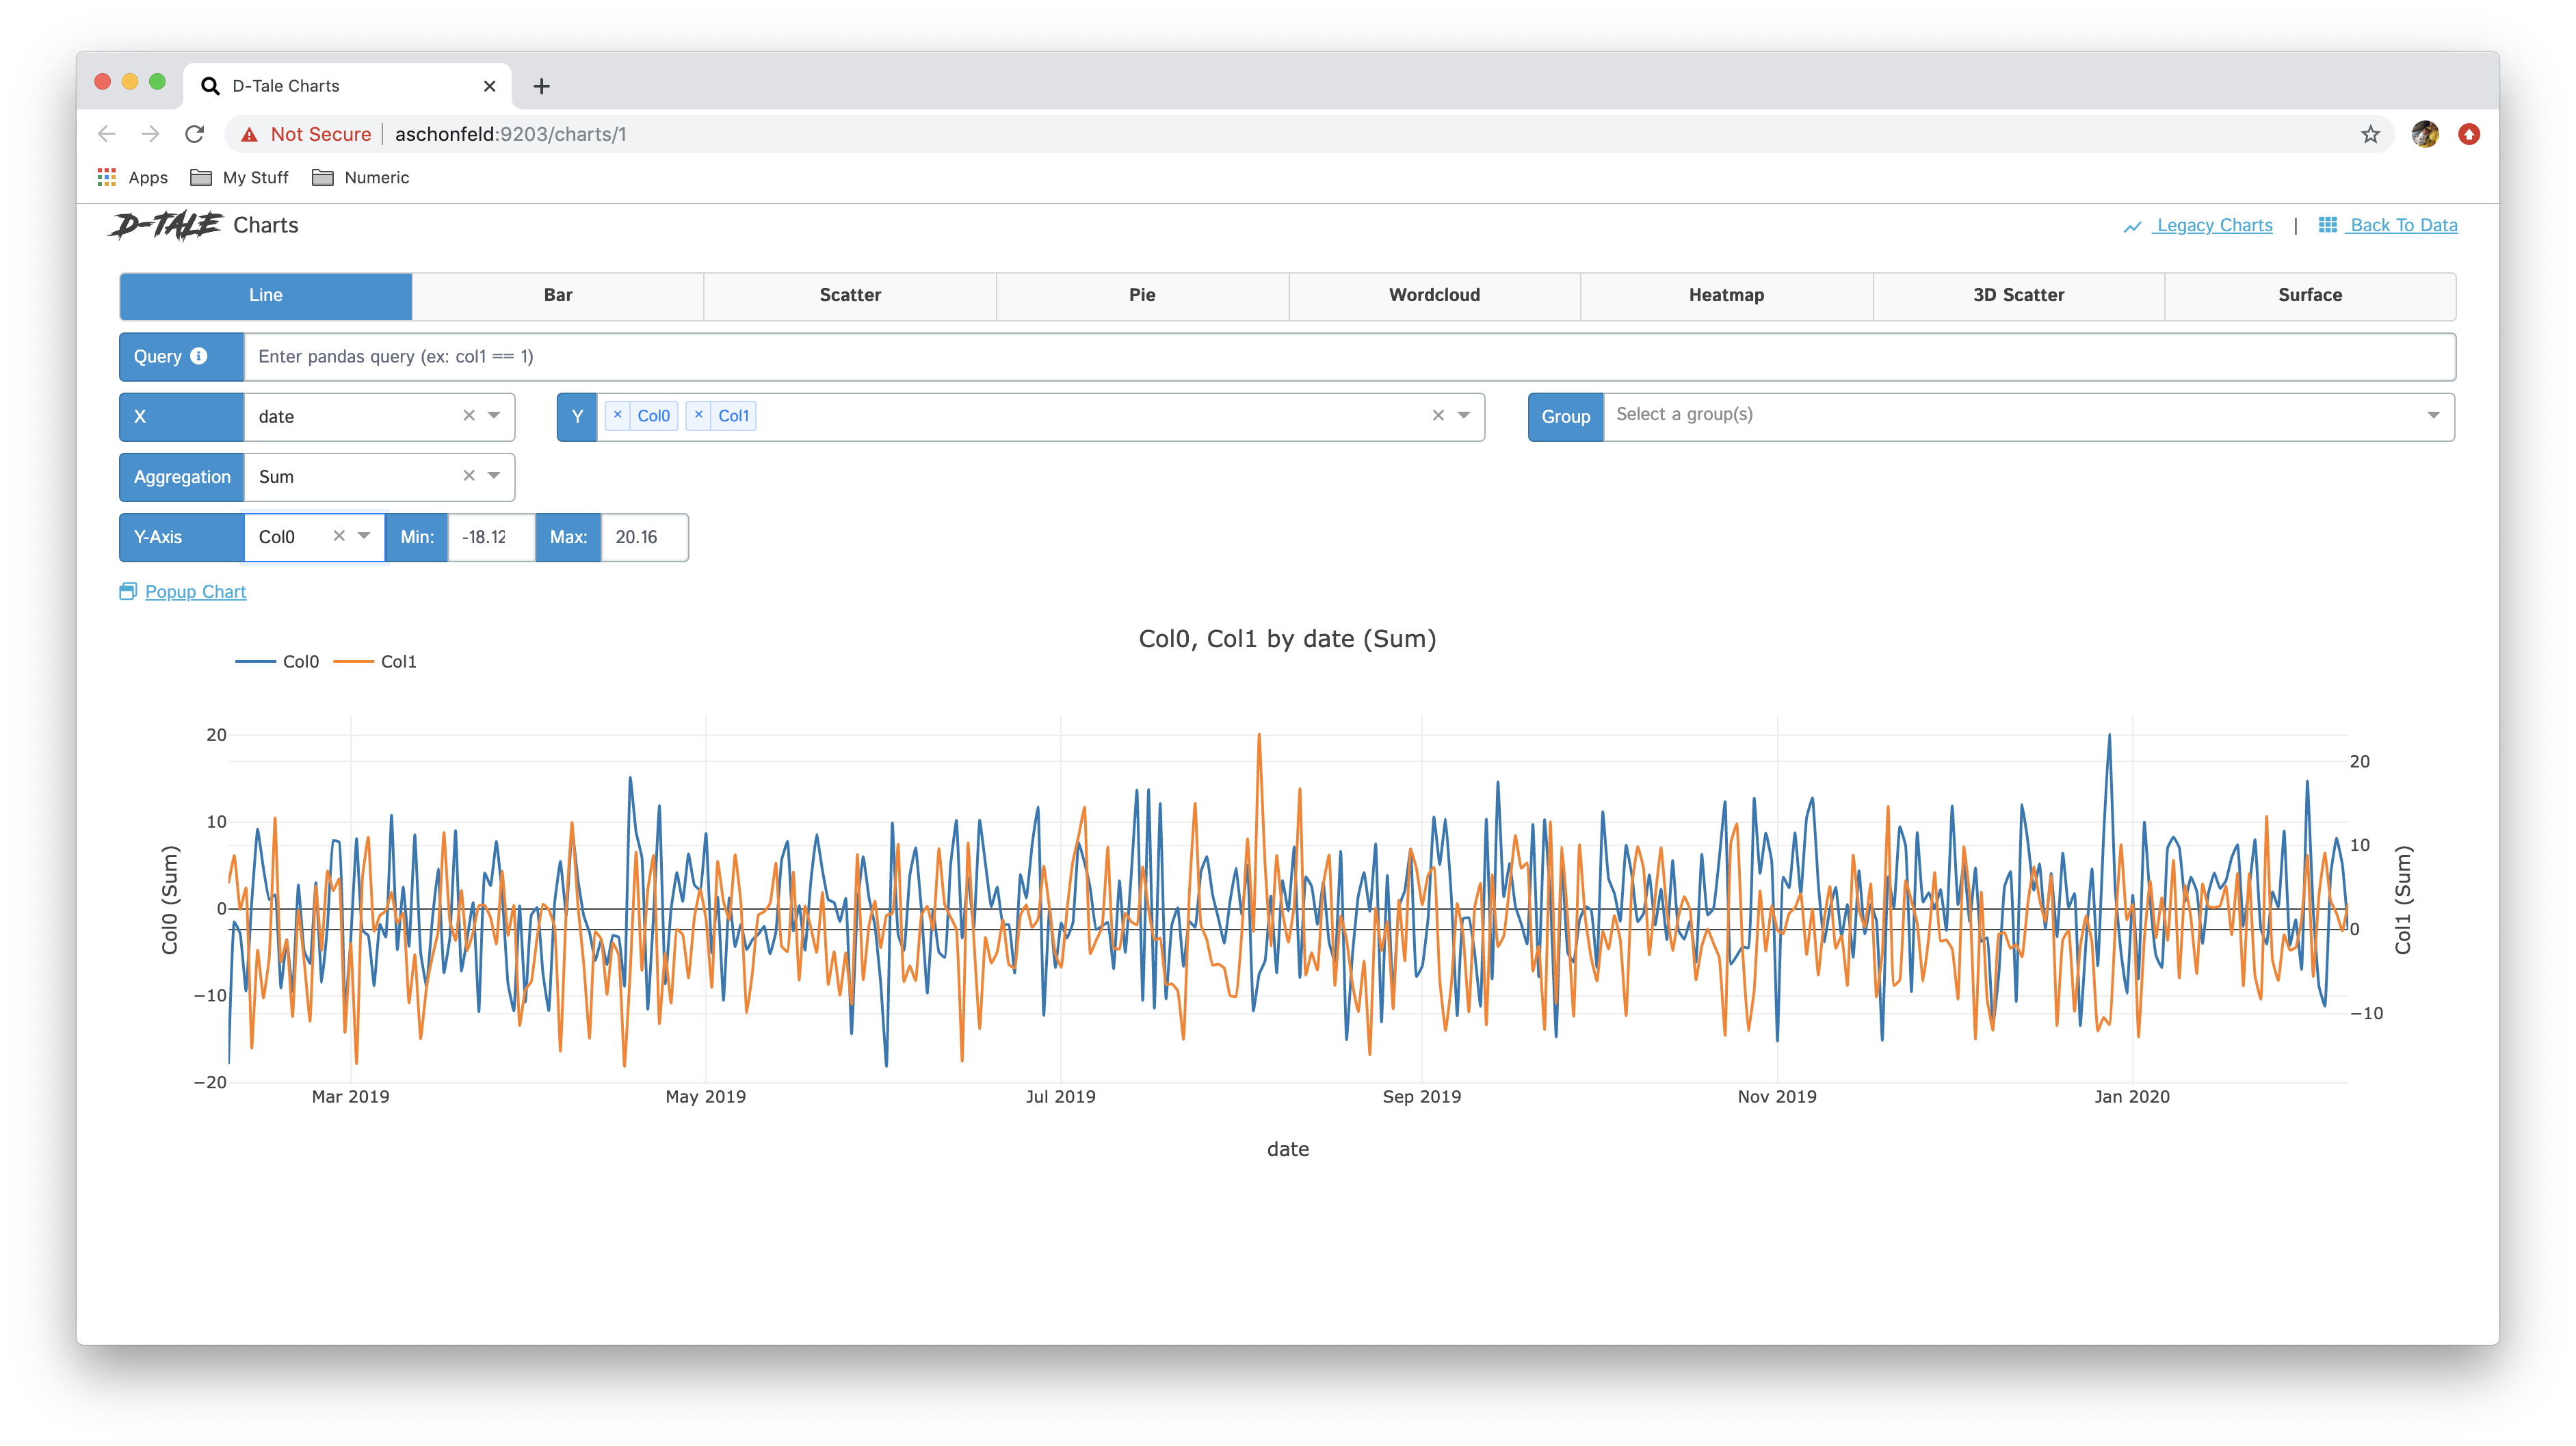 |
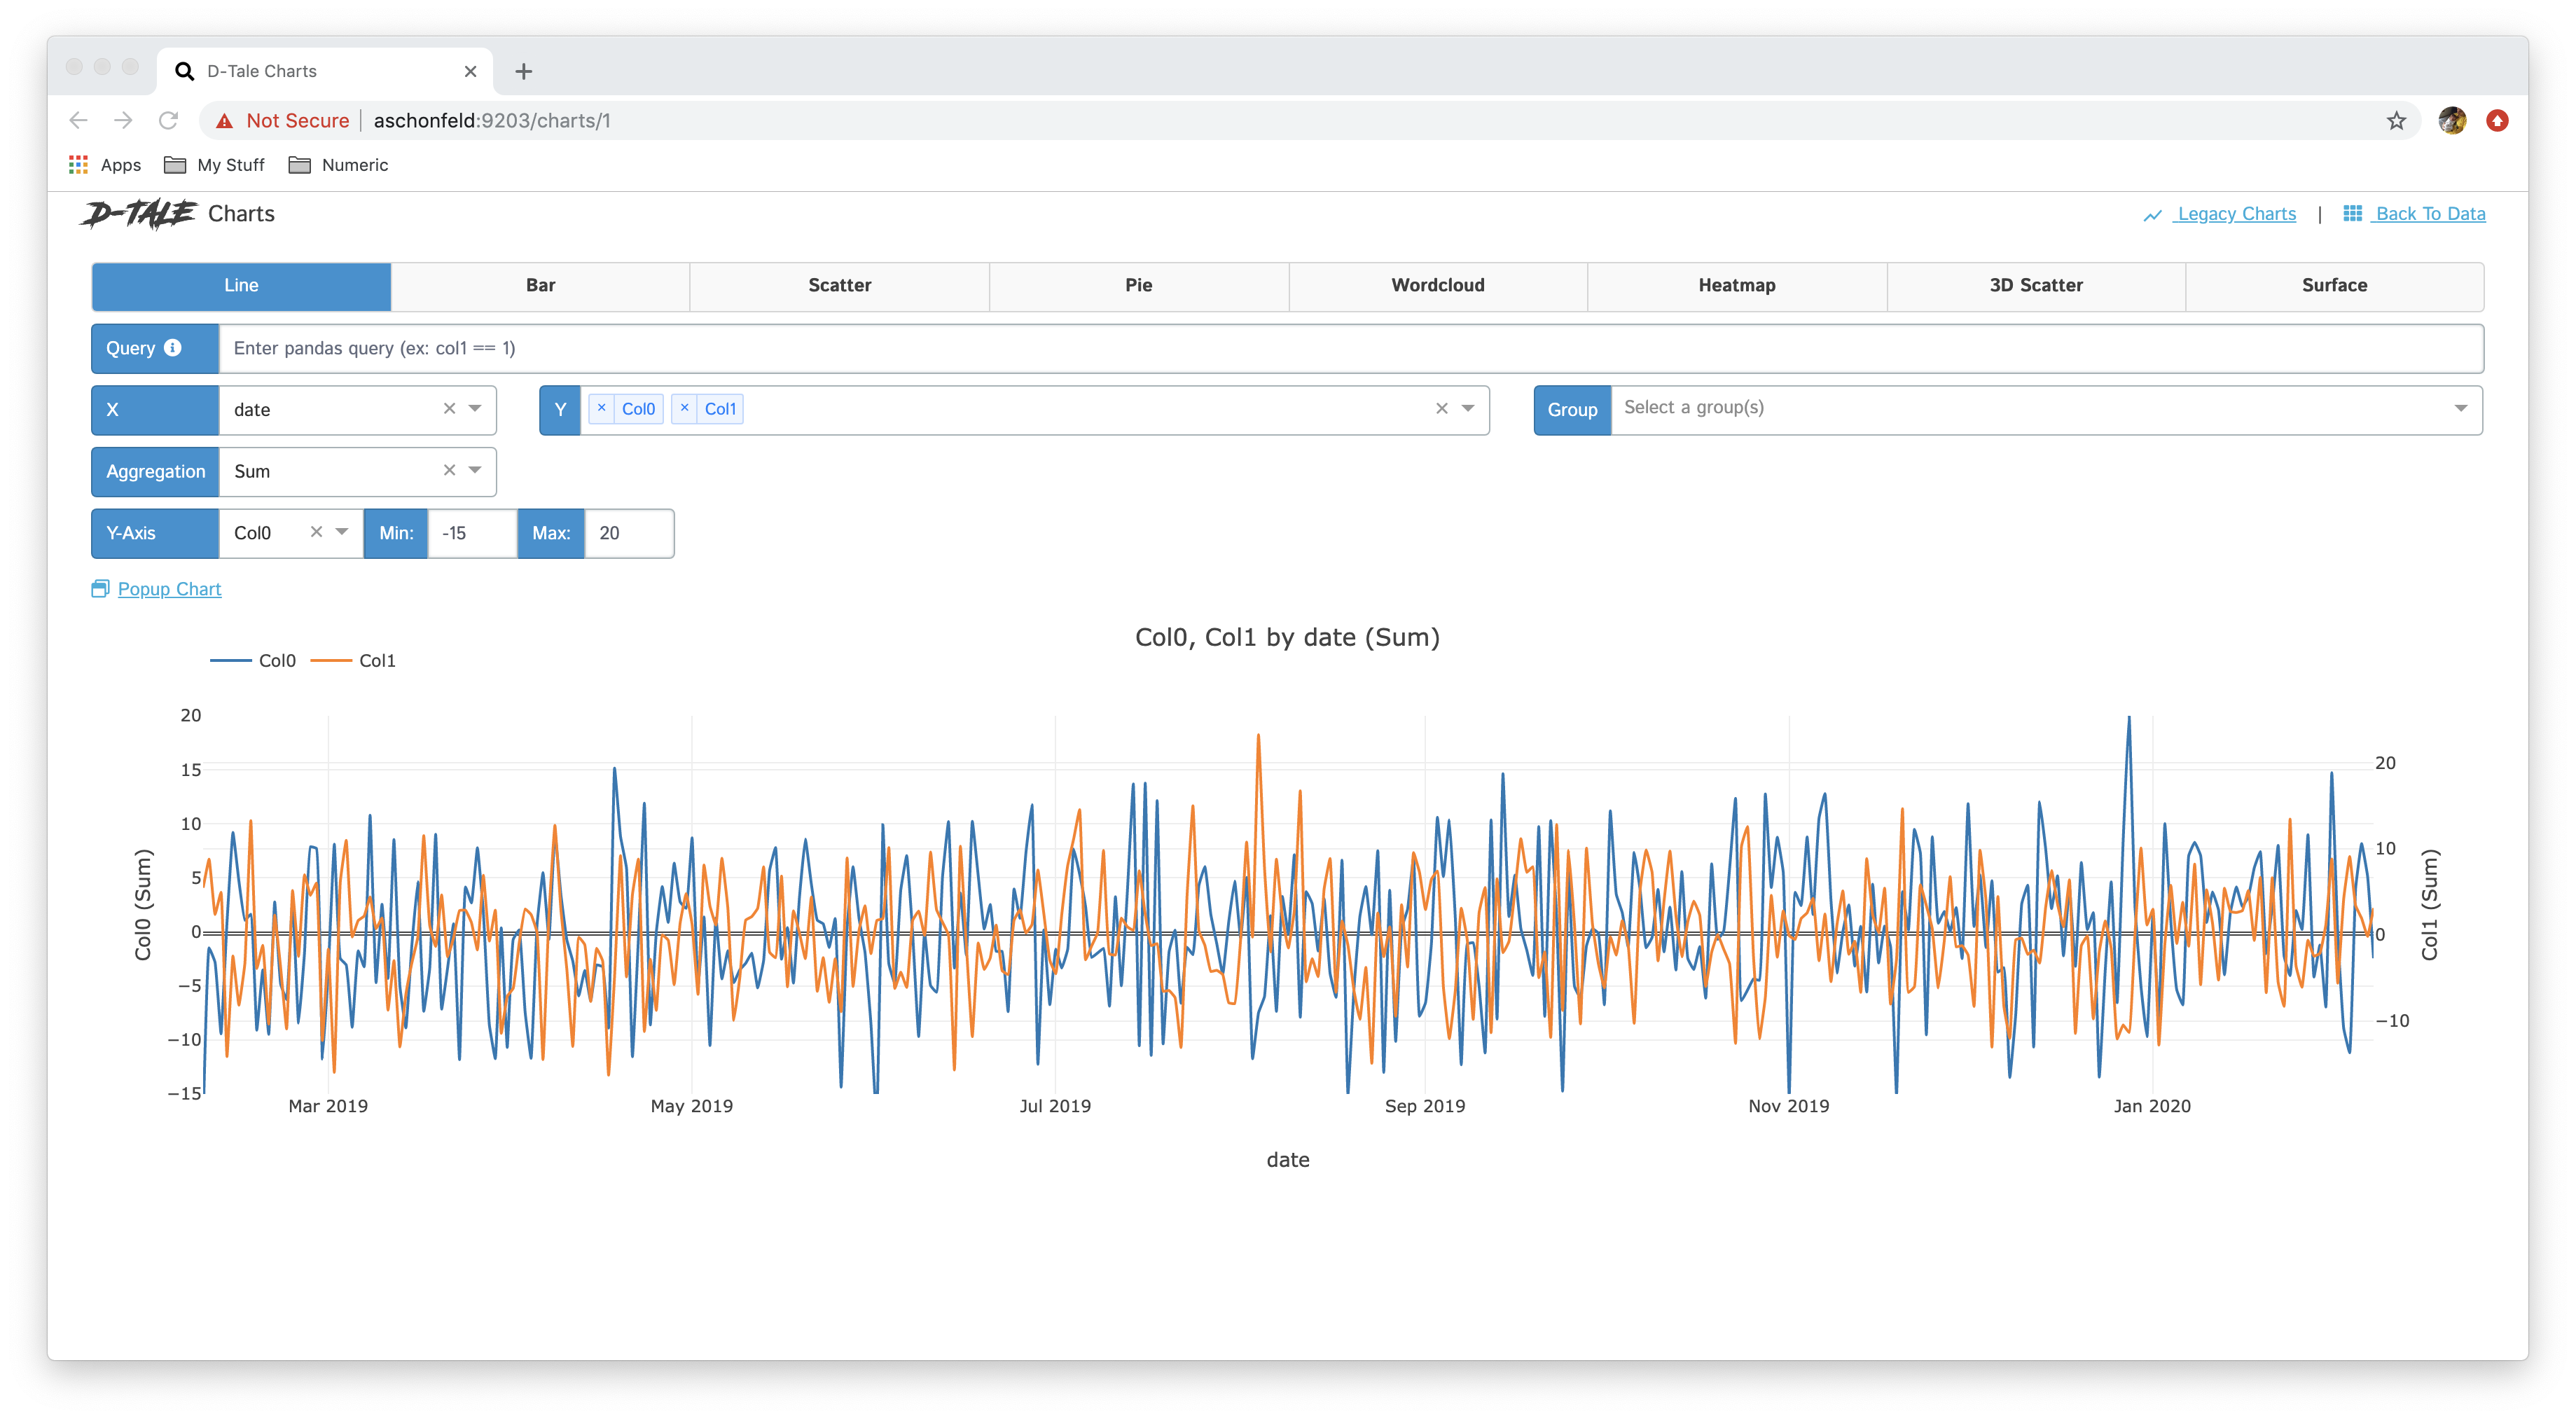 |
With a bar chart that only has a single Y-Axis you have the ability to sort the bars based on the values for the Y-Axis
| Pre-sort | Post-sort |
|---|---|
 |
 |
Popup Charts
Viewing multiple charts at once and want to separate one out into its own window or simply move one off to the side so you can work on building another for comparison? Well now you can by clicking the “Popup” button :smile:
Copy Link
Want to send what you’re looking at to someone else? Simply click the “Copy Link” button and it will save a pre-populated chart URL into your clipboard. As long as your D-Tale process is still running when that link is opened you will see your original chart.
Exporting Charts
You can now export your dash charts (with the exception of Wordclouds) to static HTML files which can be emailed to others or saved down to be viewed at a later time. The best part is that all of the javascript for plotly is embedded in these files so the nice zooming, panning, etc is still available! :boom:
Exporting CSV
I’ve been asked about being able to export the data that is contained within your chart to a CSV for further analysis in tools like Excel. This button makes that possible.
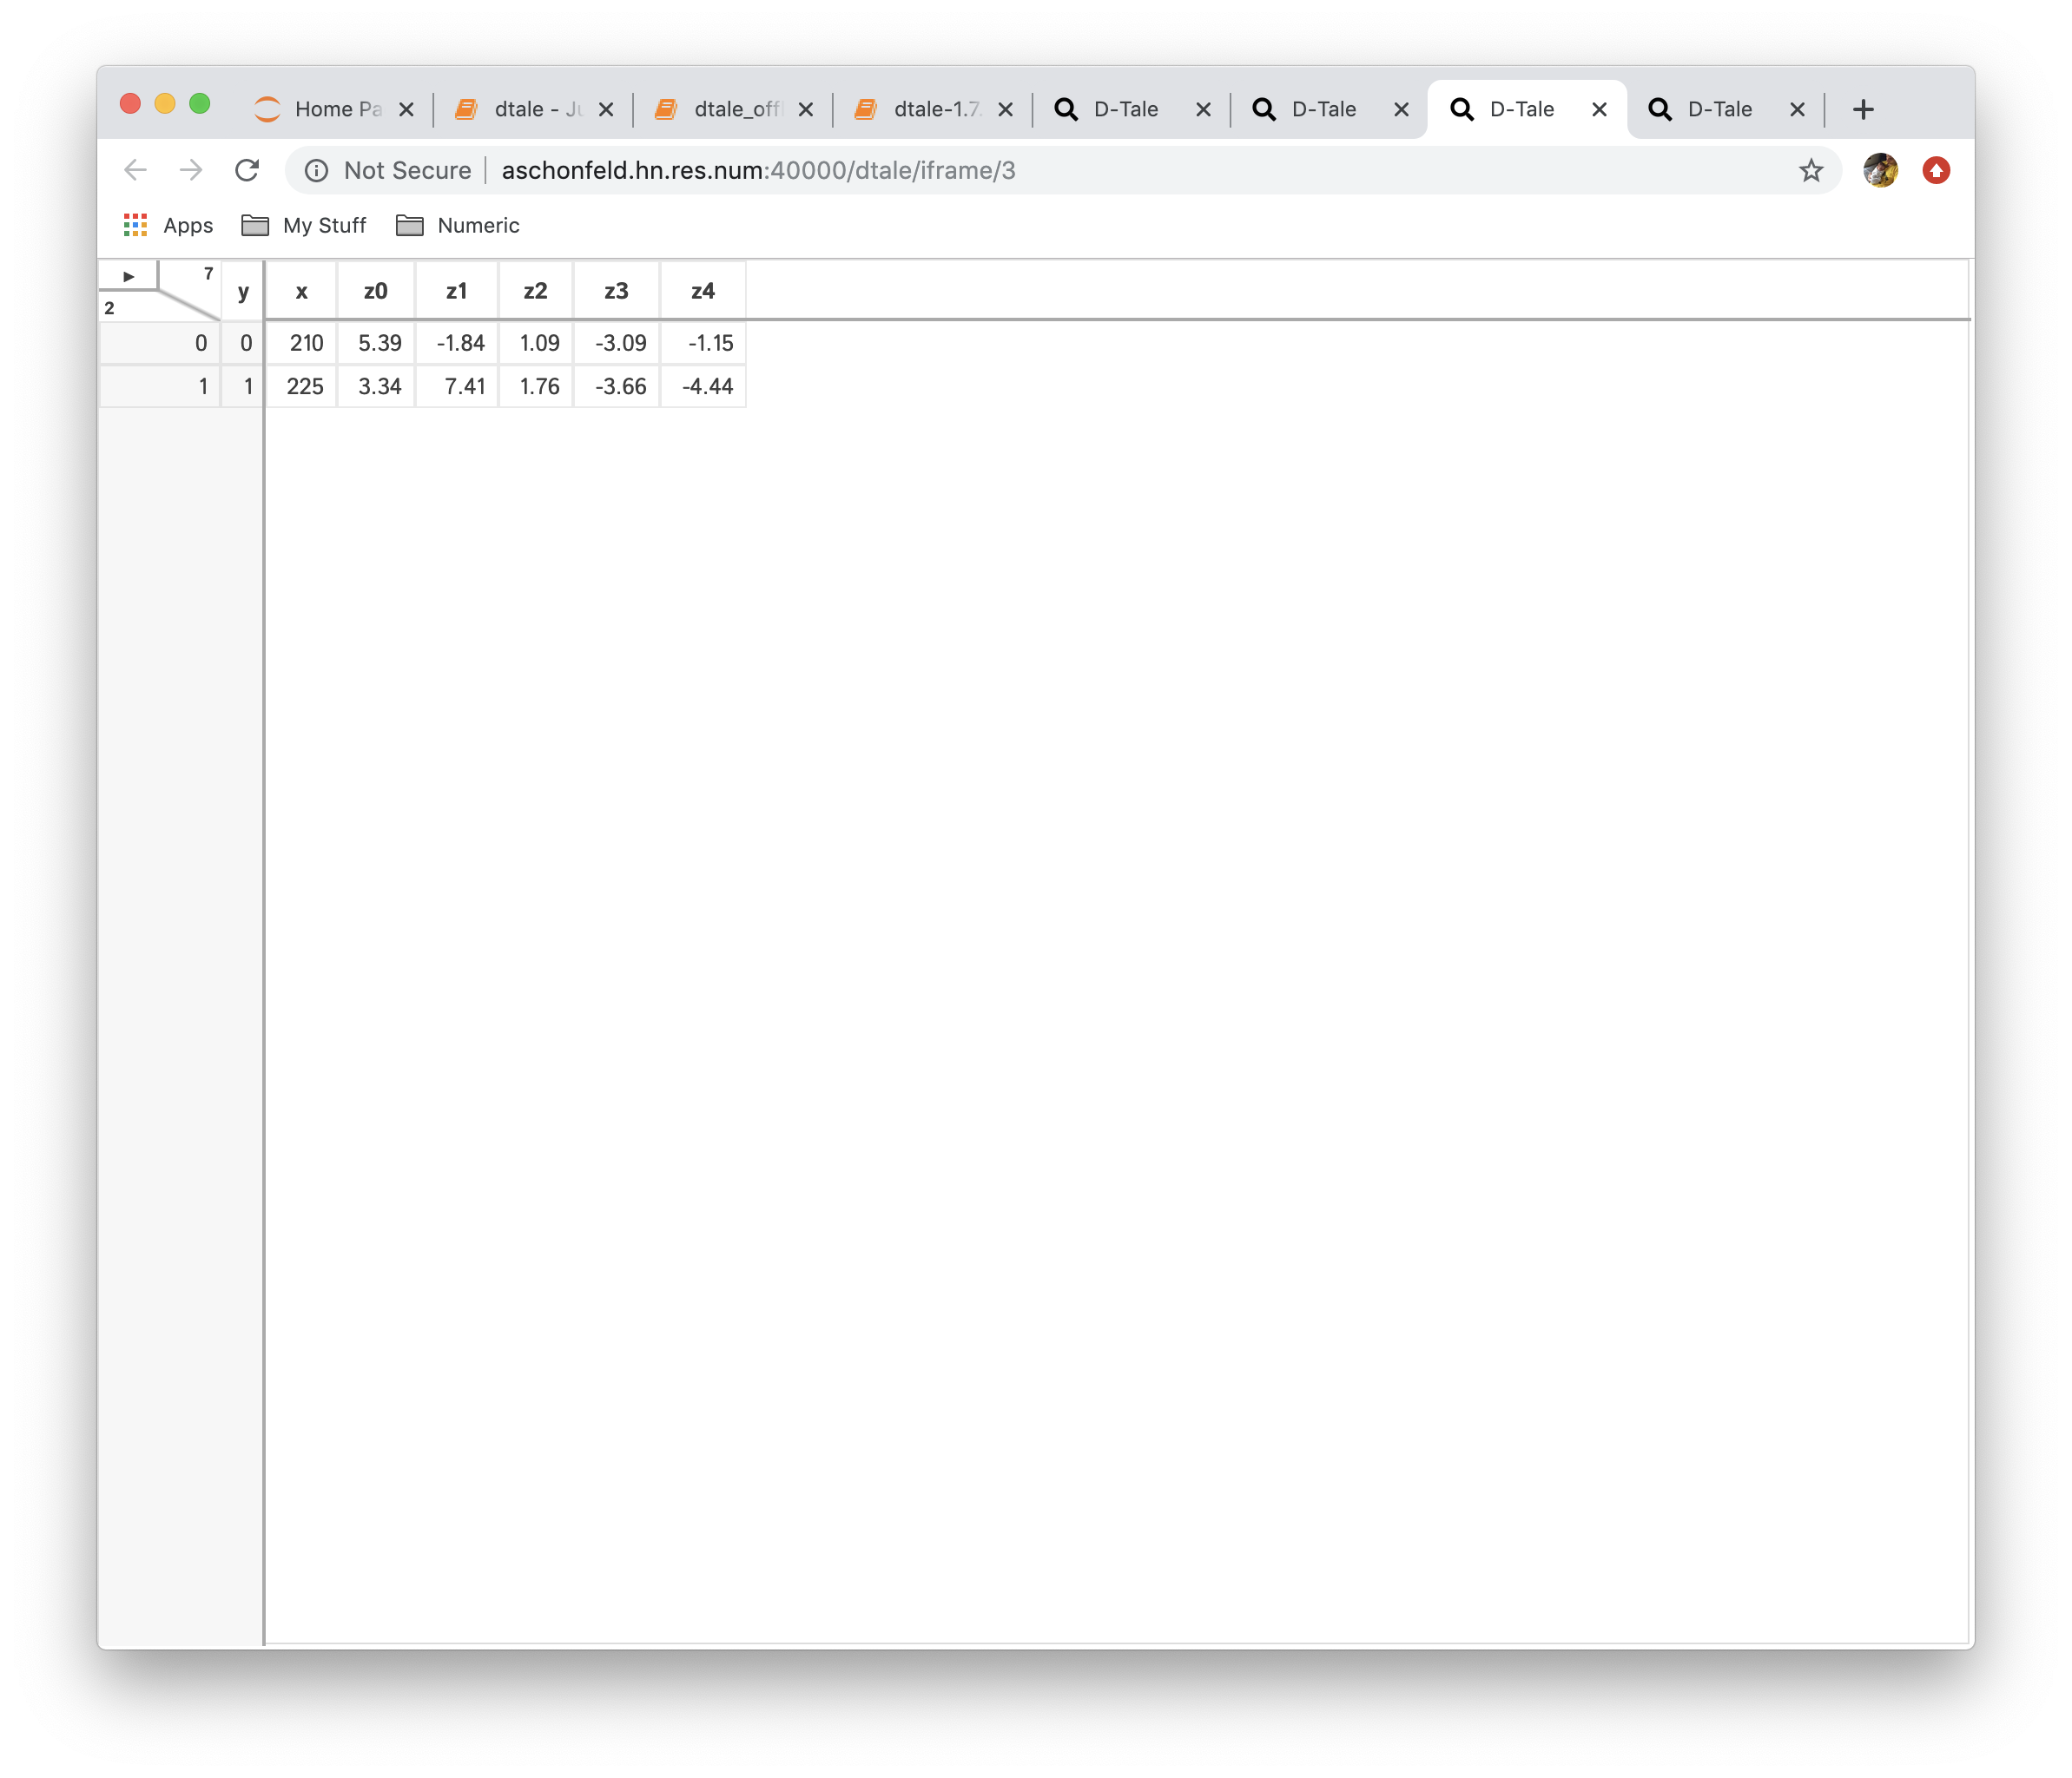
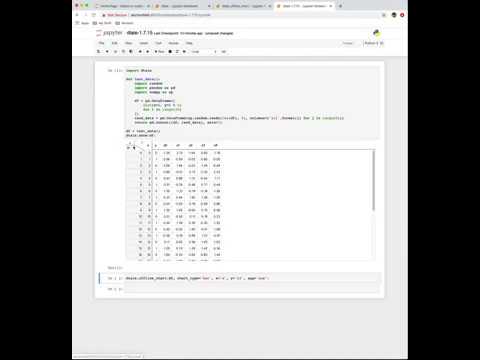
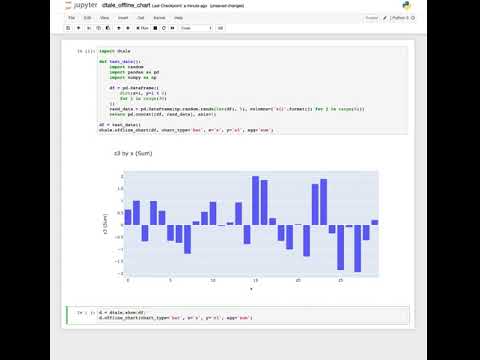
OFFLINE CHARTS
Want to run D-Tale in a jupyter notebook and build a chart that will still be displayed even after your D-Tale process has shutdown? Now you can! Here’s an example code snippet show how to use it:
import dtale

def test_data():
    import random
    import pandas as pd
    import numpy as np

    df = pd.DataFrame([
        dict(x=i, y=i % 2)
        for i in range(30)
    ])
    rand_data = pd.DataFrame(np.random.randn(len(df), 5), columns=['z{}'.format(j) for j in range(5)])
    return pd.concat([df, rand_data], axis=1)

d = dtale.show(test_data())
d.offline_chart(chart_type='bar', x='x', y='z3', agg='sum')
Disclaimer: Long Running Chart Requests
If you choose to build a chart that requires a lot of computational resources then it will take some time to run. Based on the way Flask & plotly/dash interact this will block you from performing any other request until it completes. There are two courses of action in this situation:
- Restart your jupyter notebook kernel or python console
- Open a new D-Tale session on a different port than the current session. You can do that with the following command:
dtale.show(df, port=[any open port], force=True)
If you miss the legacy (non-plotly/dash) charts, not to worry! They are still available from the link in the upper-right corner, but on for a limited time… Here is the documentation for those: Legacy Charts
Your Feedback is Valuable
This is a very powerful feature with many more features that could be offered (linked subplots, different statistical aggregations, etc…) so please submit issues :)
Coverage (Deprecated)
If you have watched the video within the Man Institute blog post you’ll notice that there is a “Coverage” popup. This was deprecated with the creation of the “Charts” page. You can create the same coverage chart in that video by choosing the following options in the “Charts” page:
- Type: Line
- X: date
- Y: security_id
- Aggregation: Count or Unique Count
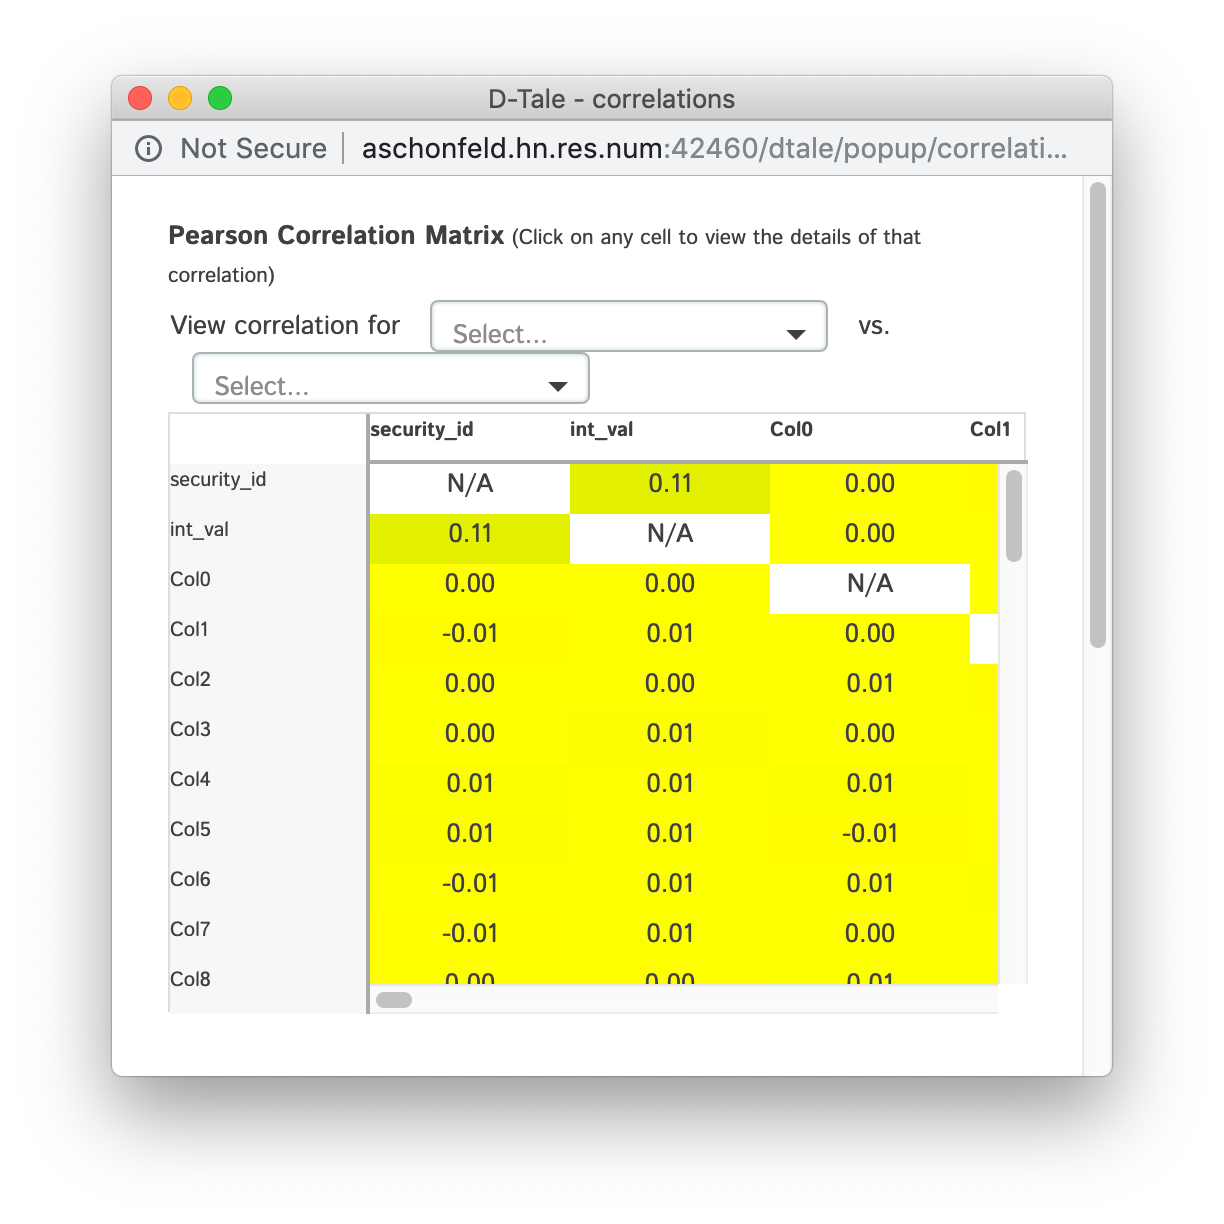
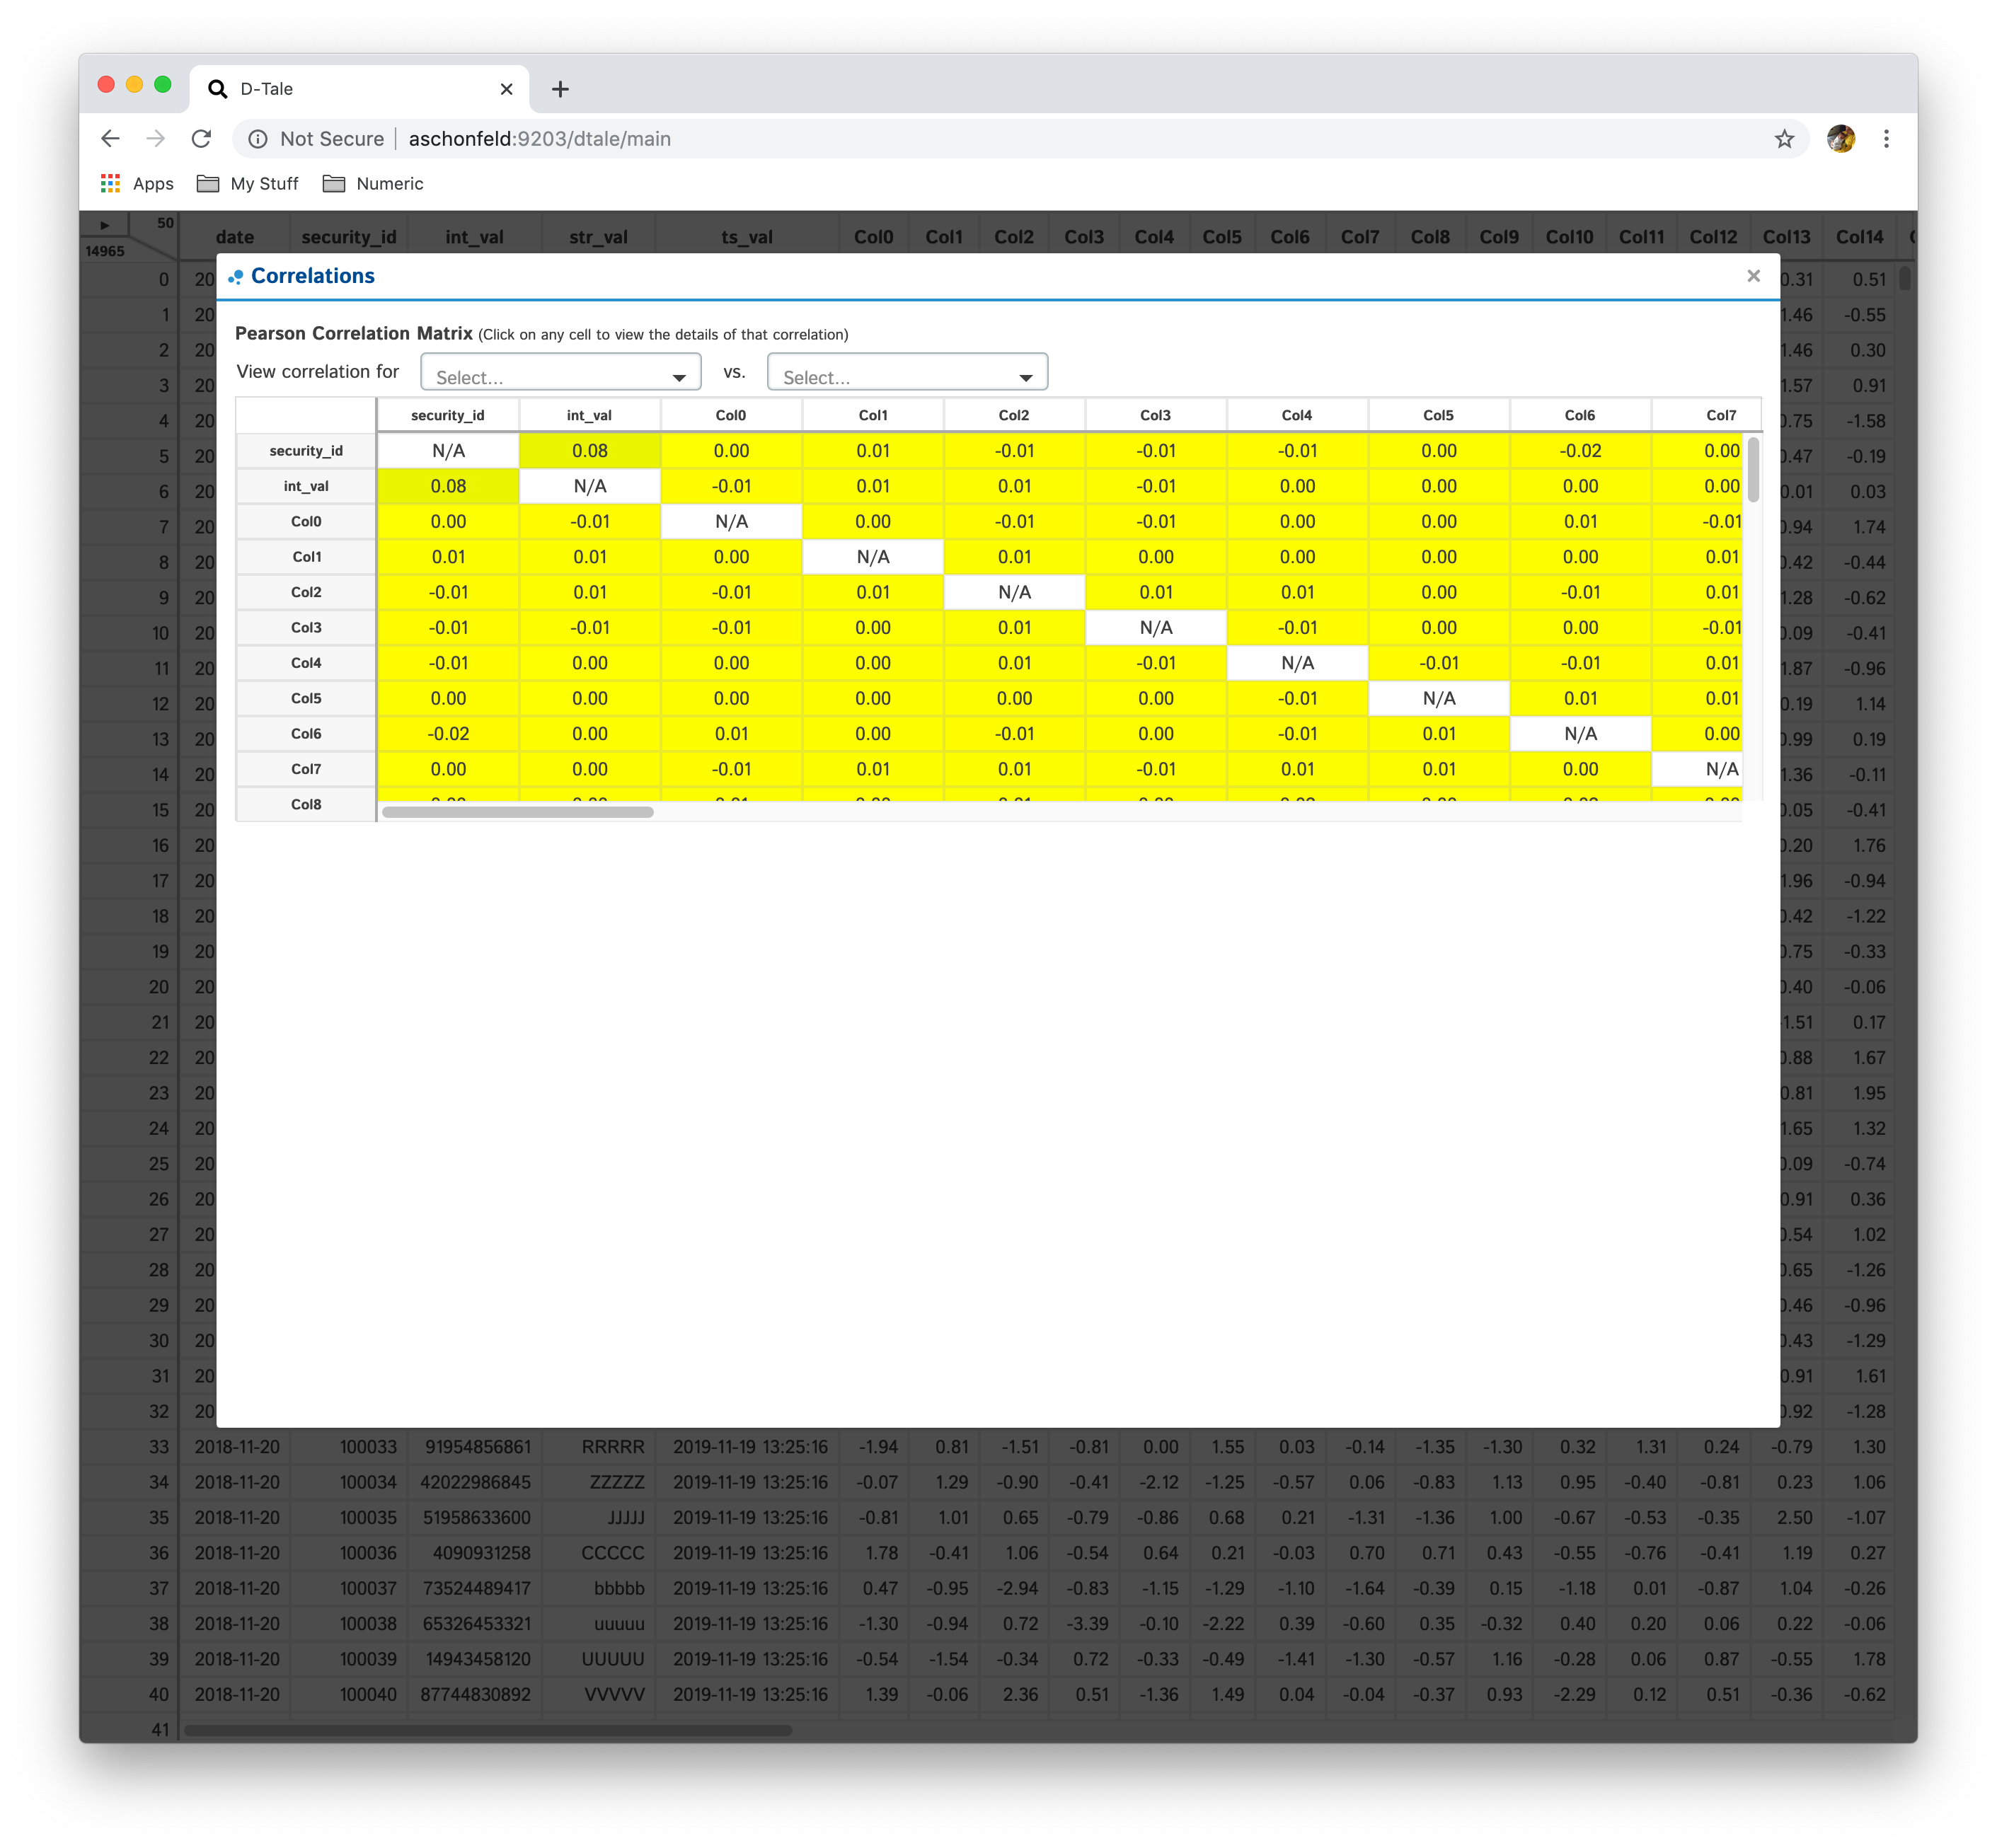
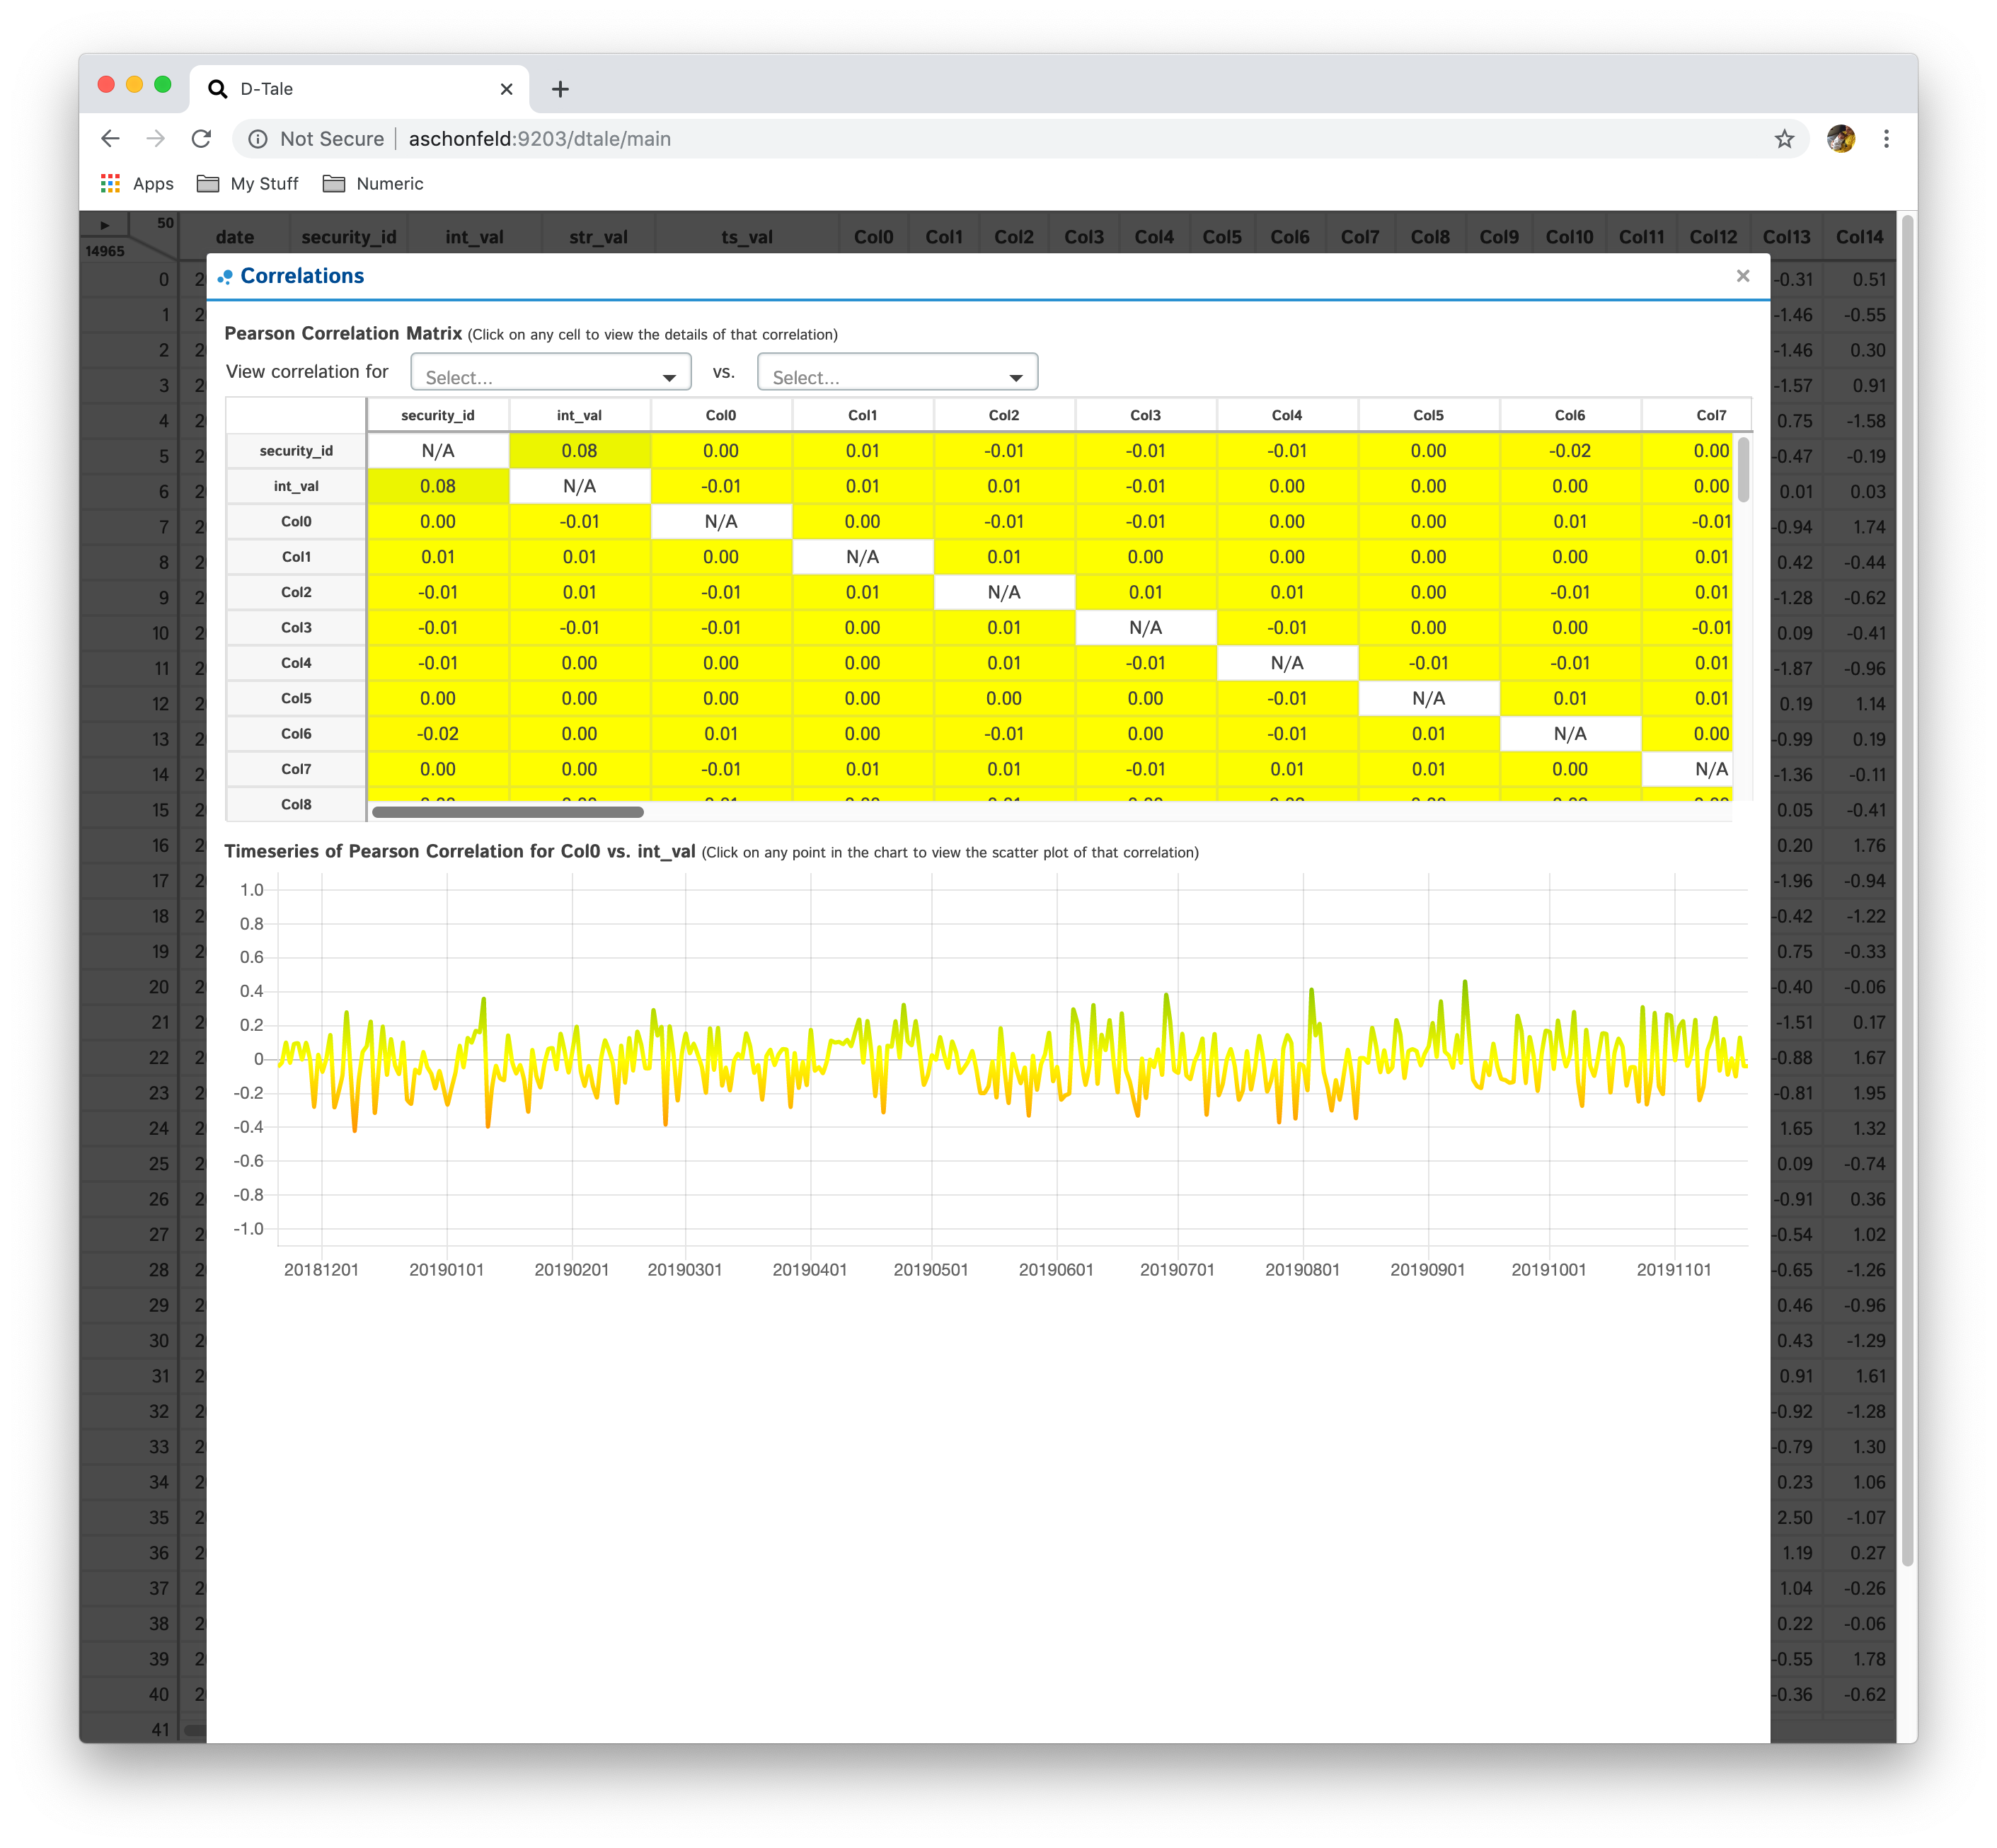
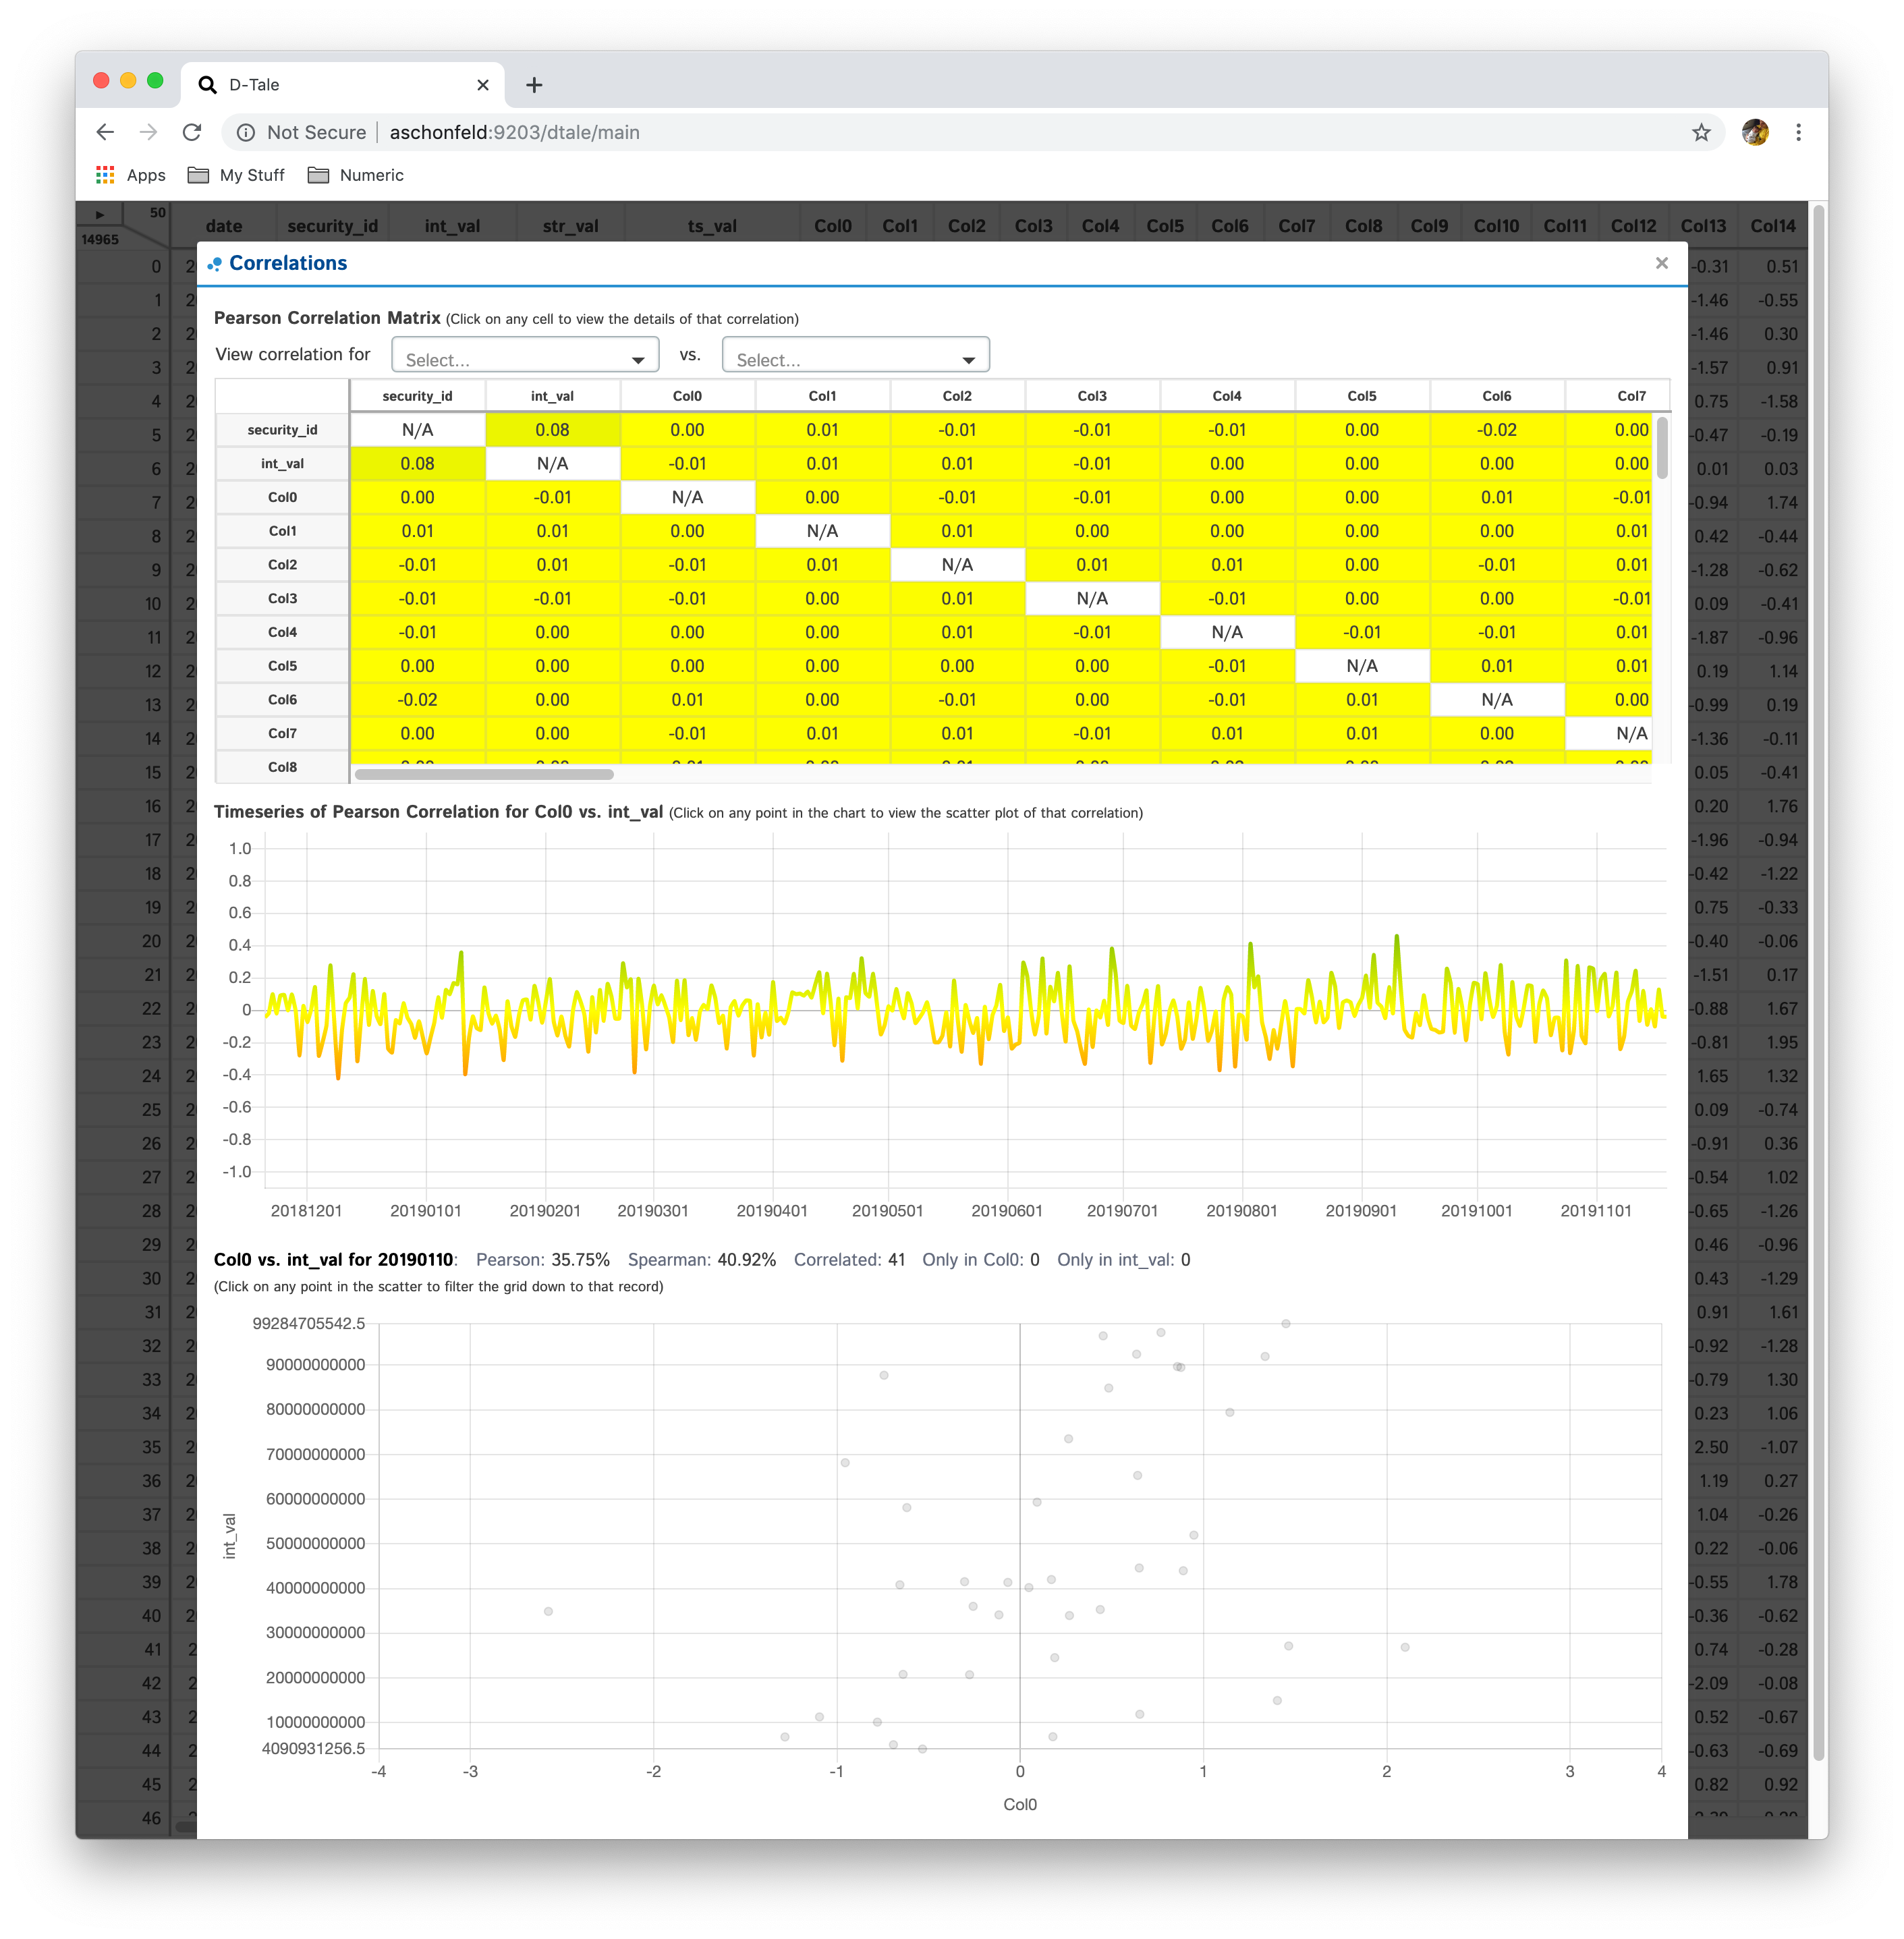
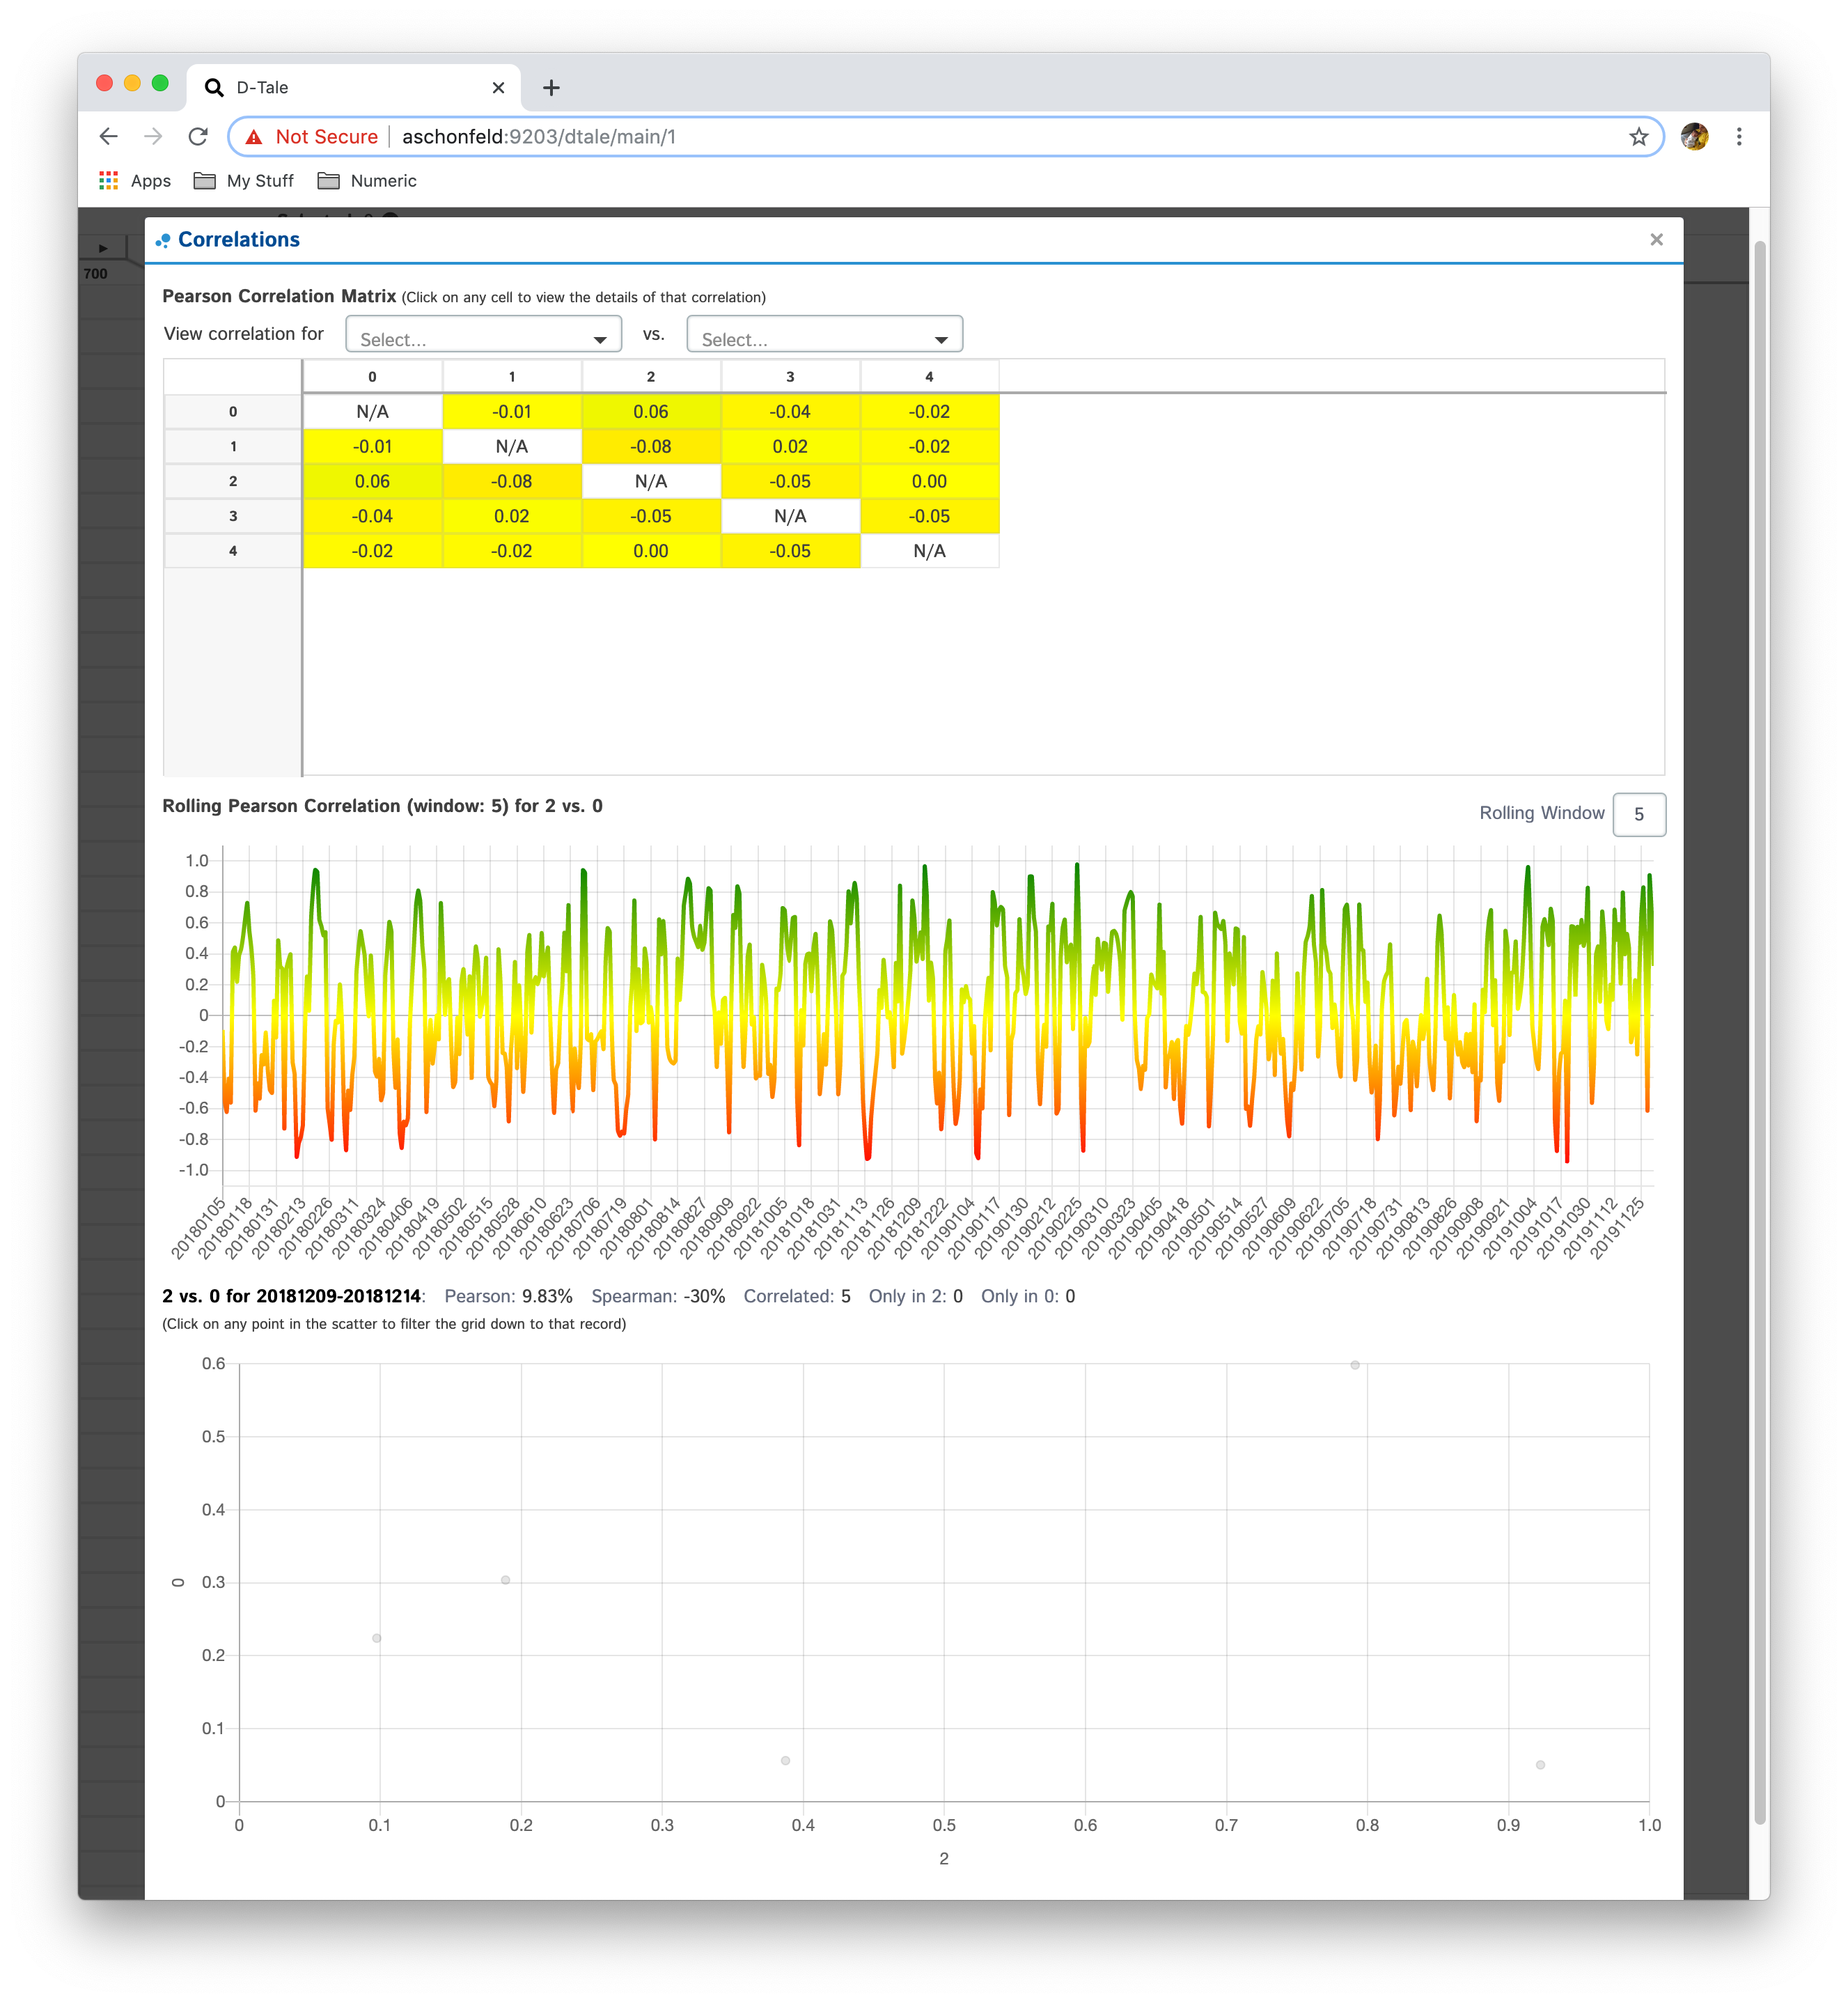
Correlations
Shows a pearson correlation matrix of all numeric columns against all other numeric columns
- By default, it will show a grid of pearson correlations (filtering available by using drop-down see 2nd table of screenshots)
- If you have a date-type column, you can click an individual cell and see a timeseries of pearson correlations for that column combination
- Currently if you have multiple date-type columns you will have the ability to toggle between them by way of a drop-down
- Furthermore, you can click on individual points in the timeseries to view the scatter plot of the points going into that correlation
| Matrix | Timeseries | Scatter |
|---|---|---|
 |
 |
 |
| Col1 Filtered | Col2 Filtered | Col1 & Col2 Filtered |
|---|---|---|
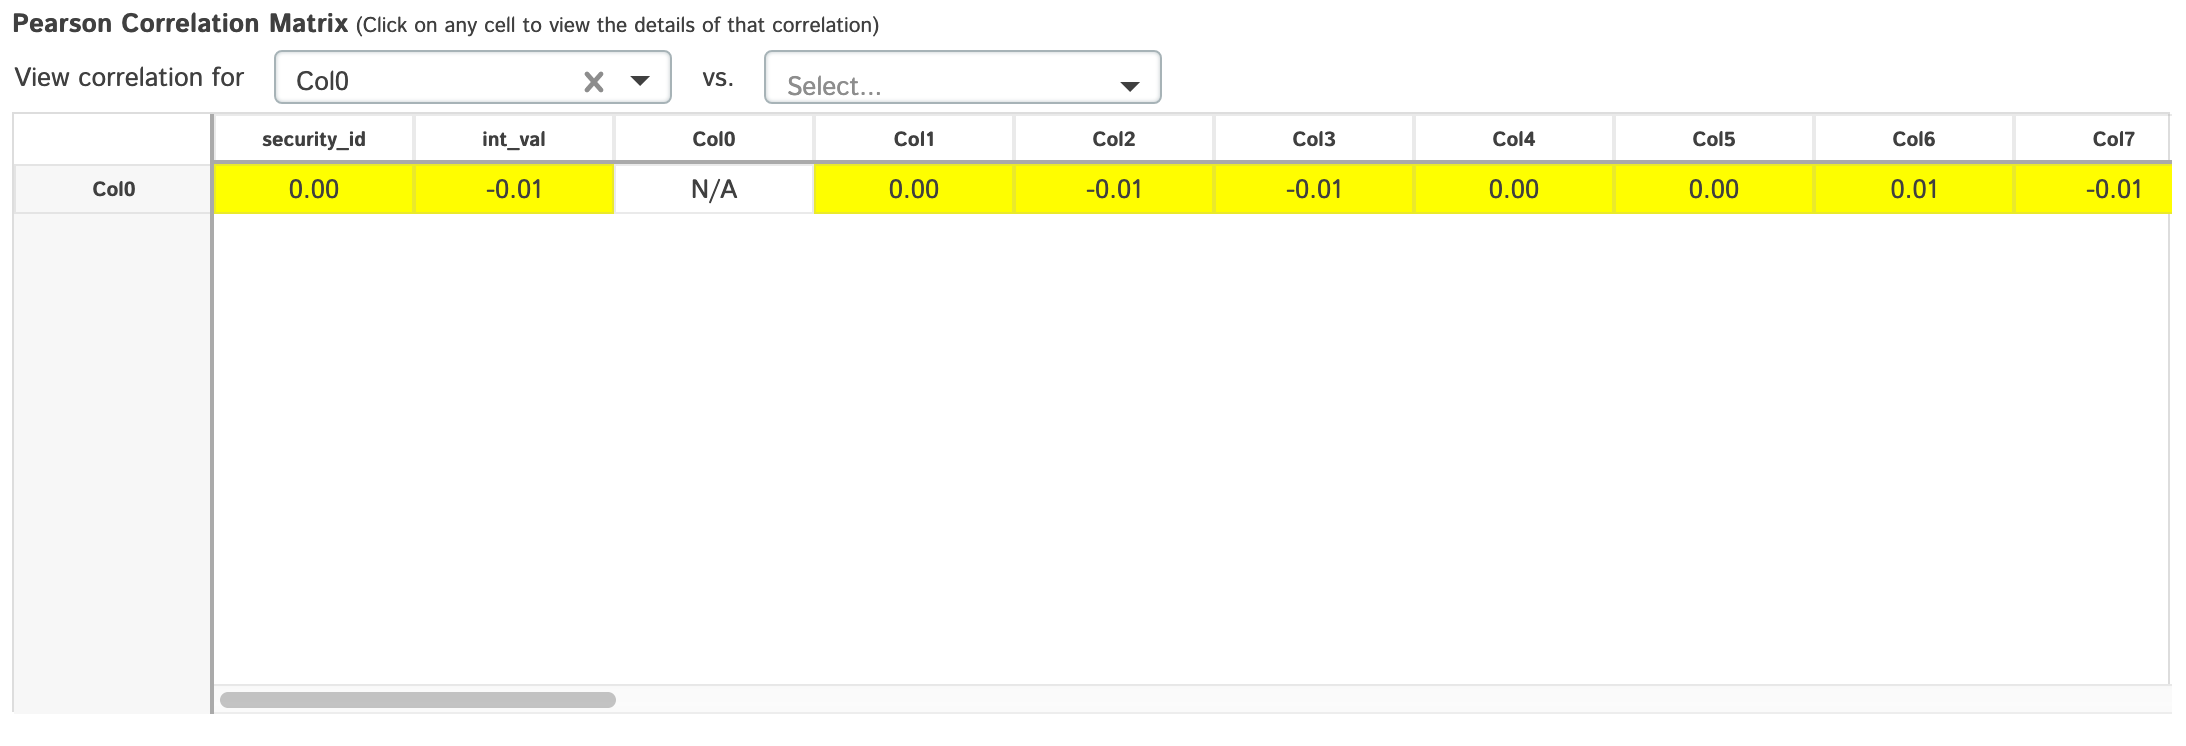 |
 |
 |
When the data being viewed in D-Tale has date or timestamp columns but for each date/timestamp vlaue there is only one row of data the behavior of the Correlations popup is a little different
- Instead of a timeseries correlation chart the user is given a rolling correlation chart which can have the window (default: 10) altered
- The scatter chart will be created when a user clicks on a point in the rollign correlation chart. The data displayed in the scatter will be for the ranges of dates involved in the rolling correlation for that date.
| Data | Correlations |
|---|---|
 |
 |
Heat Map
This will hide any non-float columns (with the exception of the index on the right) and apply a color to the background of each cell
- Each float is renormalized to be a value between 0 and 1.0
- Each renormalized value is passed to a color scale of red(0) - yellow(0.5) - green(1.0)
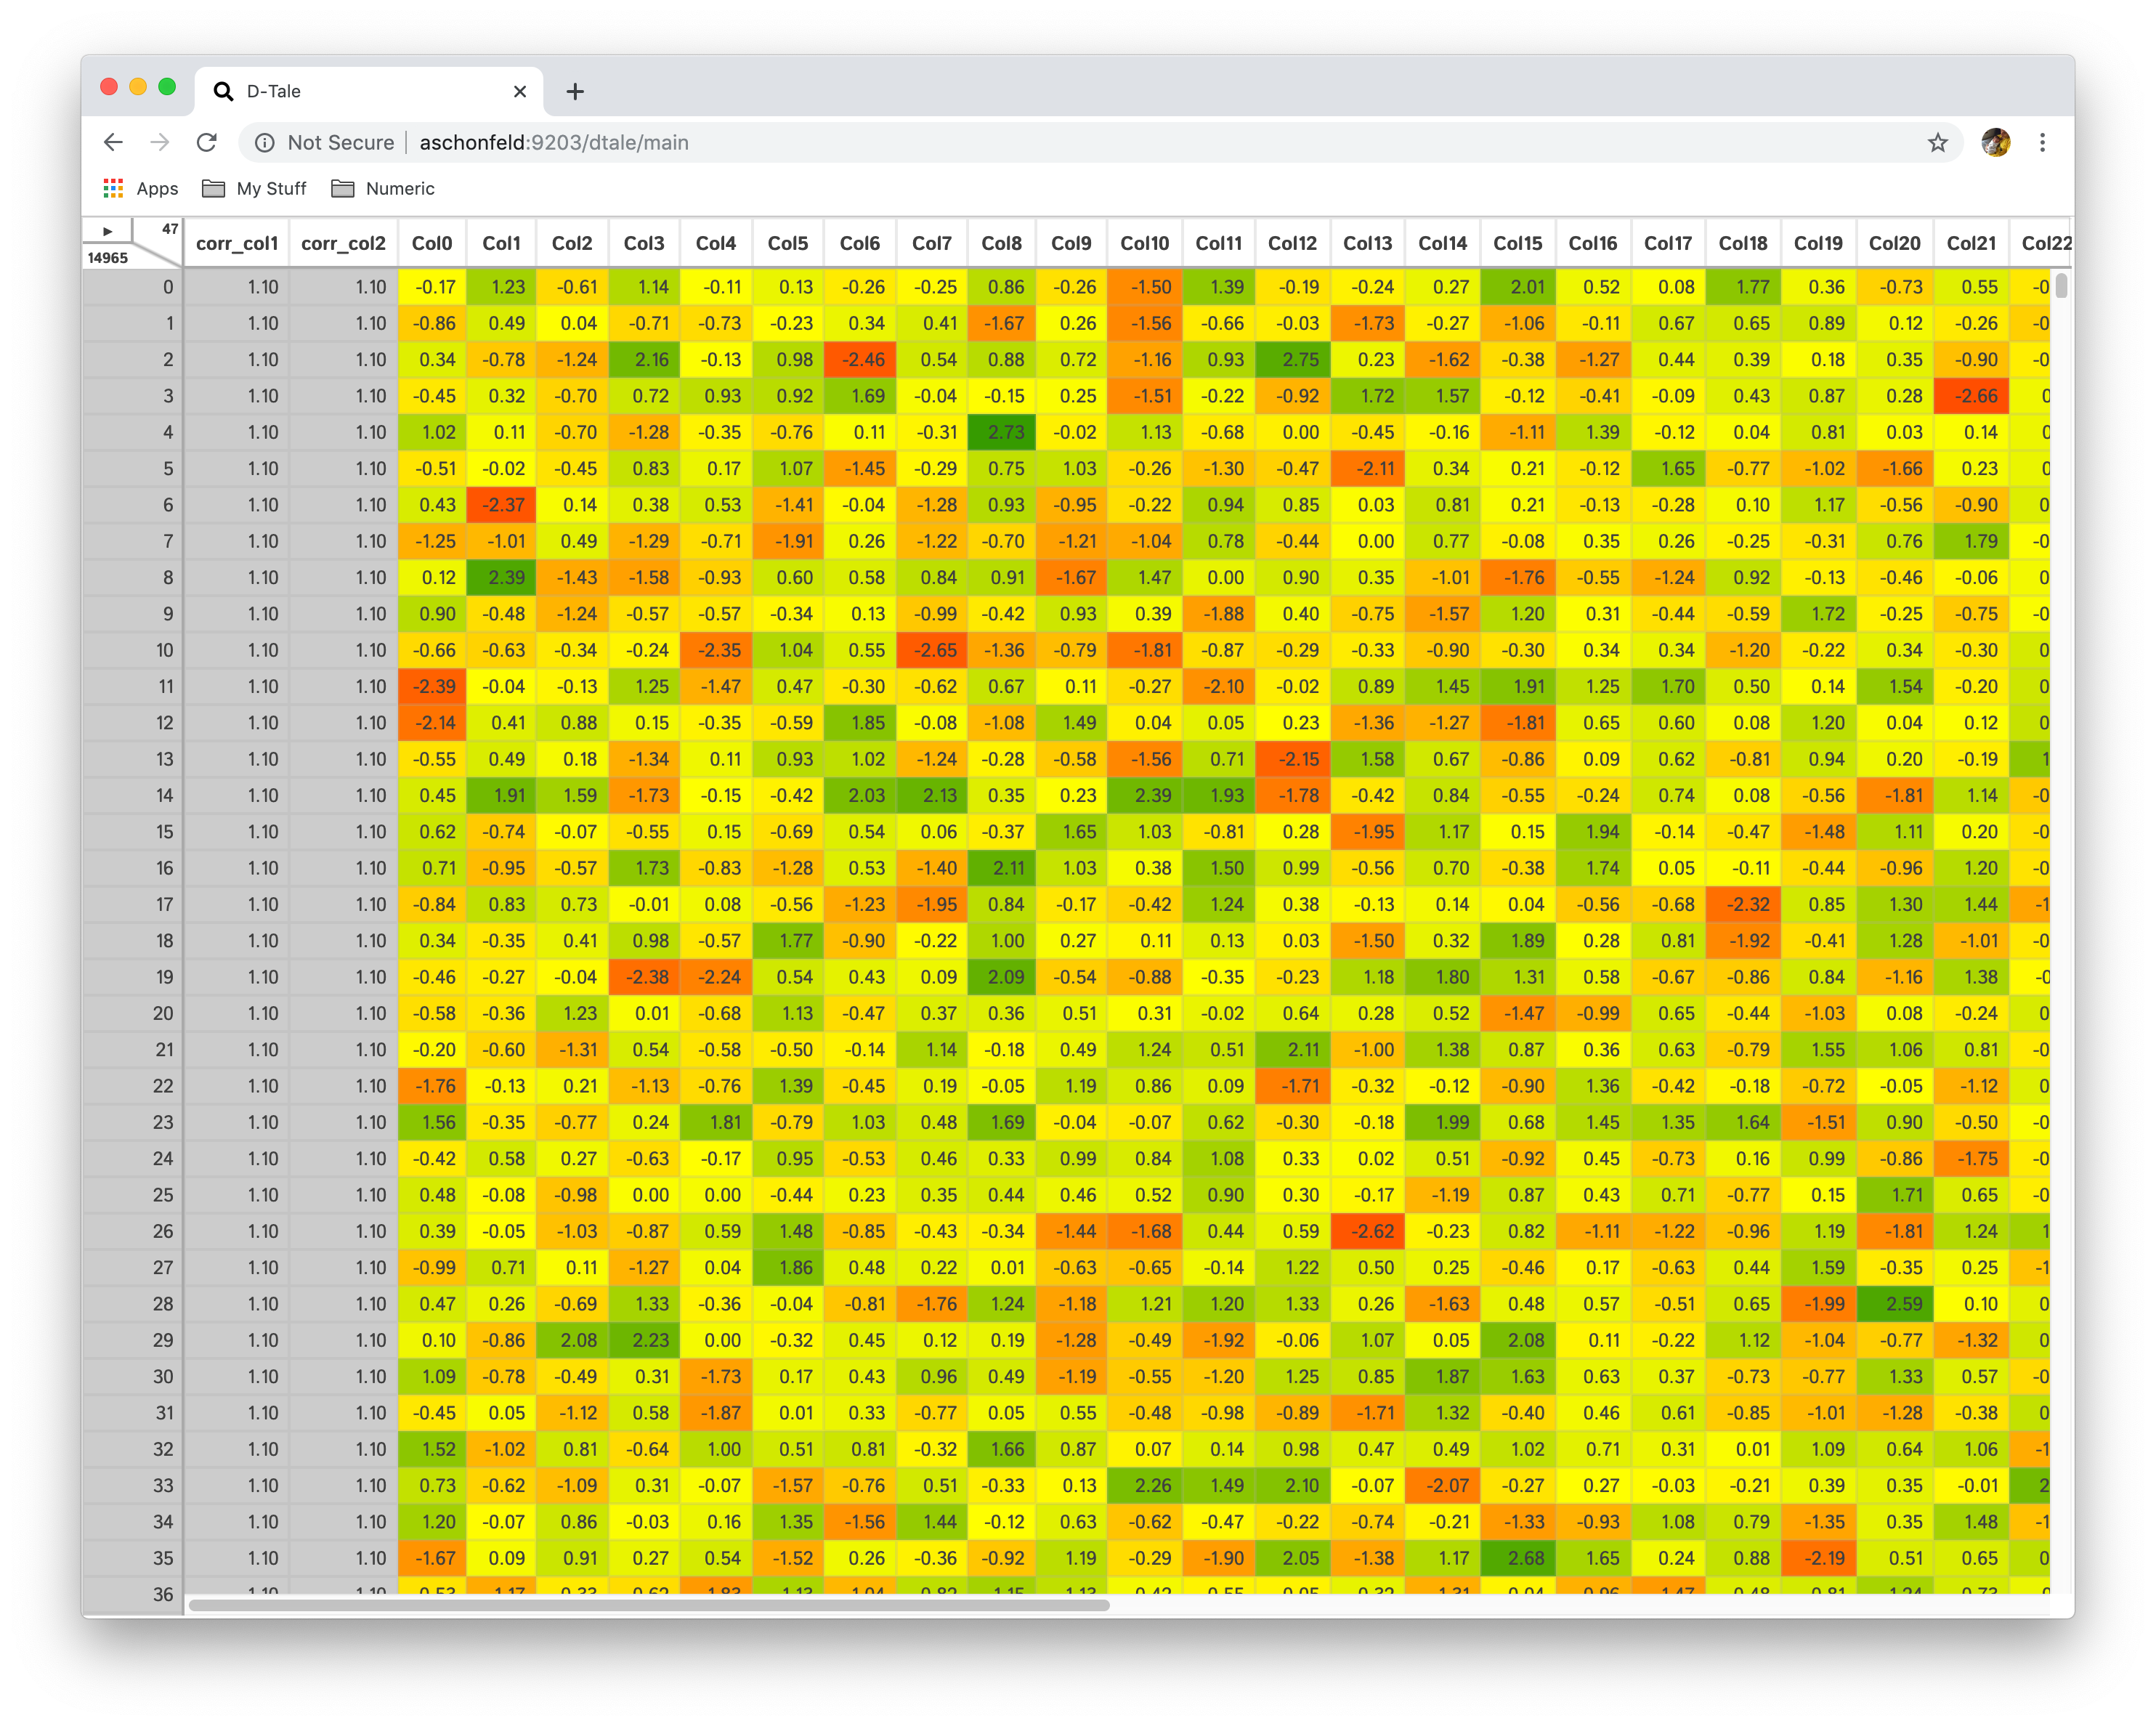
Turn off Heat Map by clicking menu option again
Code Exports
Code Exports are small snippets of code representing the current state of the grid you’re viewing including things like:
- columns built
- filtering
- sorting
Other code exports available are:
- Column Analysis
- Correlations (grid, timeseries chart & scatter chart)
- Describe
- Charts built using the Chart Builder
| Type | Code Export |
|---|---|
| Main Grid | 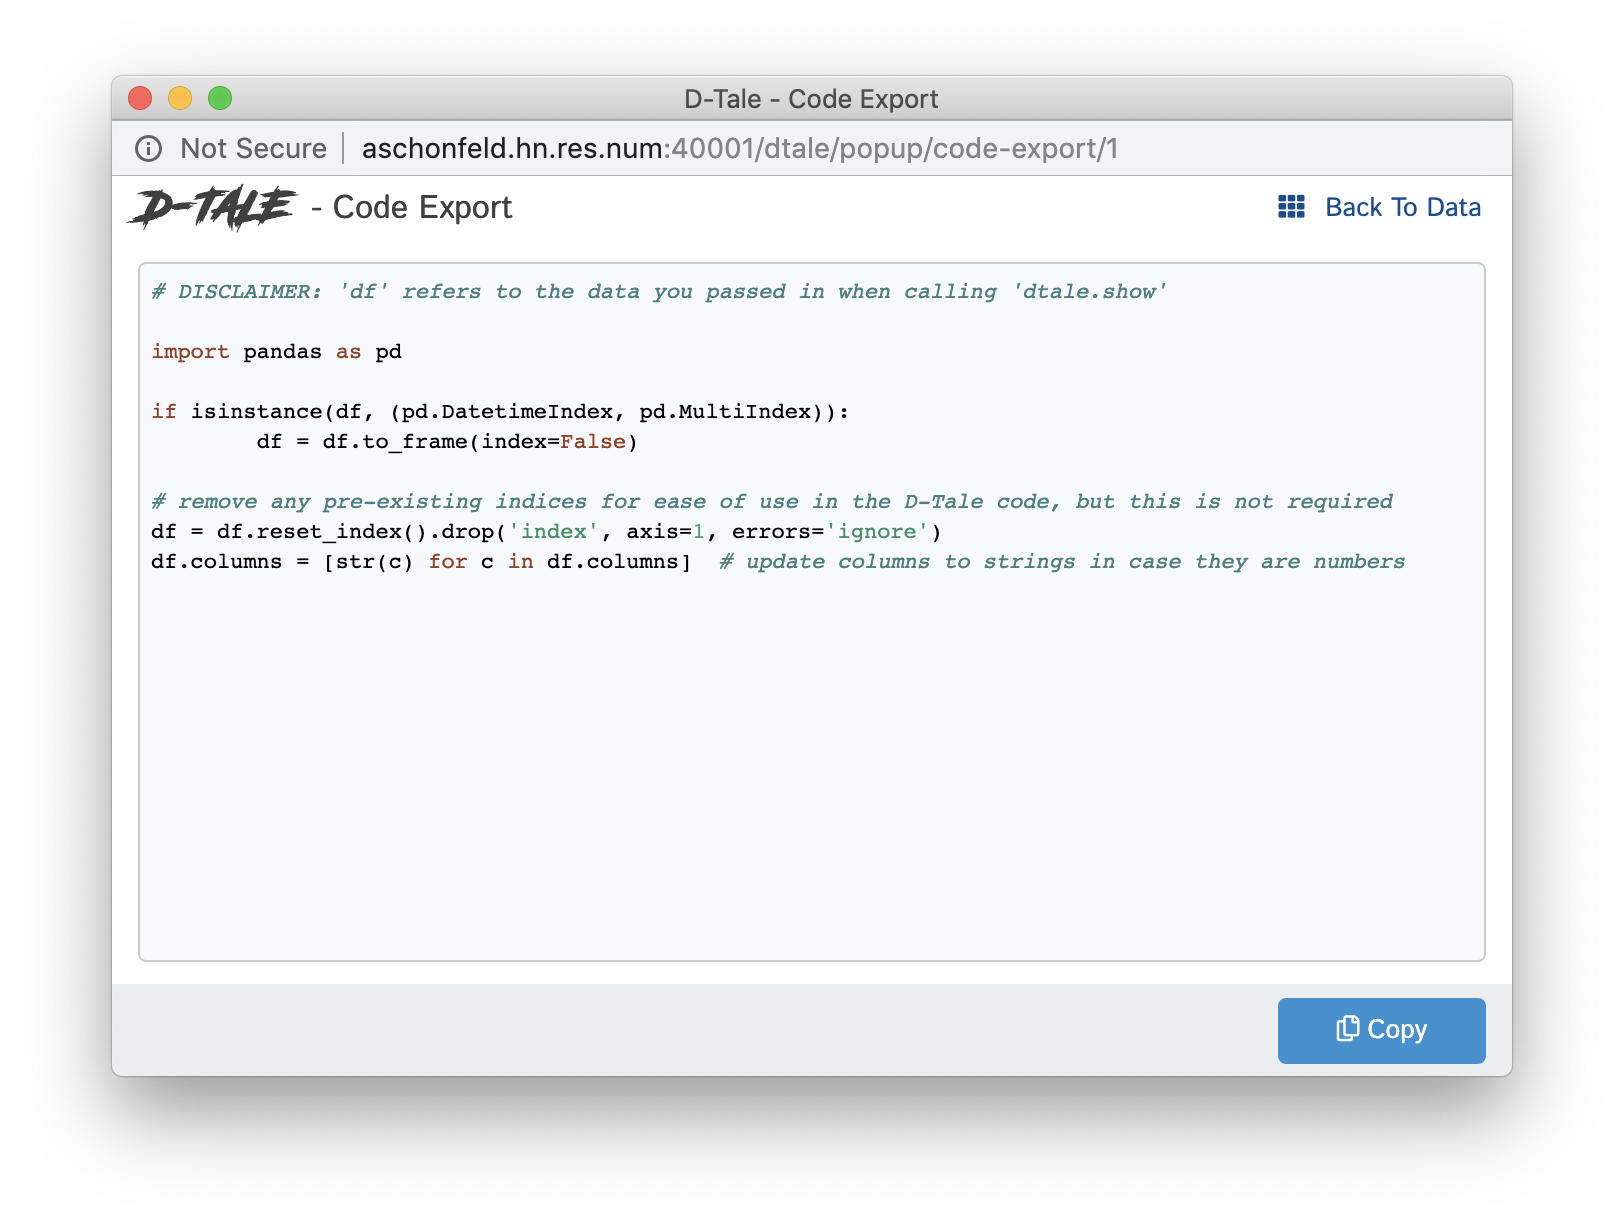 |
| Histogram | 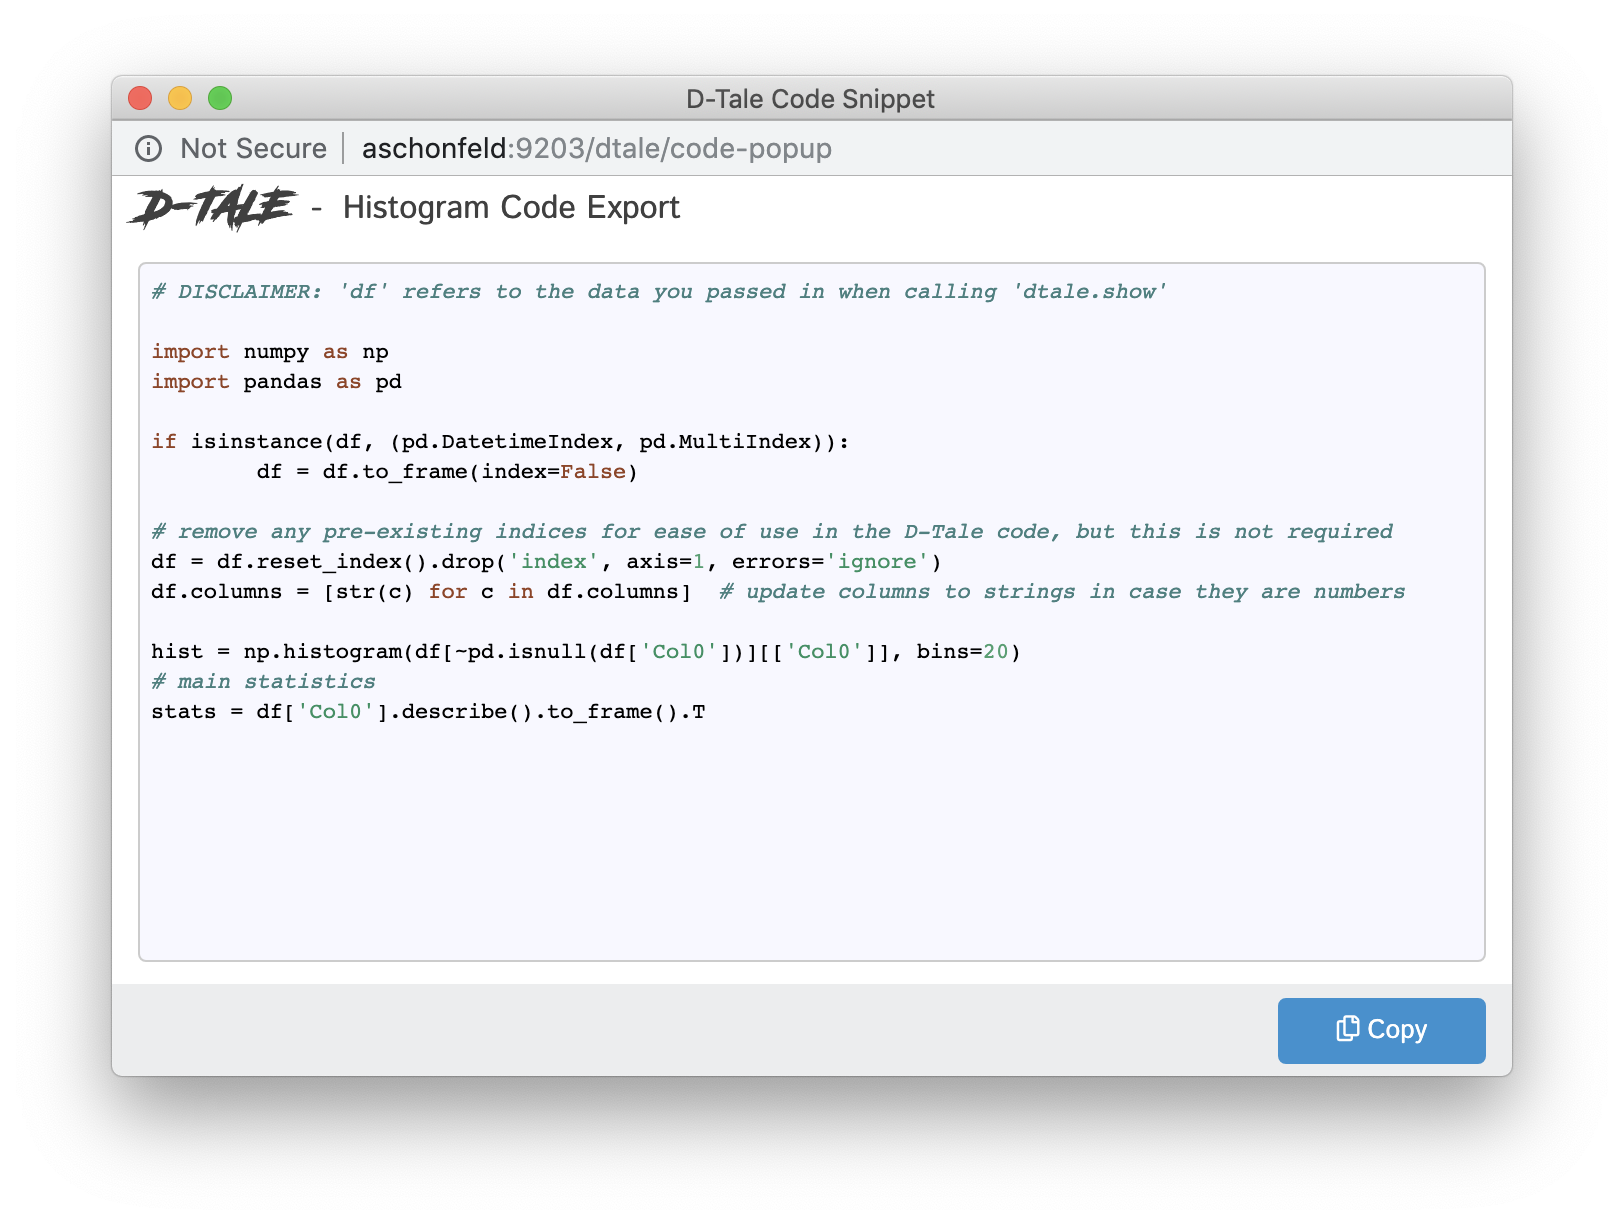 |
| Describe | 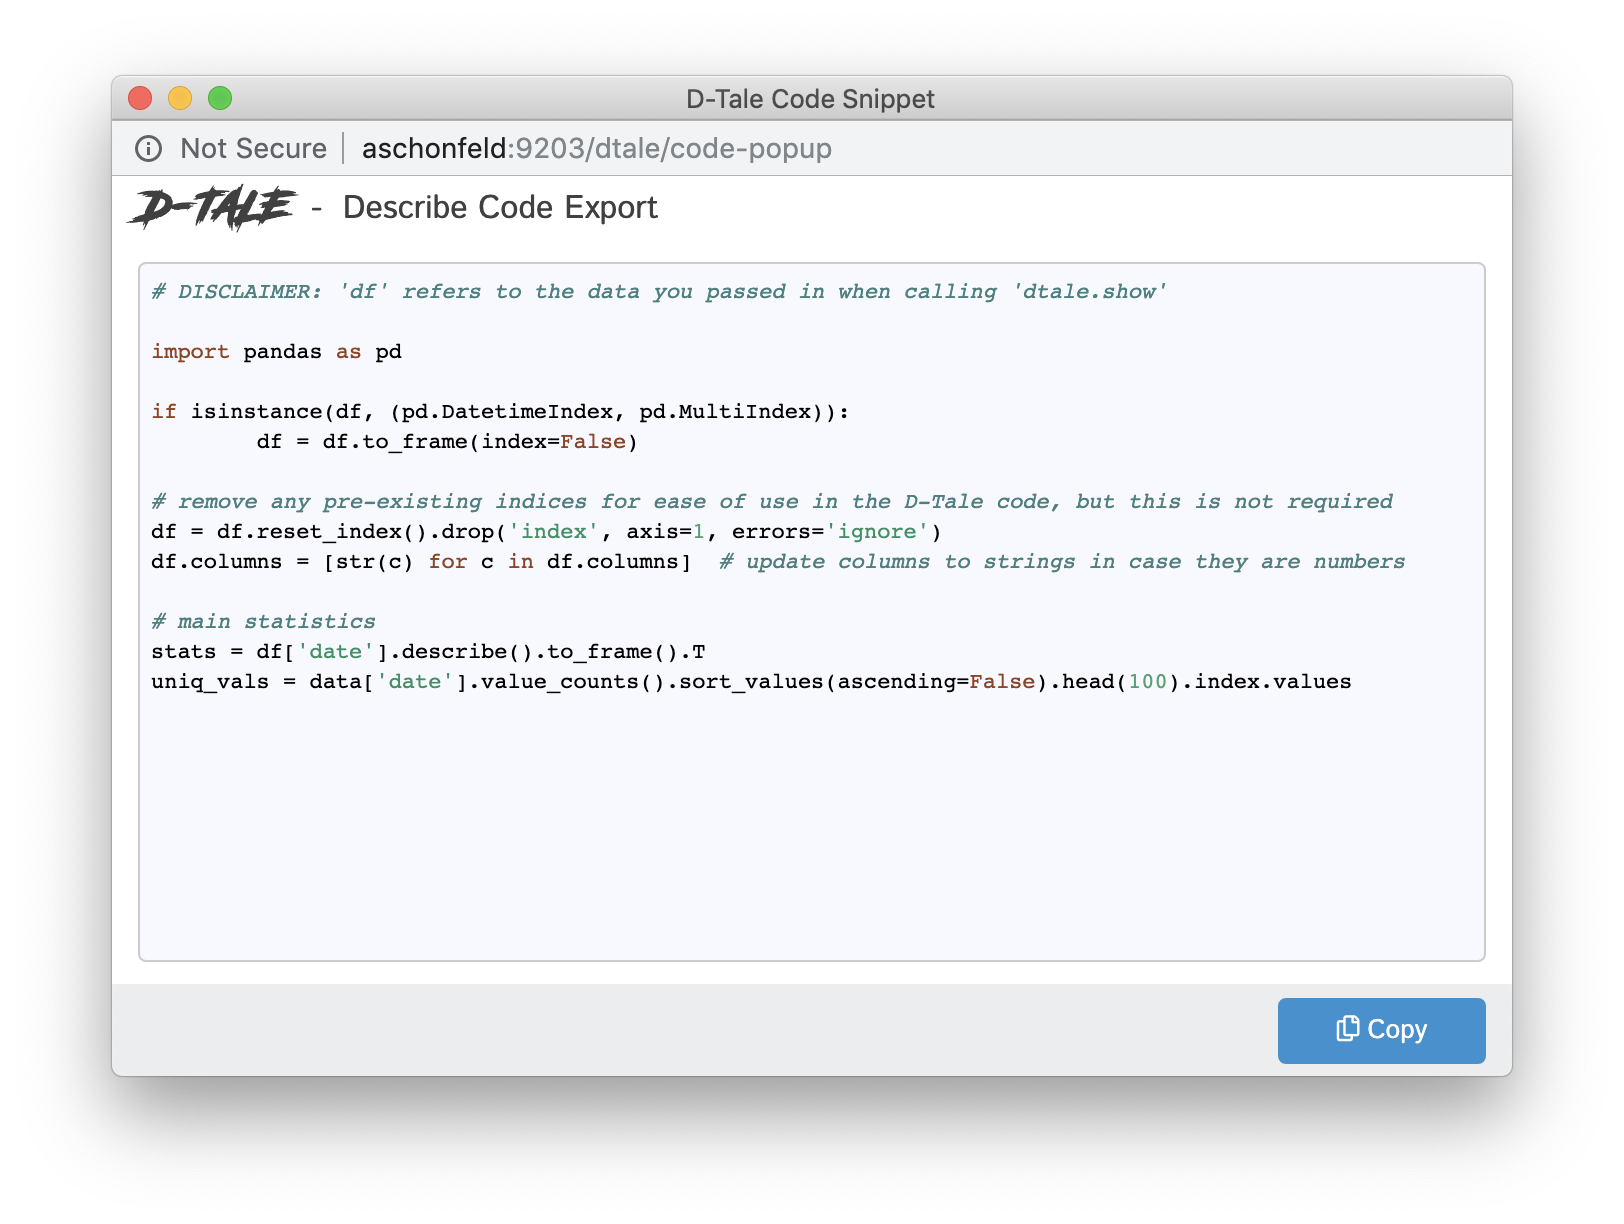 |
| Correlation Grid | |
| Correlation Timeseries |  |
| Correlation Scatter | 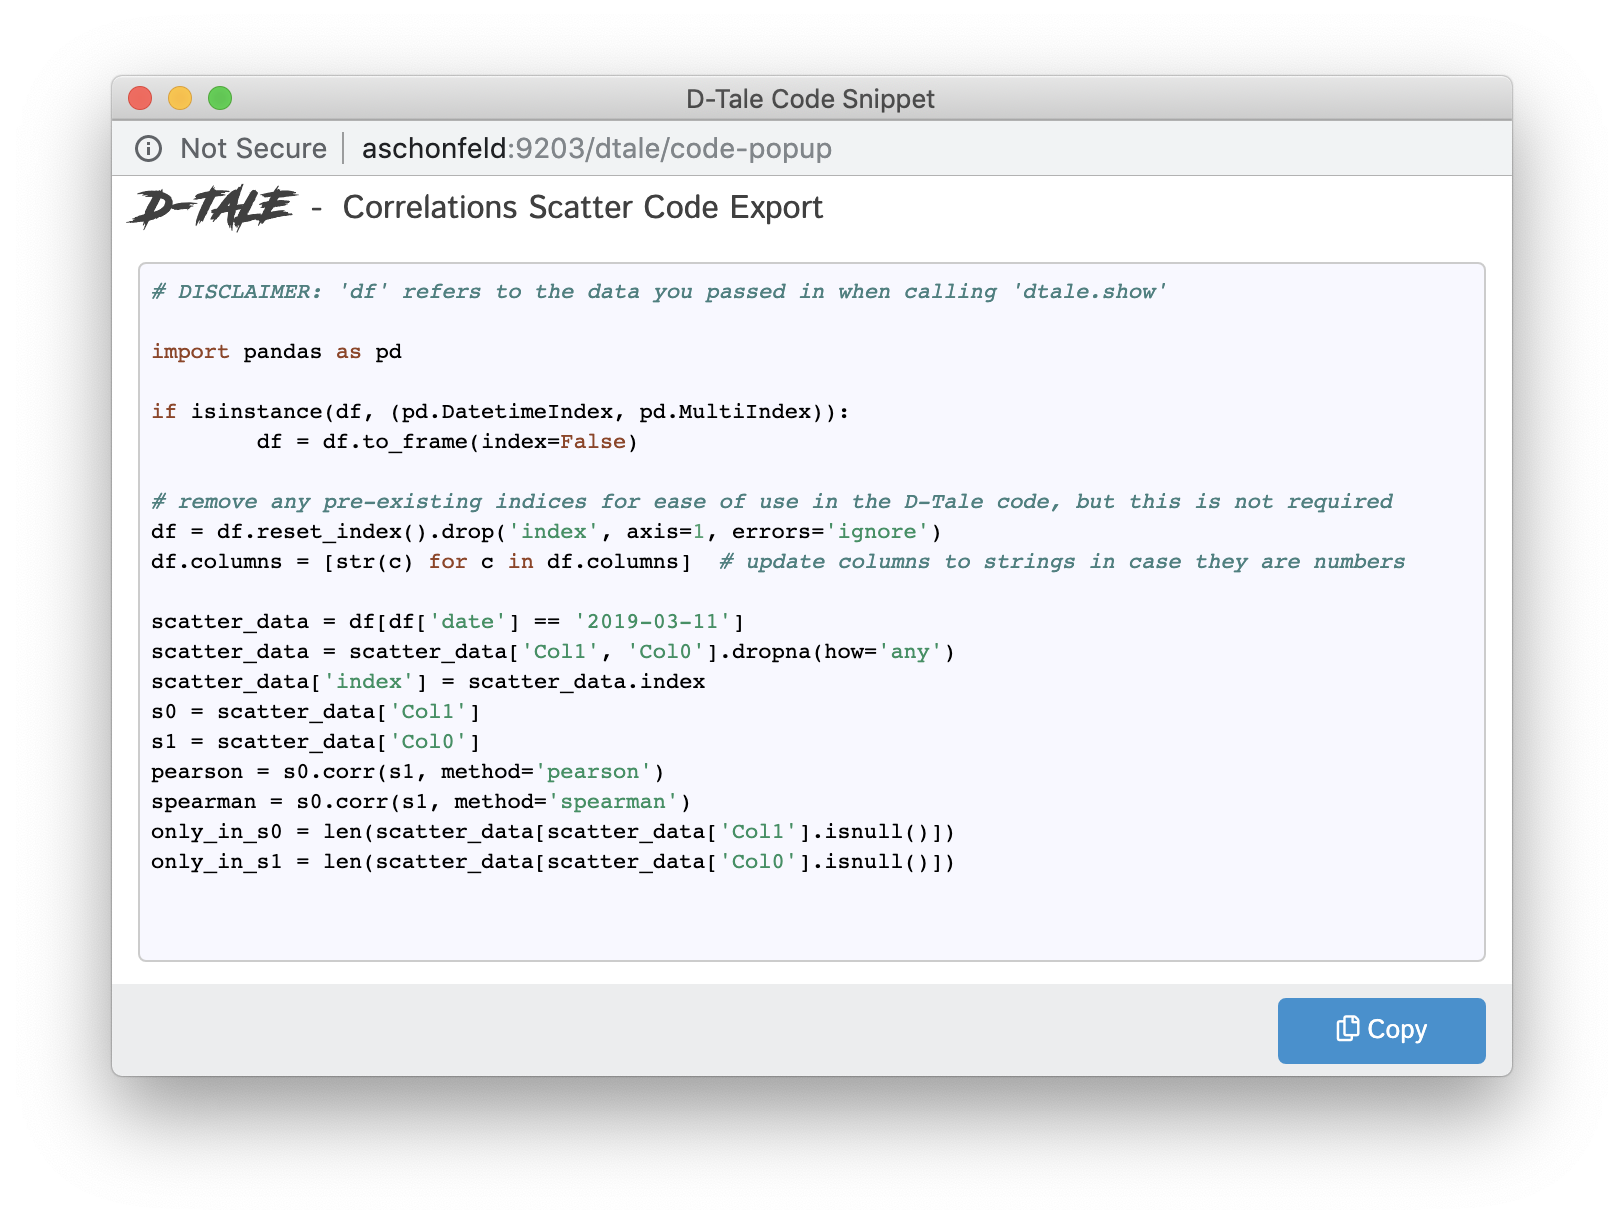 |
| Charts |  |
Instances
This will give you information about other D-Tale instances are running under your current Python process.
For example, if you ran the following script:
import pandas as pd
import dtale

dtale.show(pd.DataFrame([dict(foo=1, bar=2, biz=3, baz=4, snoopy_D_O_double_gizzle=5)]))
dtale.show(pd.DataFrame([
    dict(a=1, b=2, c=3, d=4),
    dict(a=2, b=3, c=4, d=5),
    dict(a=3, b=4, c=5, d=6),
    dict(a=4, b=5, c=6, d=7)
]))
dtale.show(pd.DataFrame([range(6), range(6), range(6), range(6), range(6), range(6)]), name="foo")
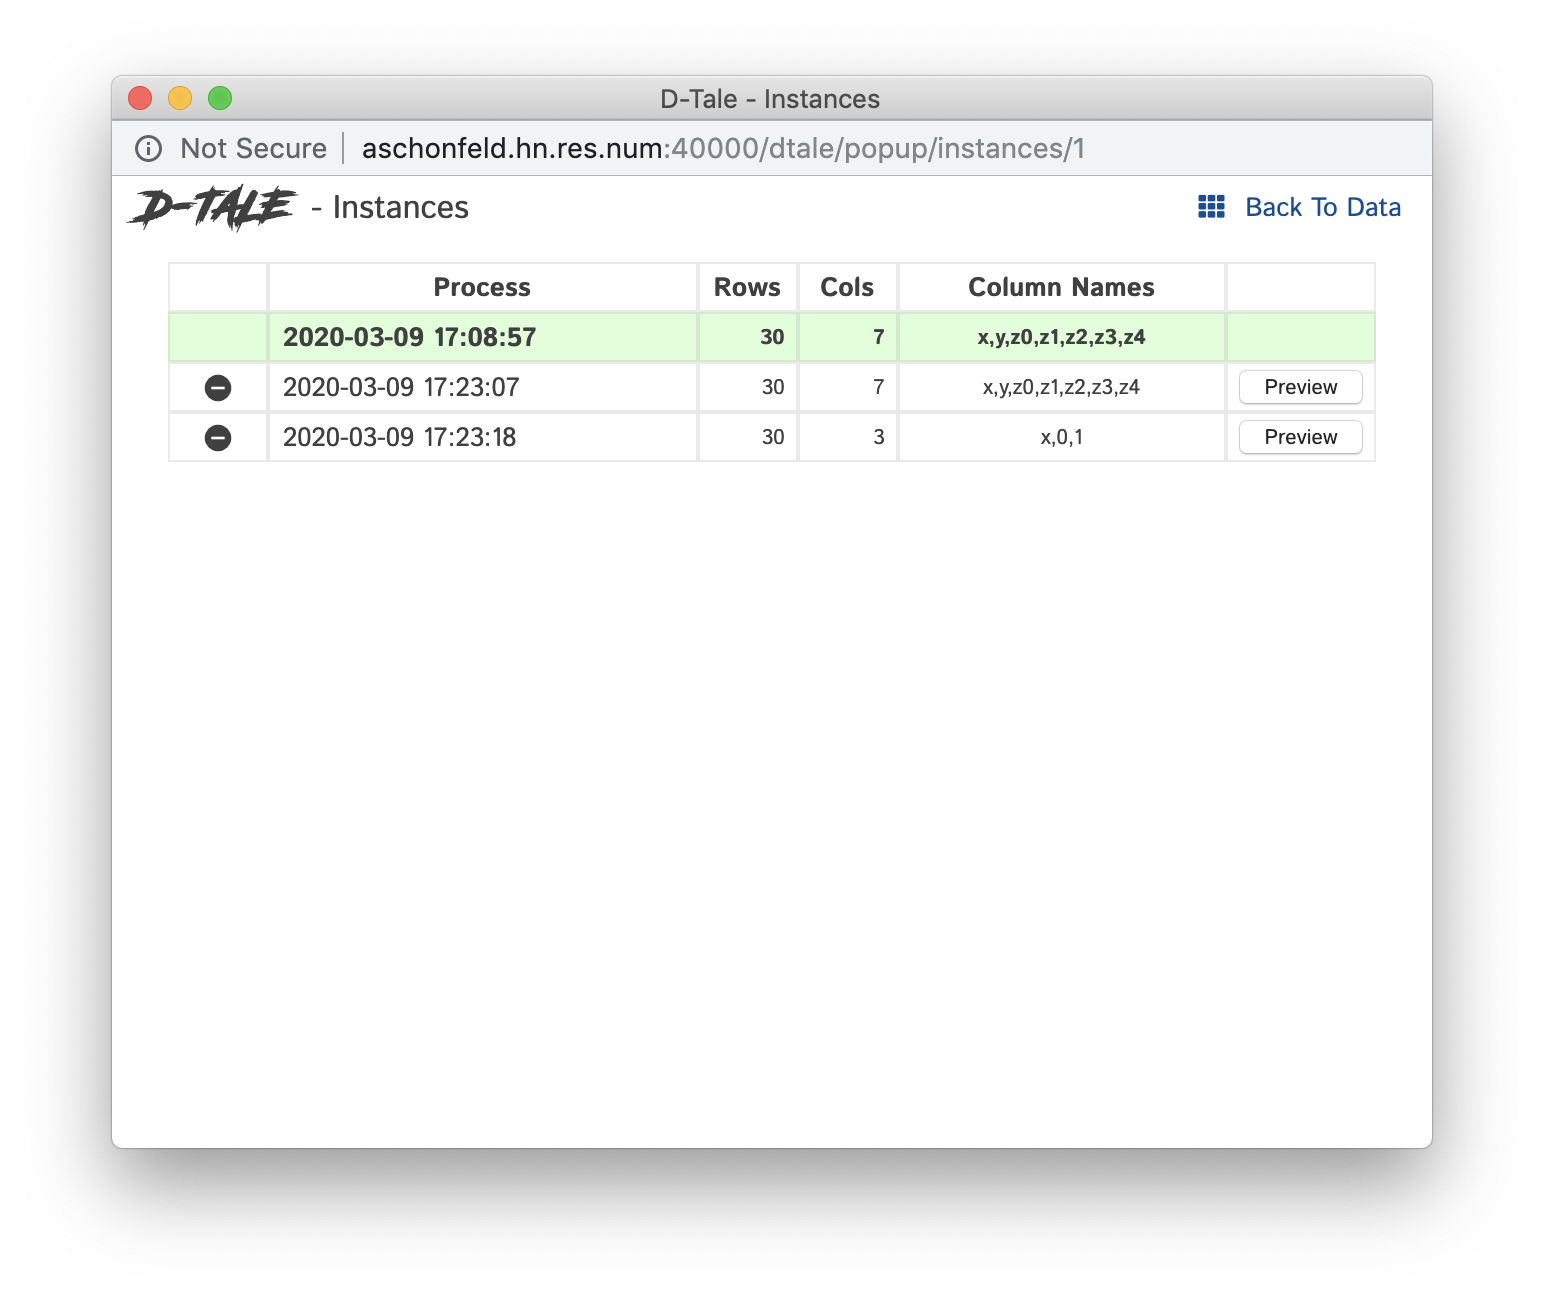
This will make the Instances button available in all 3 of these D-Tale instances. Clicking that button while in the first instance invoked above will give you this popup:
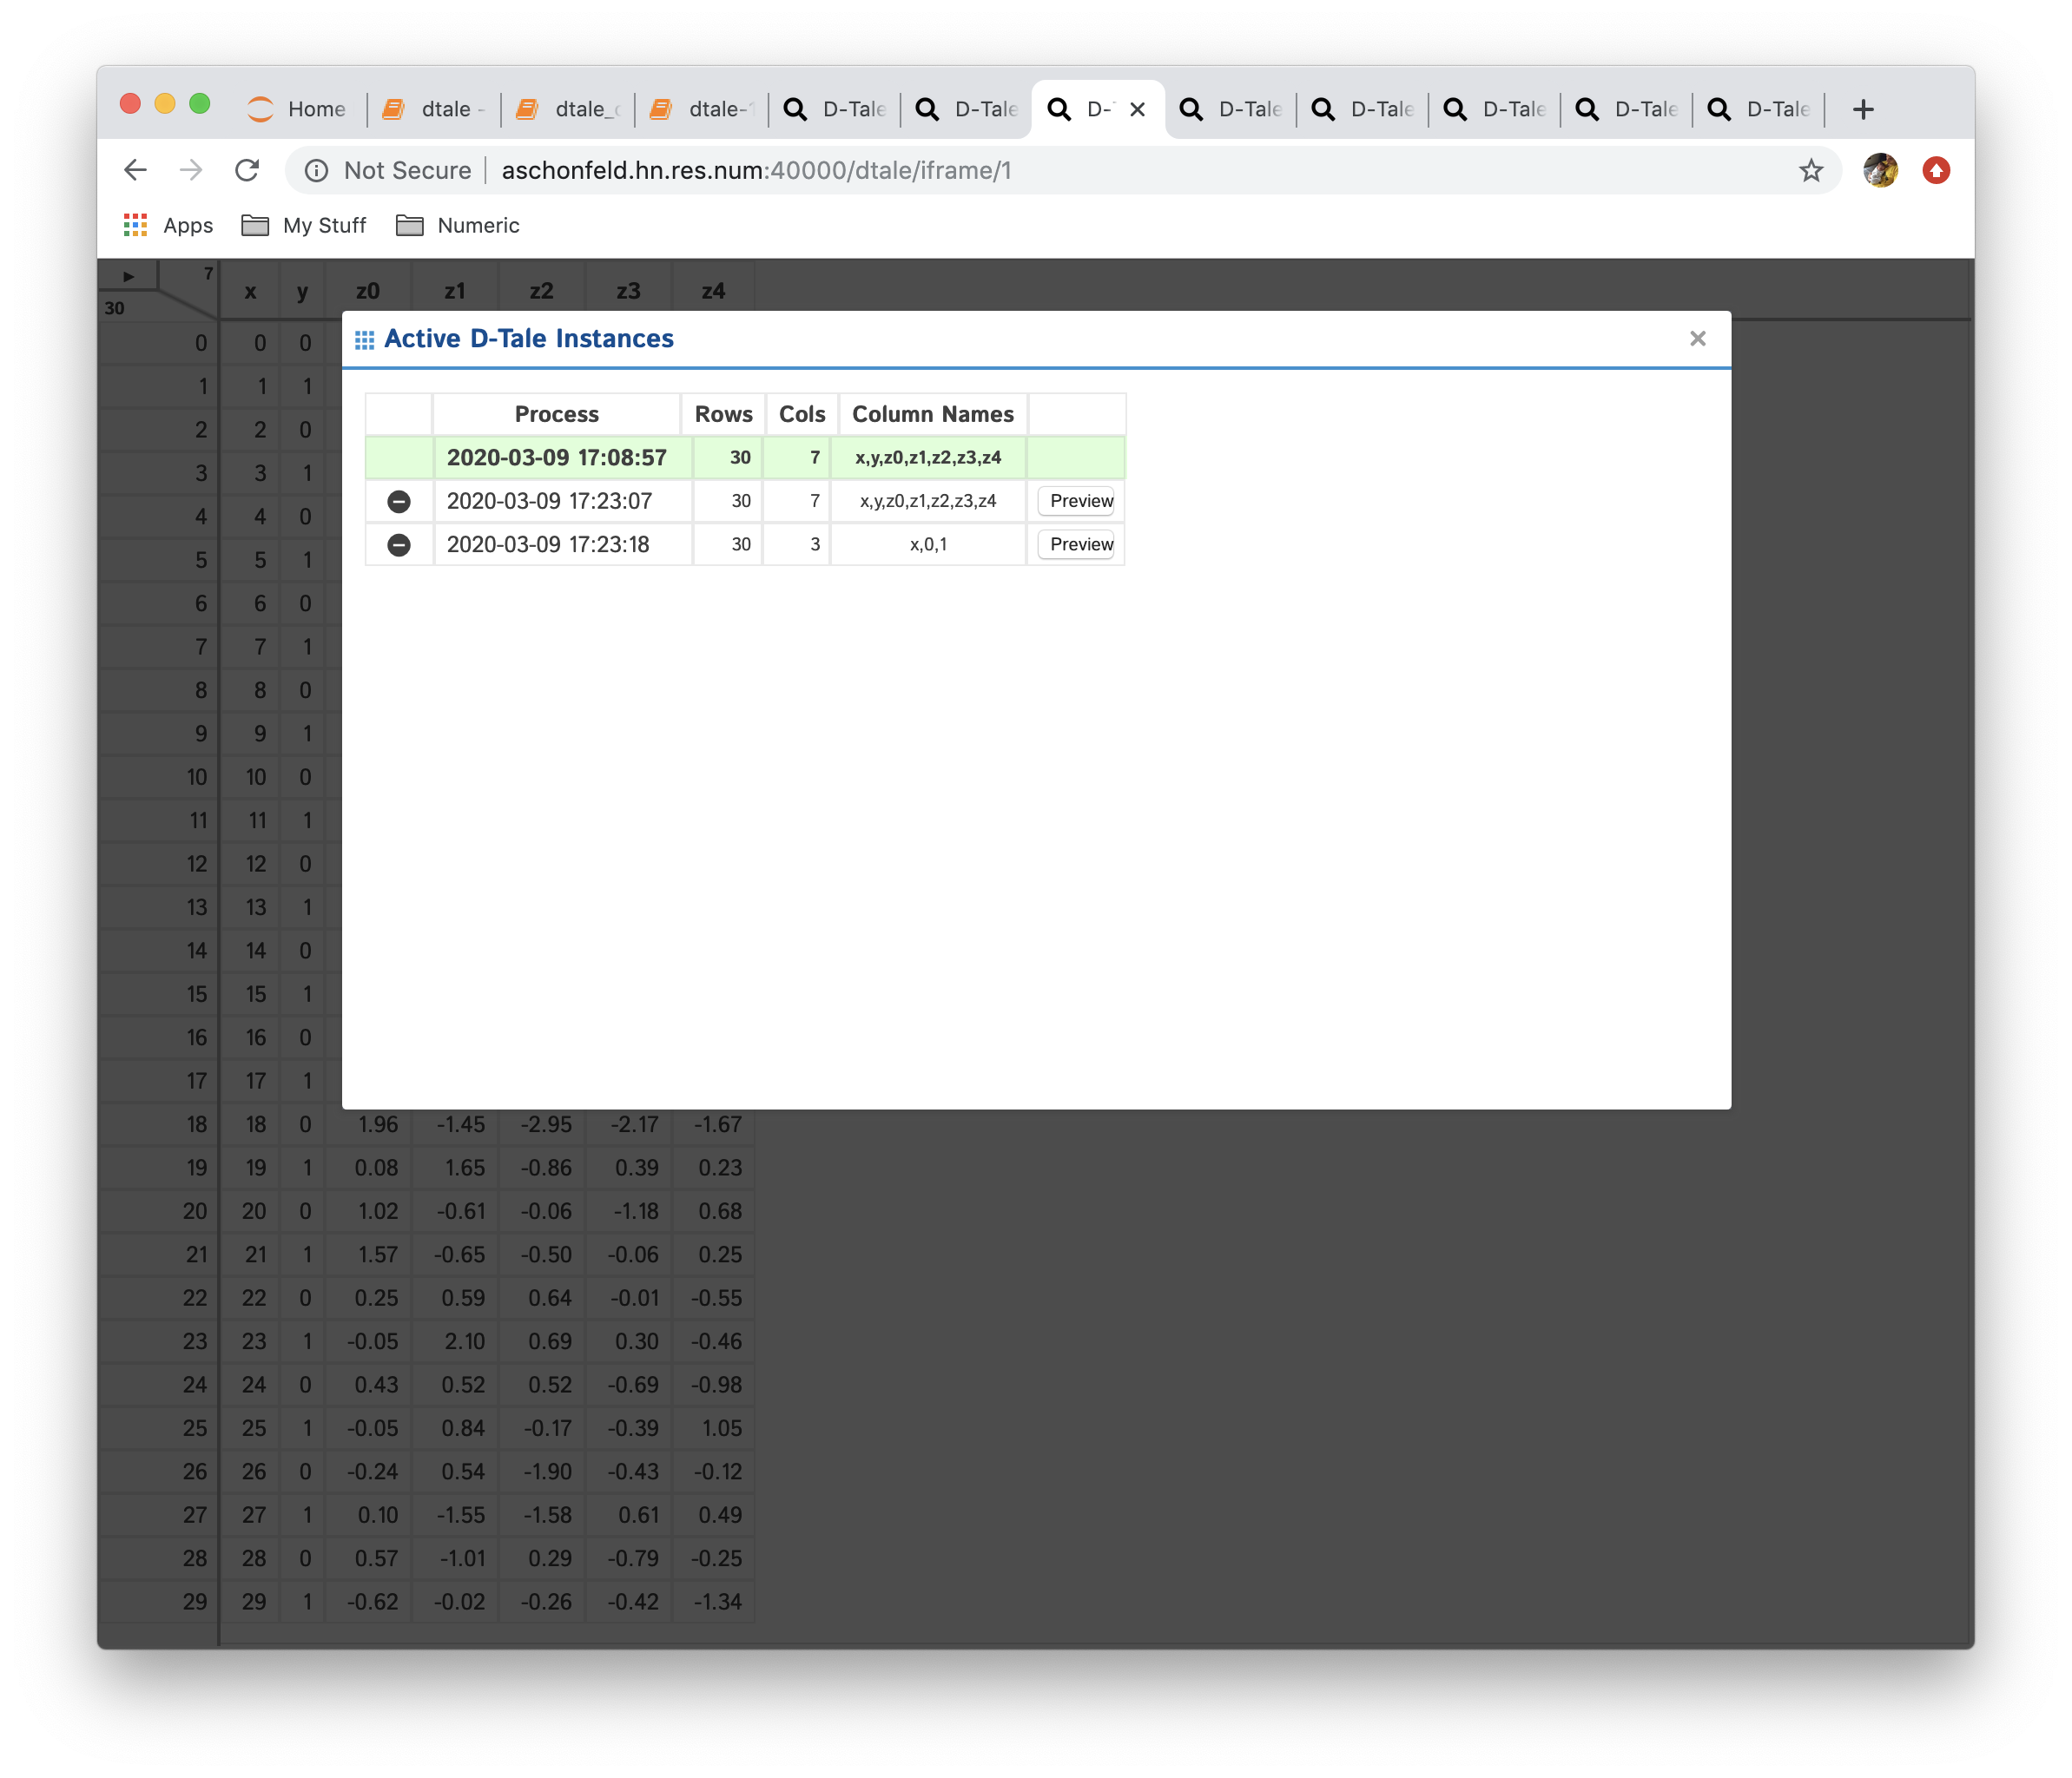
The grid above contains the following information:
- Process: timestamp when the process was started along with the name (if specified in
dtale.show()) - Rows: number of rows
- Columns: number of columns
- Column Names: comma-separated string of column names (only first 30 characters, hover for full listing)
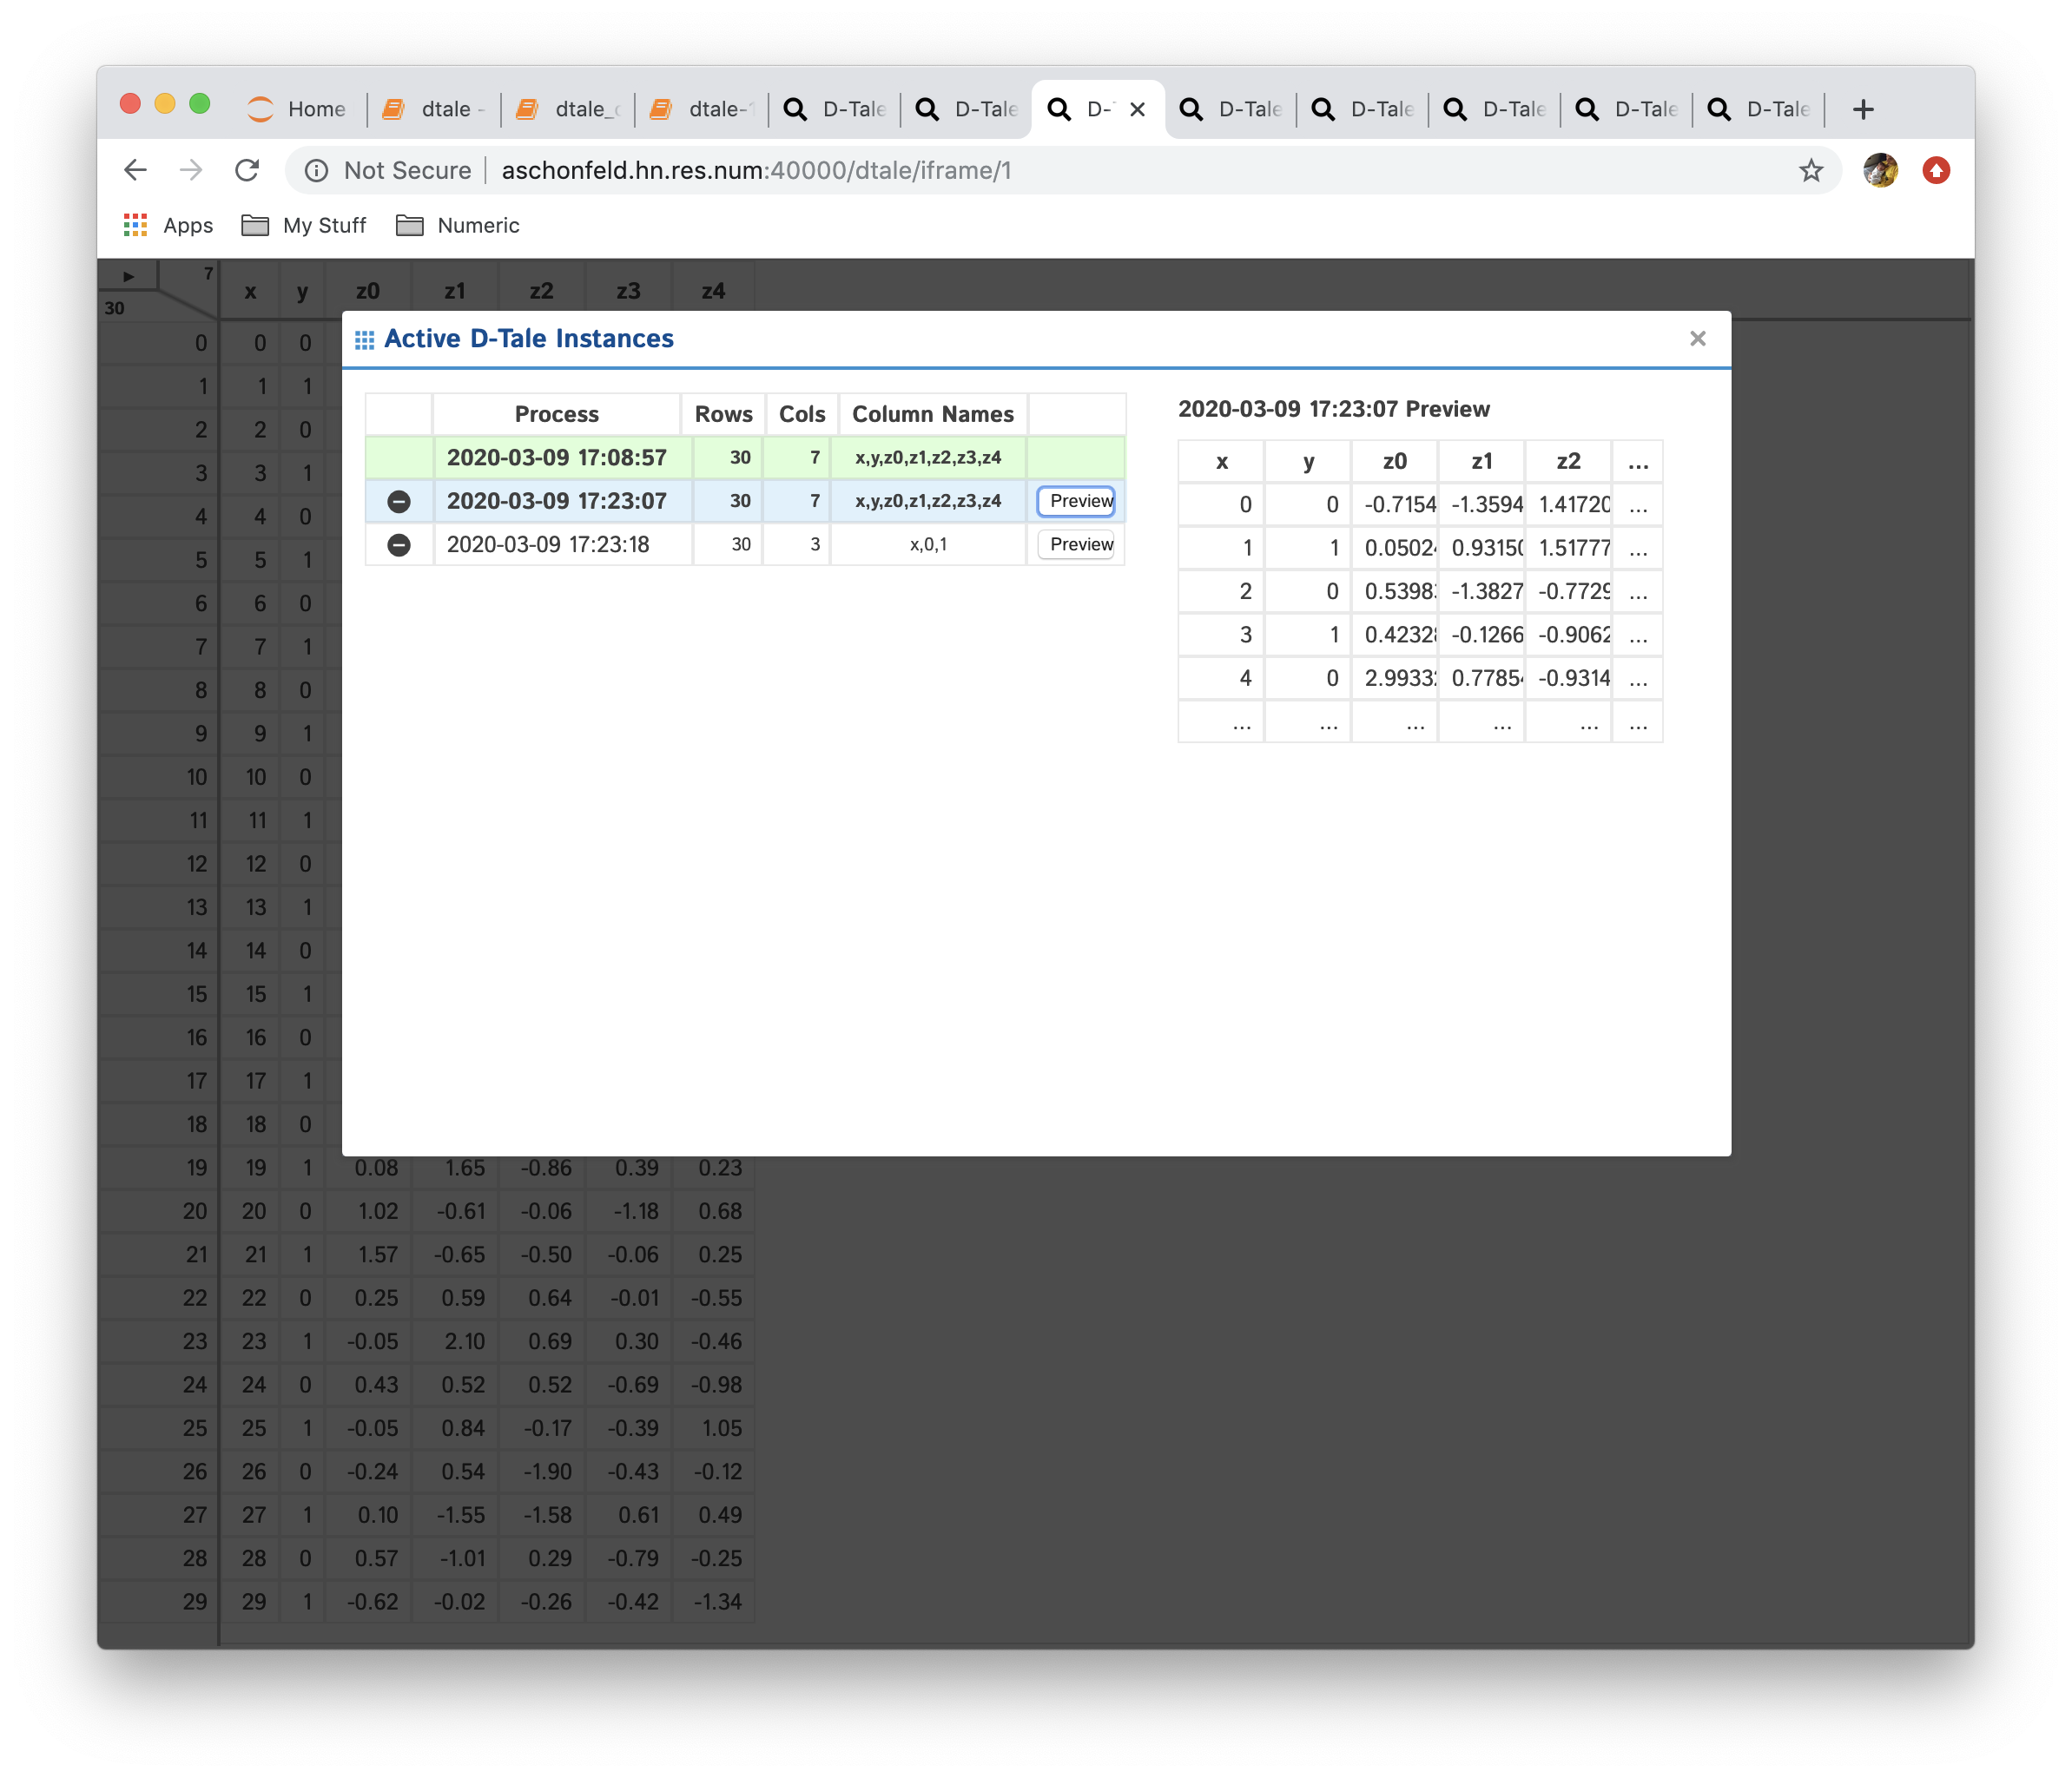
- Preview: this button is available any of the non-current instances. Clicking this will bring up left-most 5X5 grid information for that instance
- The row highlighted in green signifys the current D-Tale instance
- Any other row can be clicked to switch to that D-Tale instance
Here is an example of clicking the “Preview” button:
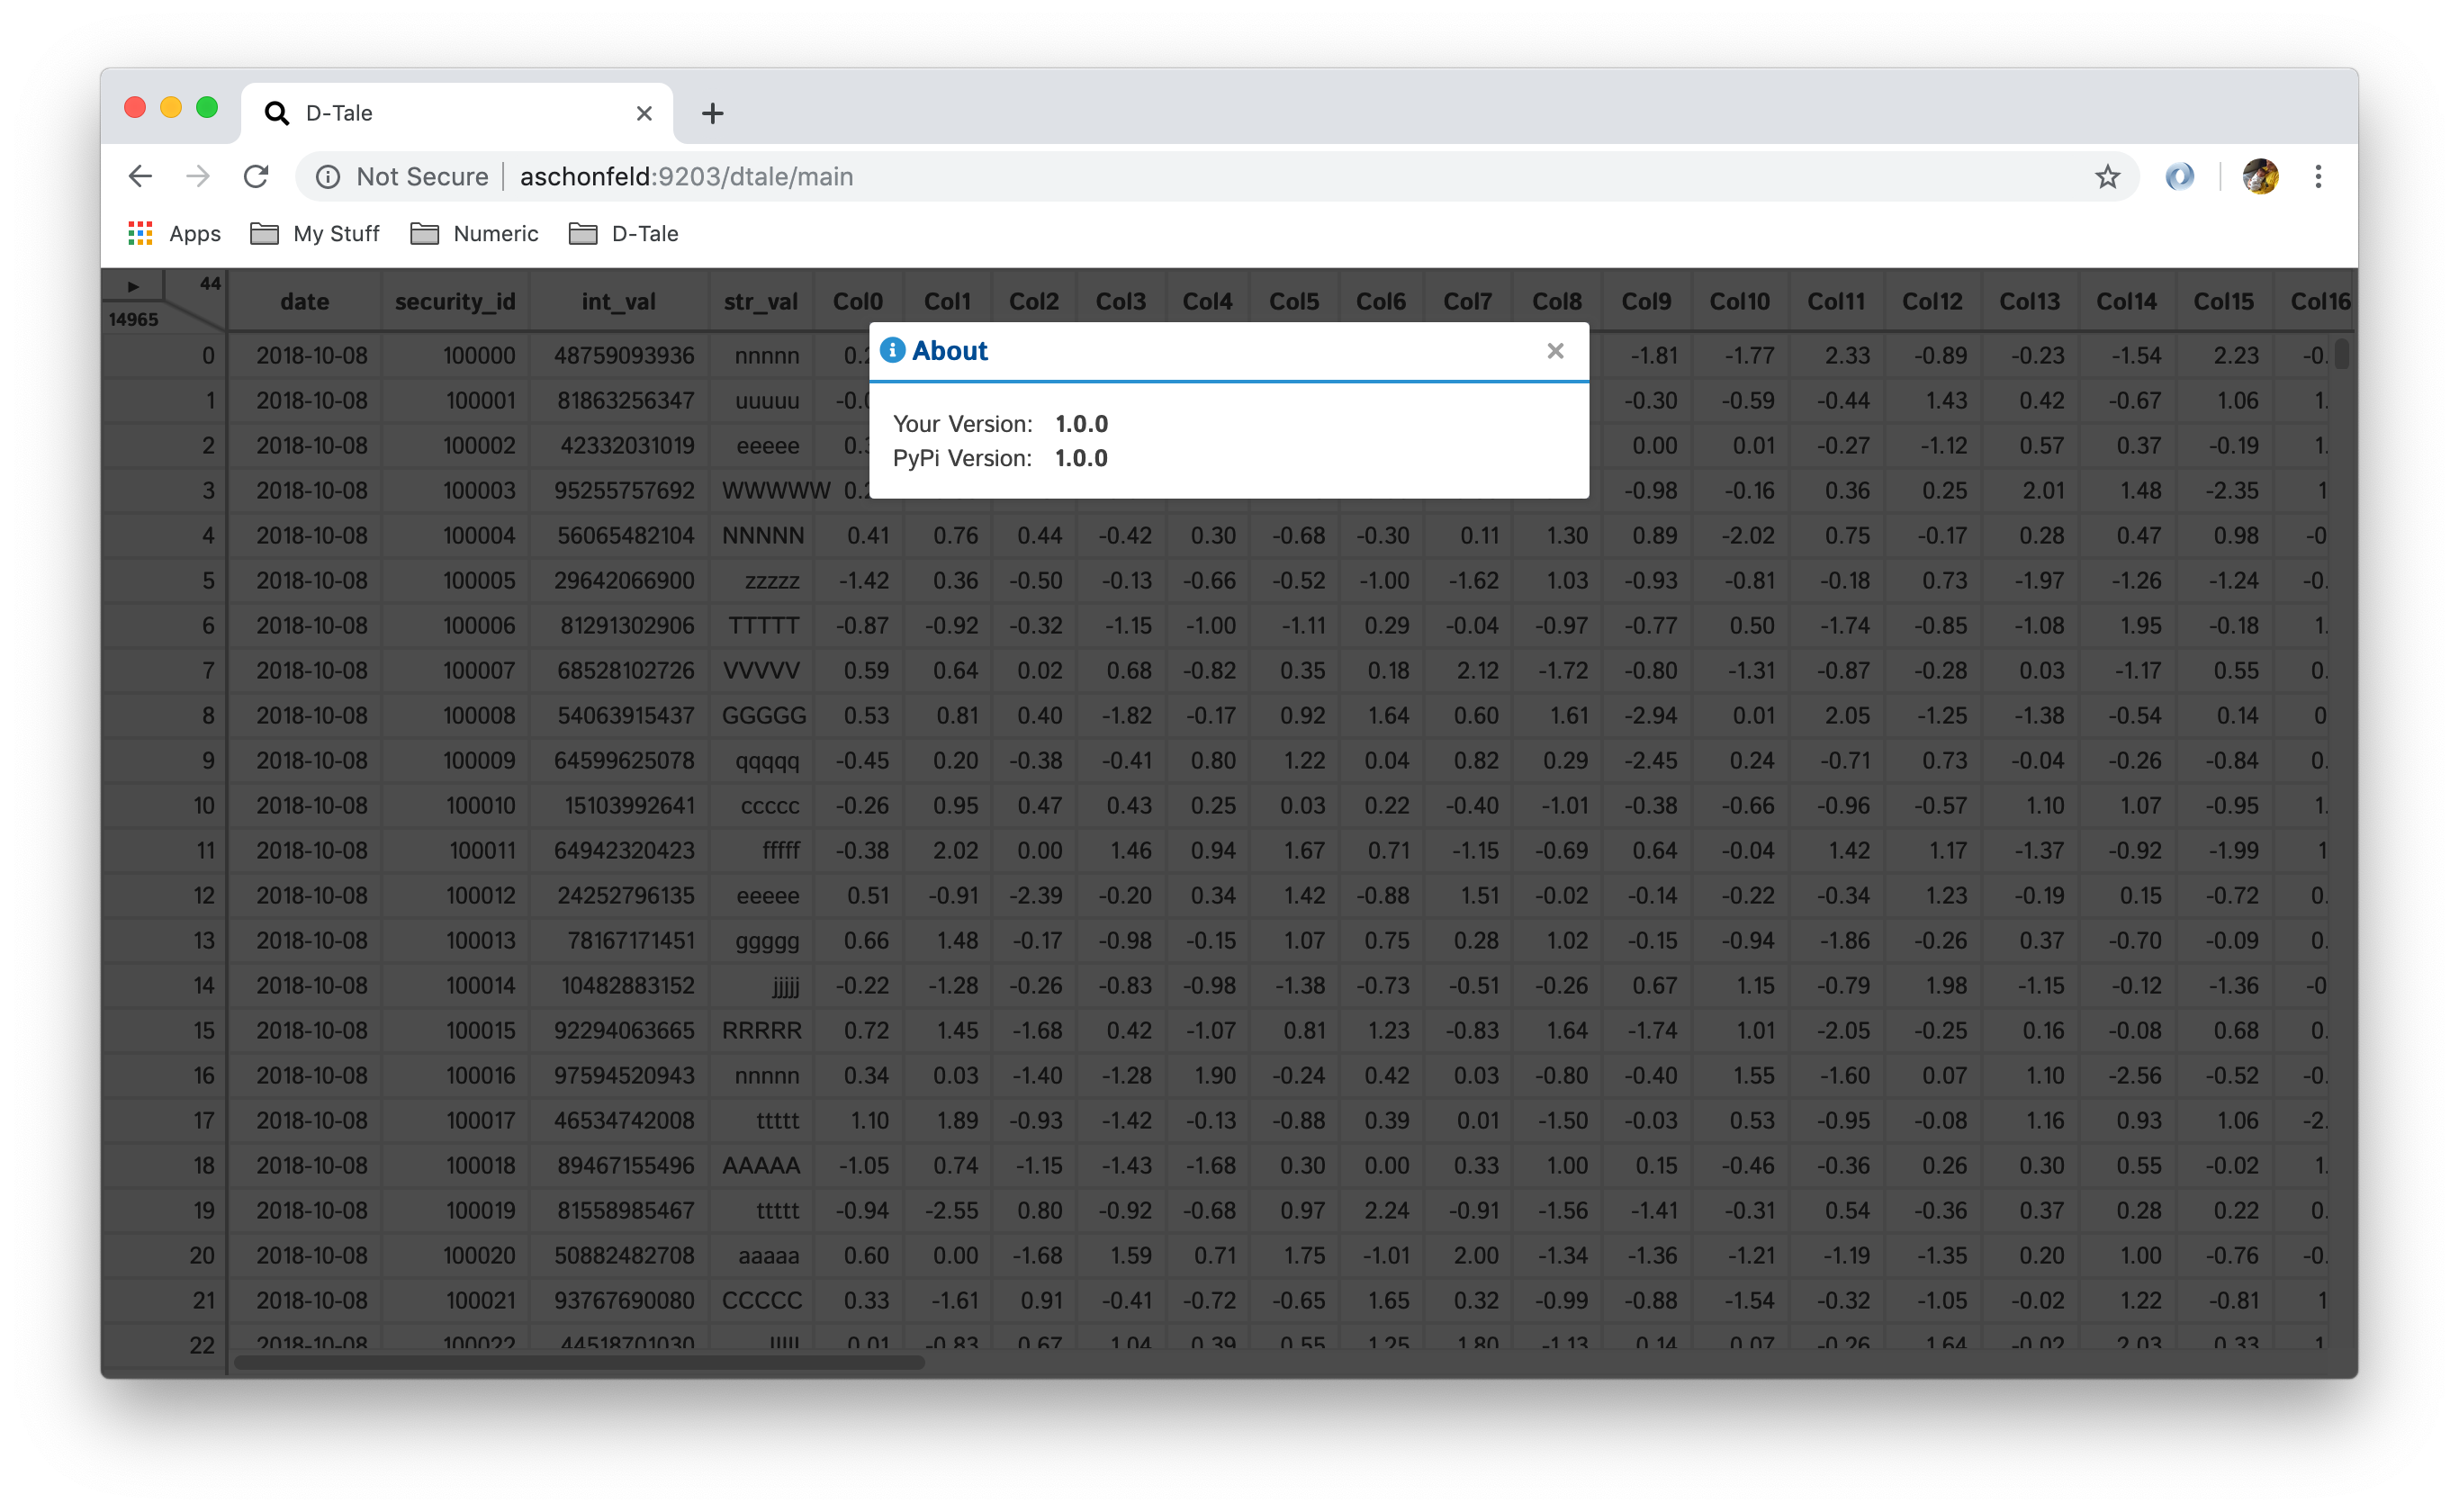
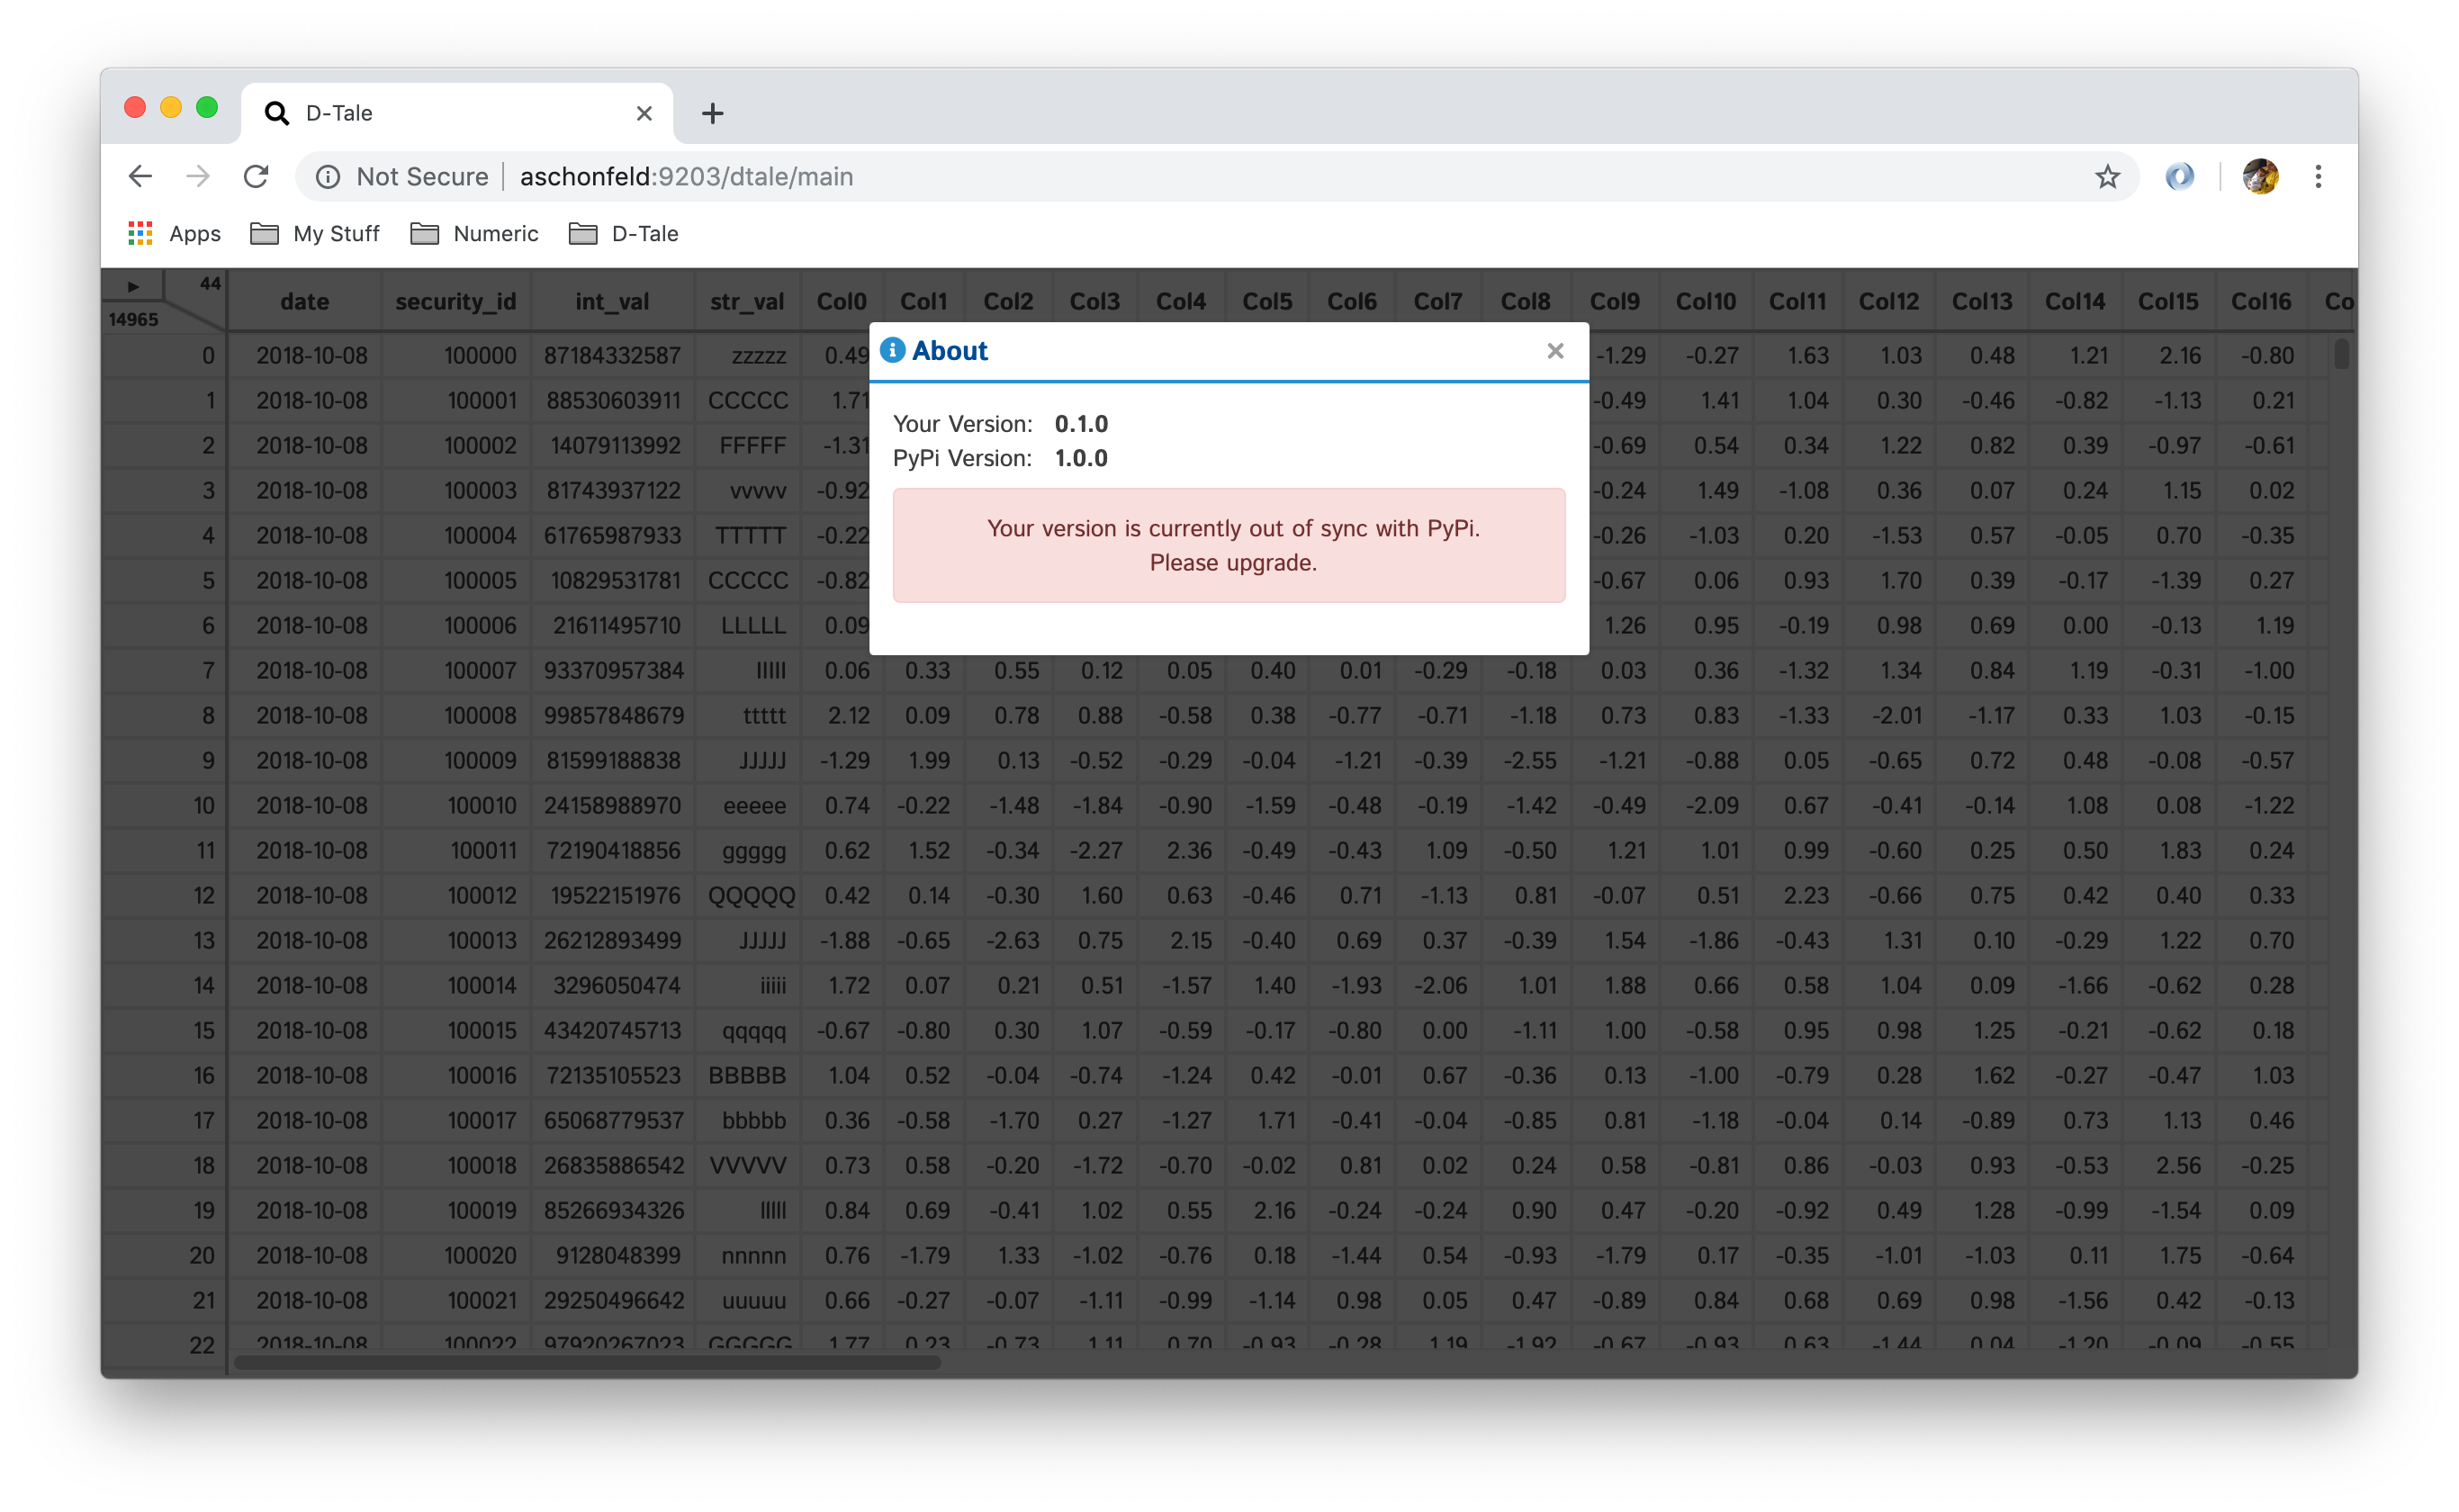
About
This will give you information about what version of D-Tale you’re running as well as if its out of date to whats on PyPi.
| Up To Date | Out Of Date |
|---|---|
 |
 |
Resize
Mostly a fail-safe in the event that your columns are no longer lining up. Click this and should fix that
Shutdown
Pretty self-explanatory, kills your D-Tale session (there is also an auto-kill process that will kill your D-Tale after an hour of inactivity)
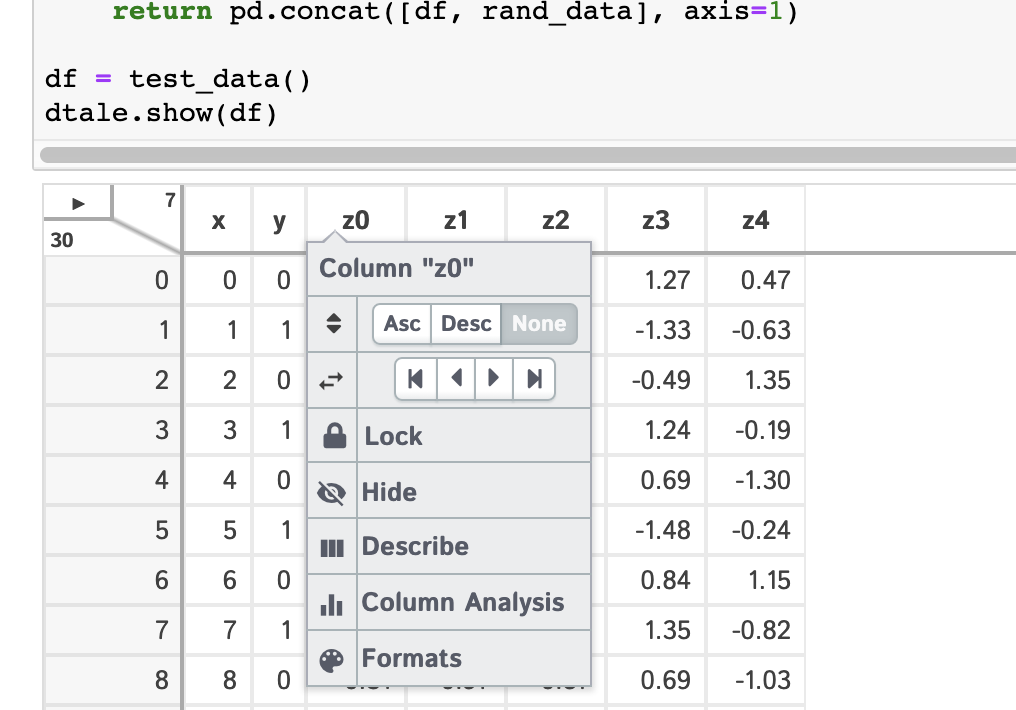
Column Menu Functions
Moving Columns
All column movements are saved on the server so refreshing your browser won’t lose them :ok_hand:
Hiding Columns
All column movements are saved on the server so refreshing your browser won’t lose them :ok_hand:
Lock
Adds your column to “locked” columns
- “locked” means that if you scroll horizontally these columns will stay pinned to the right-hand side
- this is handy when you want to keep track of which date or security_id you’re looking at
- by default, any index columns on the data passed to D-Tale will be locked
Unlock
Removed column from “locked” columns
Sorting
Applies/removes sorting (Ascending/Descending/Clear) to the column selected
Important: as you add sorts they sort added will be added to the end of the multi-sort. For example:
| Action | Sort |
|---|---|
| click “a” | |
| sort asc | a (asc) |
| click “b” | a (asc) |
| sort desc | a (asc), b(desc) |
| click “a” | a (asc), b(desc) |
| sort None | b(desc) |
| sort desc | b(desc), a(desc) |
| click “X” on sort display |
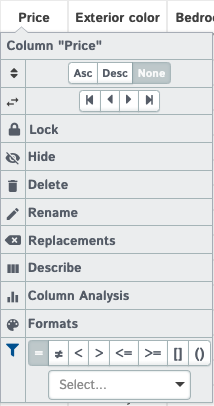
Formats
Apply simple formats to numeric values in your grid
| Type | Editing | Result |
|---|---|---|
| Numeric |  |
 |
| Date | 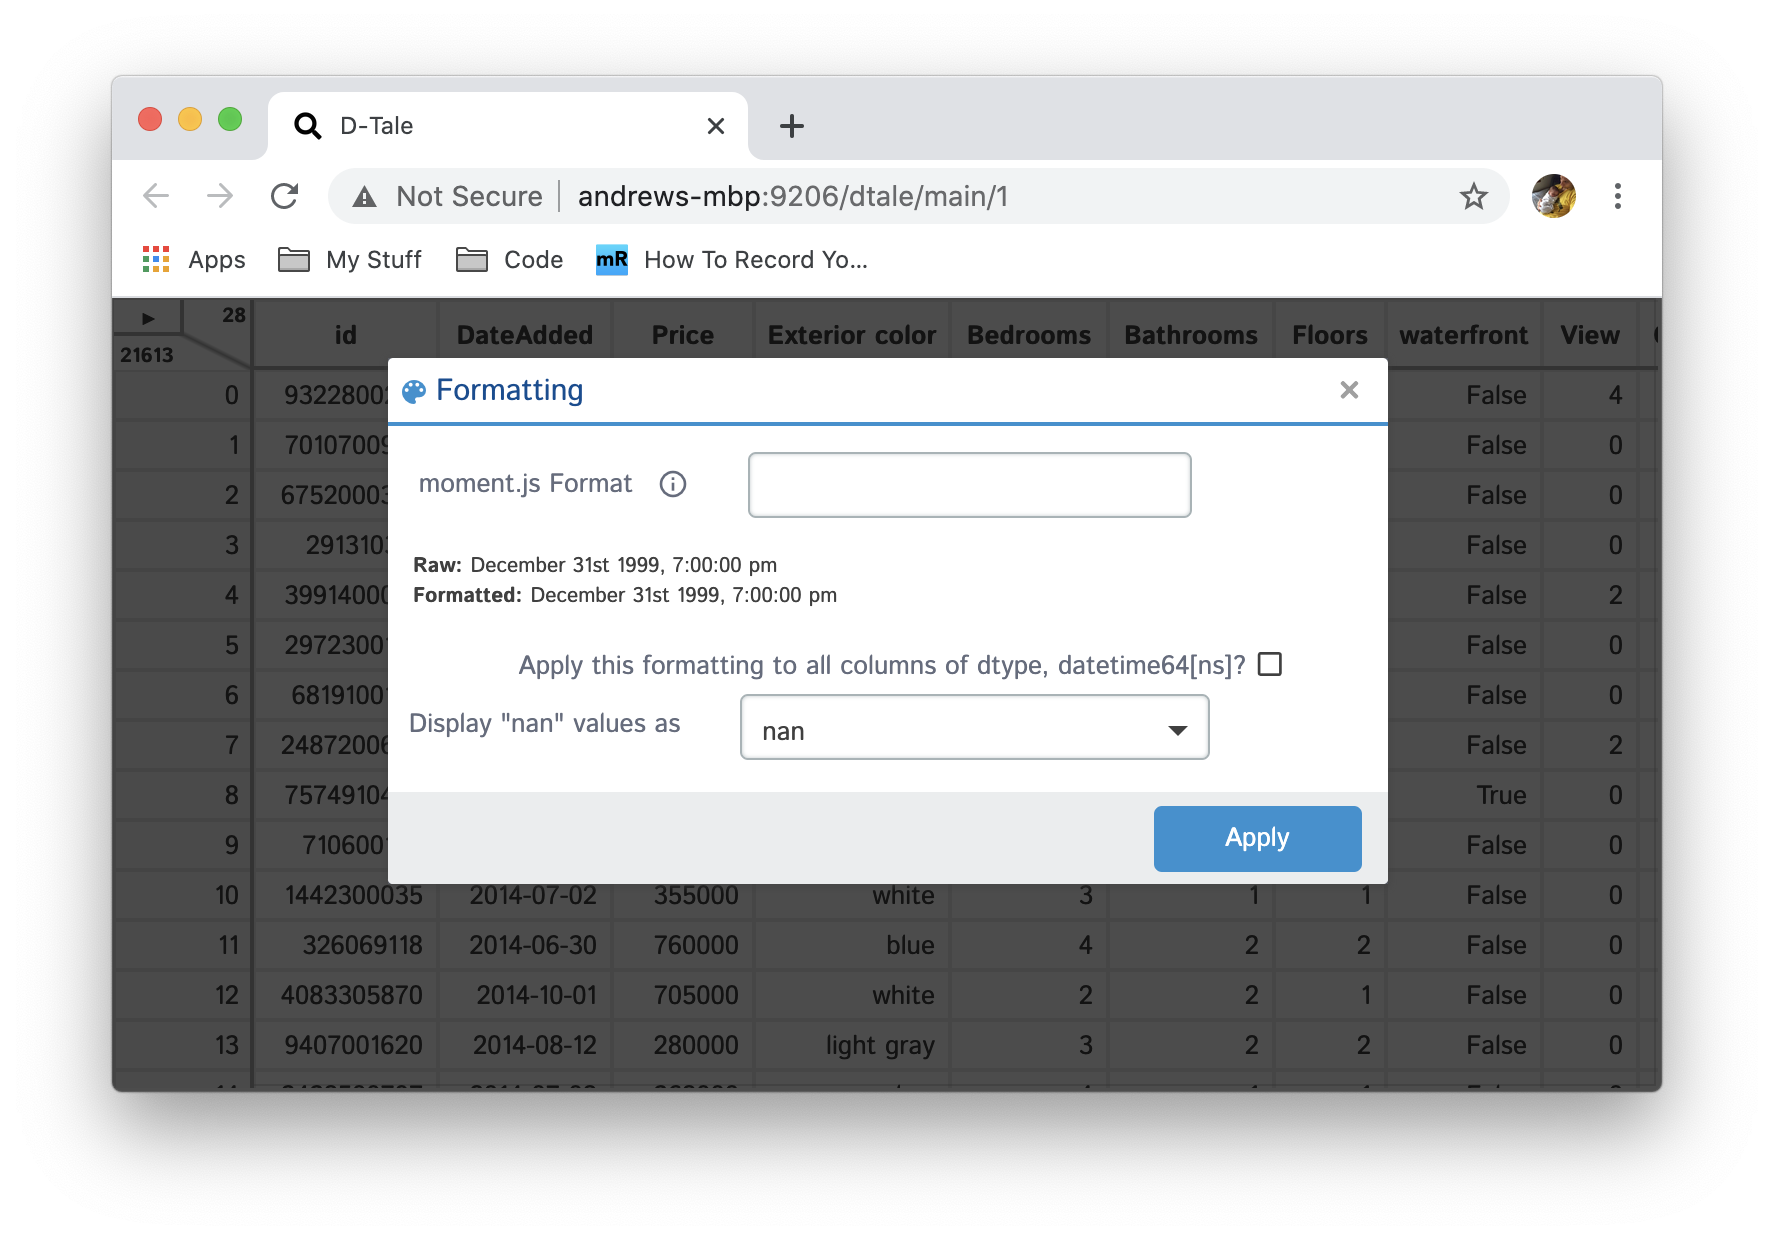 |
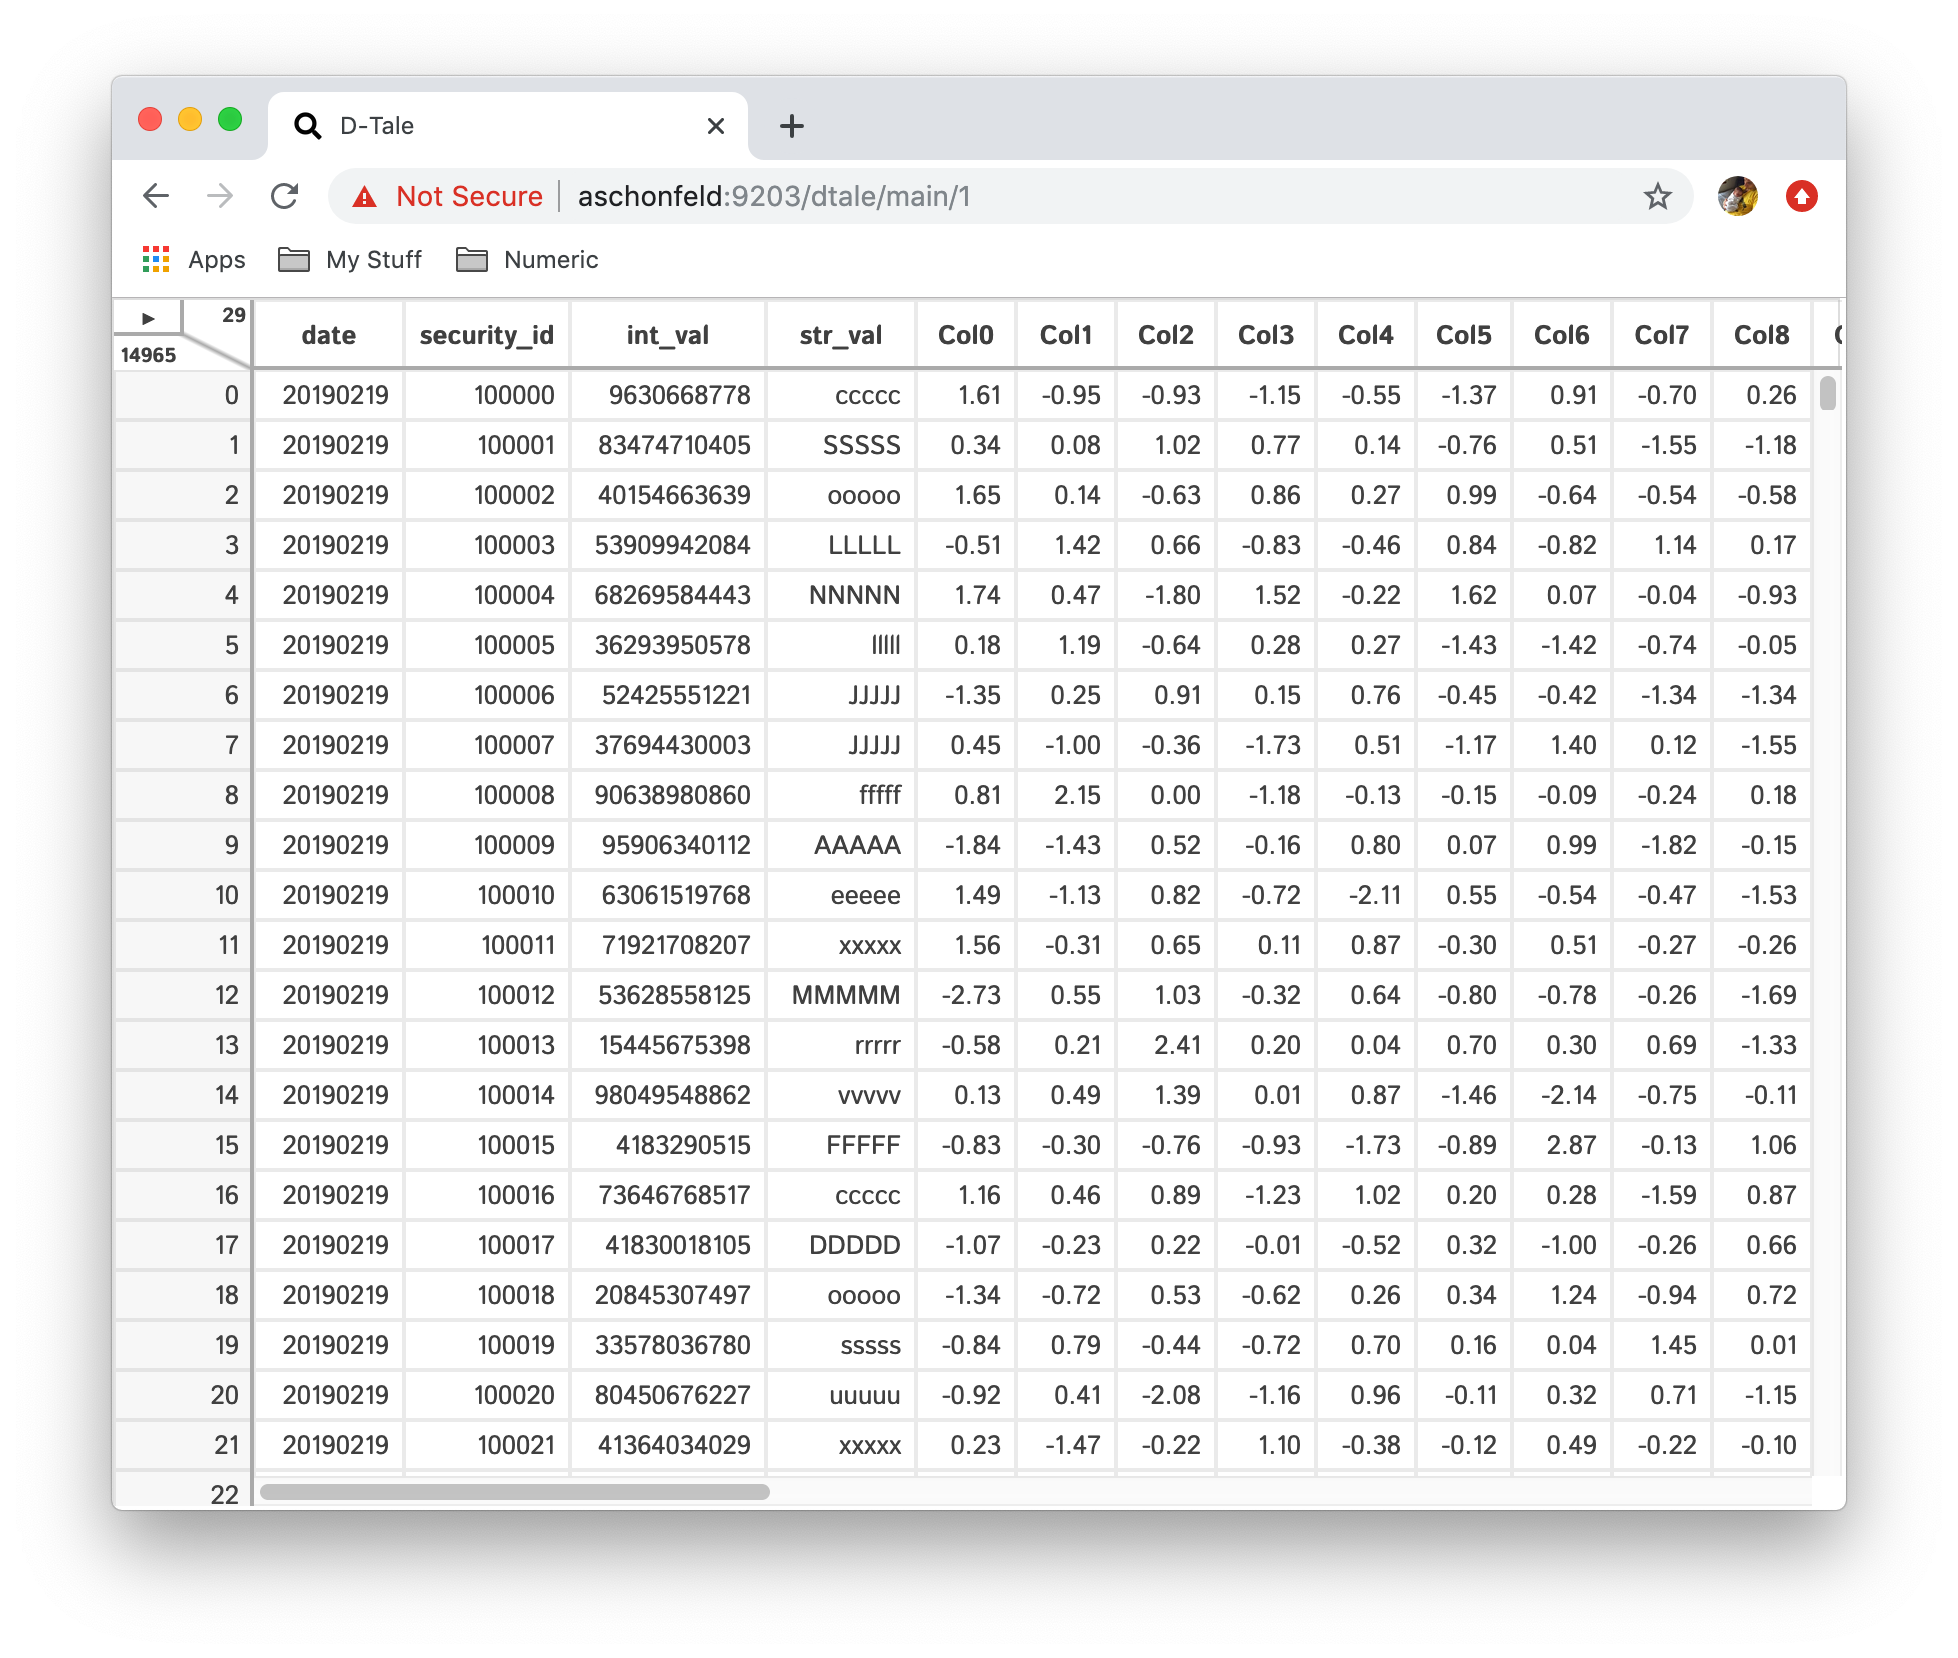 |
| String | 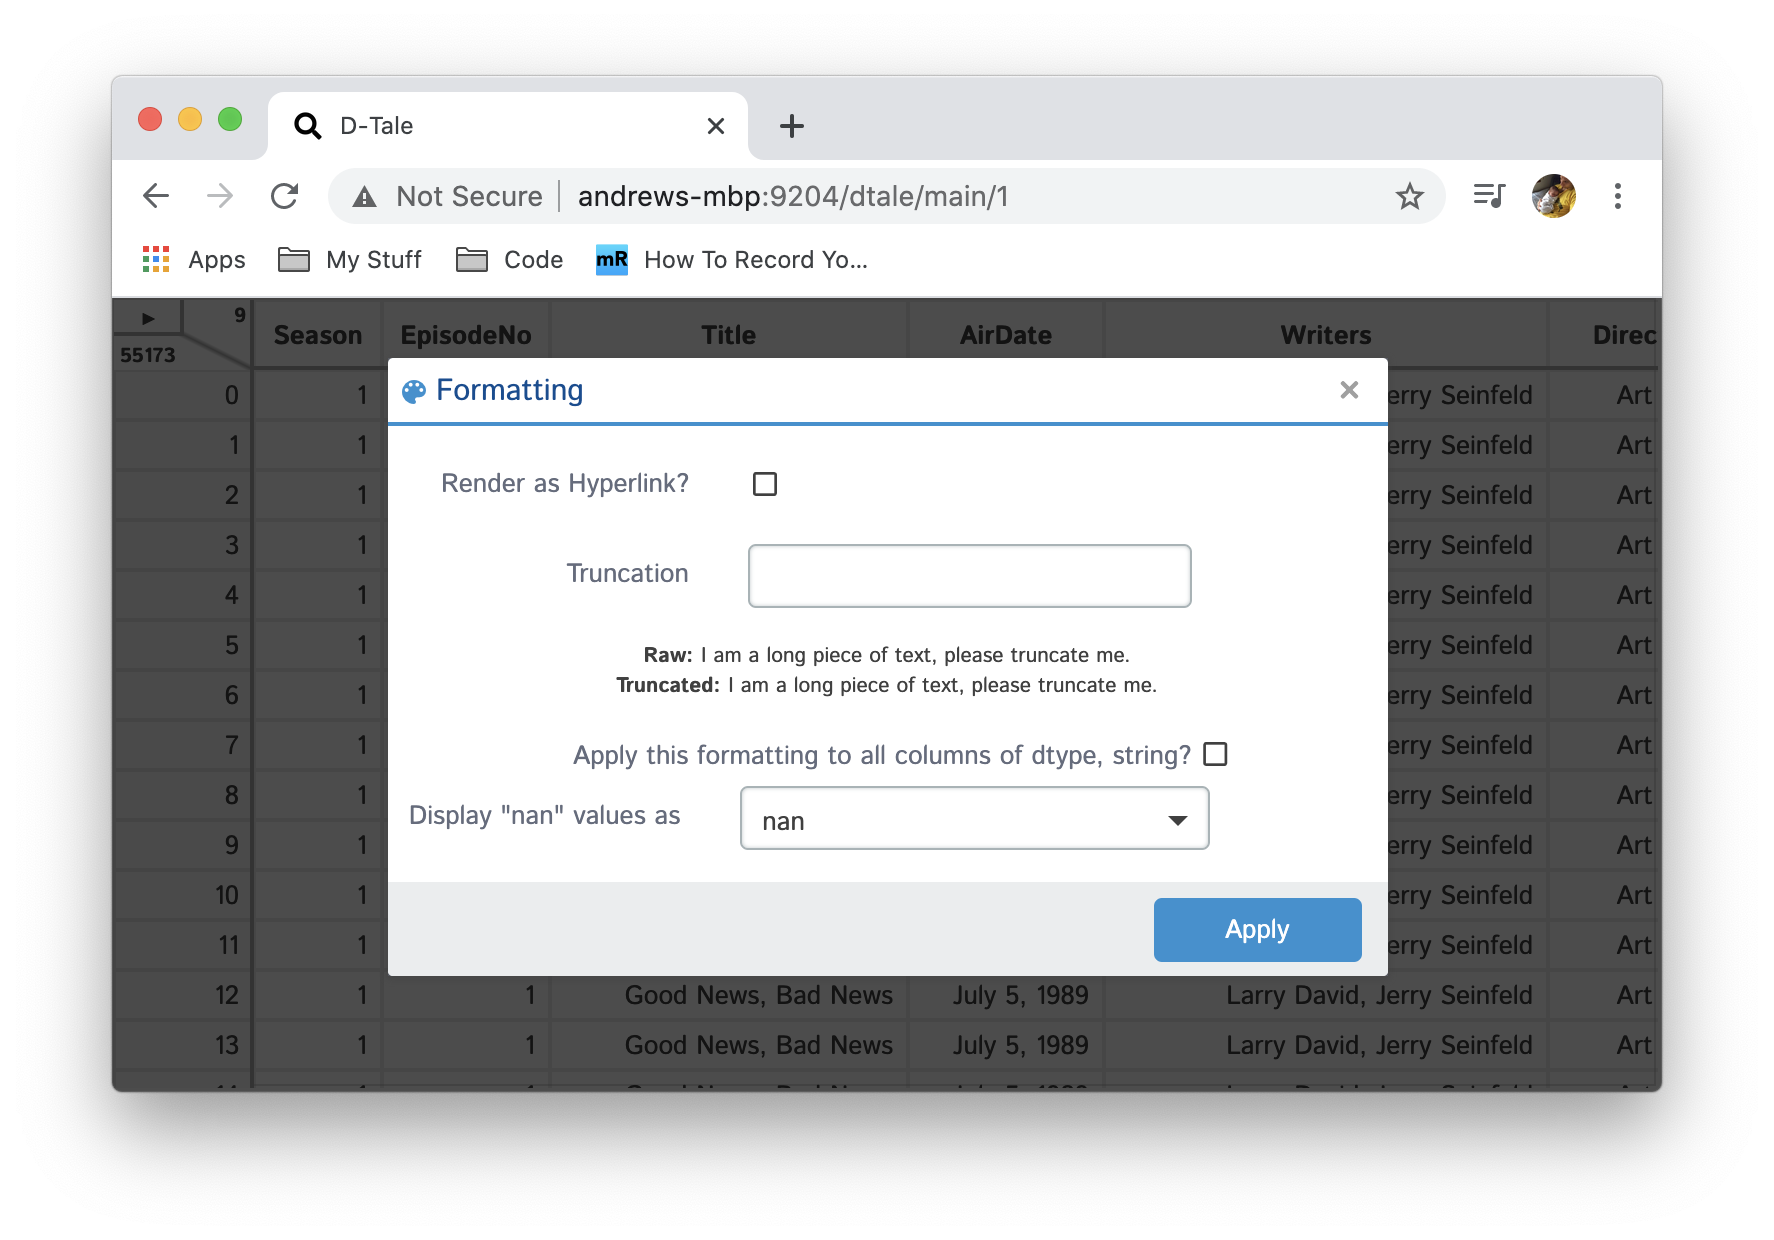 |
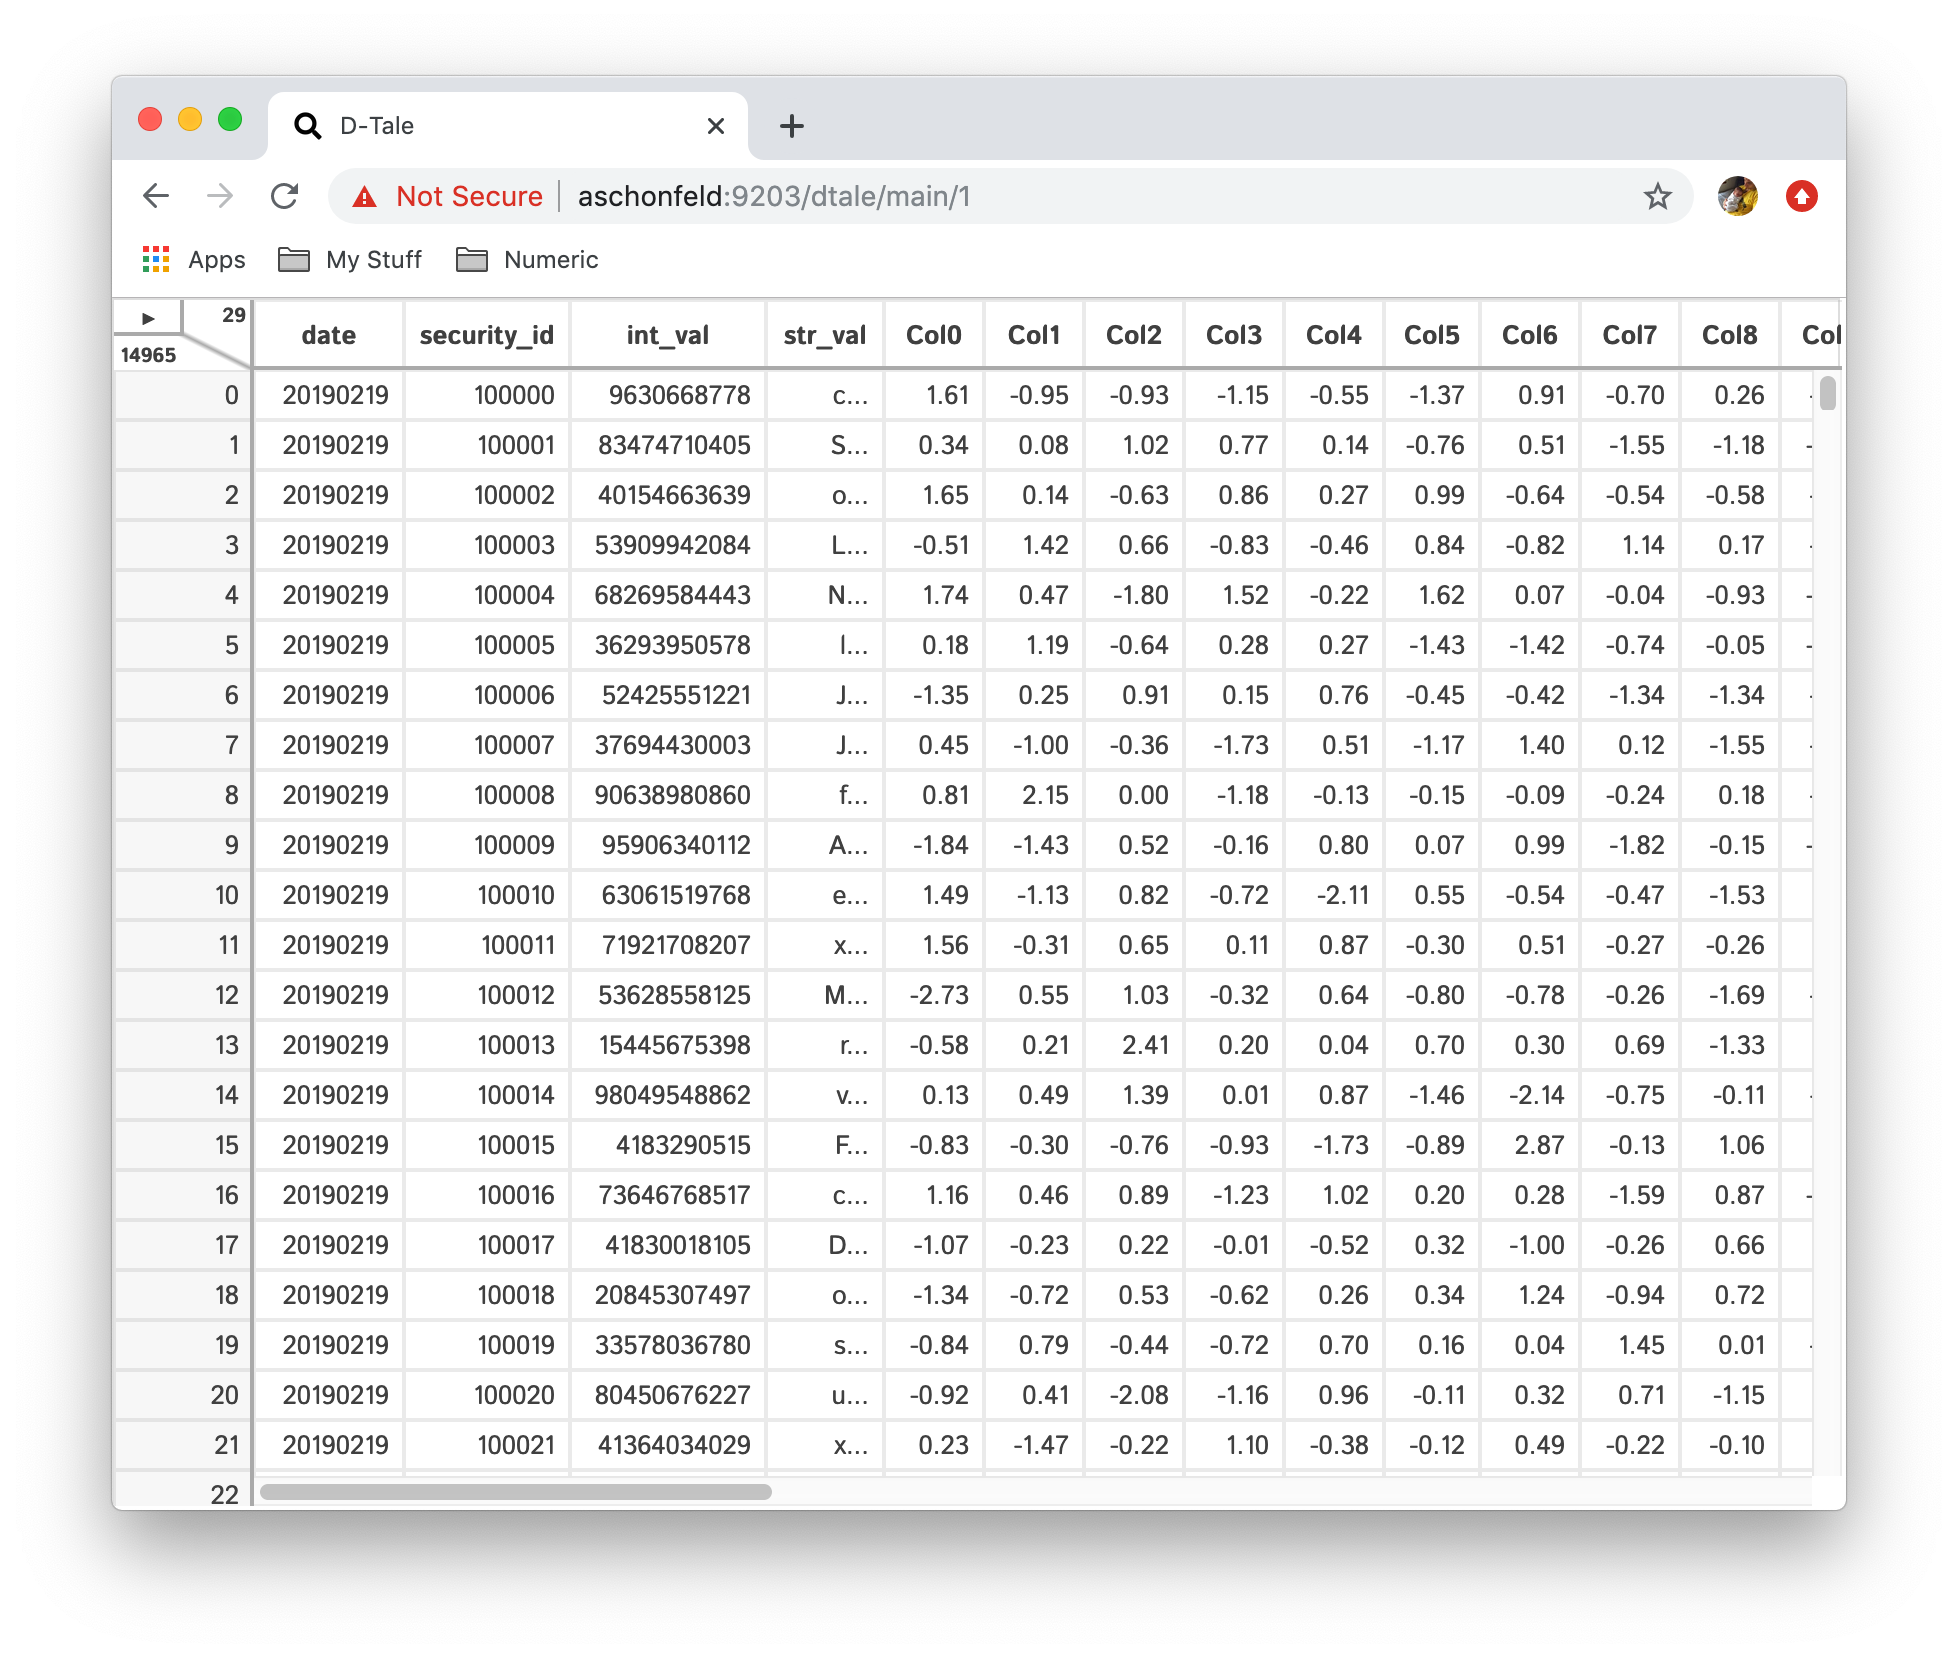 |
Here’s a grid of all the formats available with -123456.789 as input:
| Format | Output |
|---|---|
| Precision (6) | -123456.789000 |
| Thousands Sep | -123,456.789 |
| Abbreviate | -123k |
| Exponent | -1e+5 |
| BPS | -1234567890BPS |
| Red Negatives | -123457 |
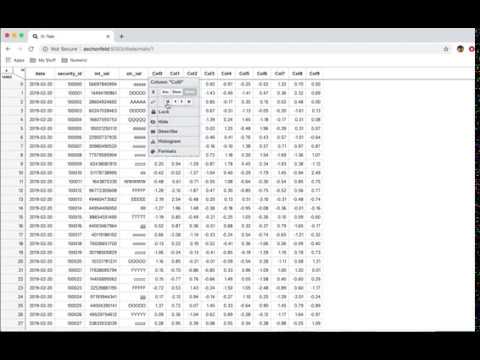
Column Analysis
Based on the data type of a column different charts will be shown.
| Data Type | Chart |
|---|---|
| Integer | Histogram, Value Counts |
| Float | Value Counts |
| Date | Value Counts |
| String | Value Counts |
Histograms can be displayed in any number of bins (default: 20), simply type a new integer value in the bins input
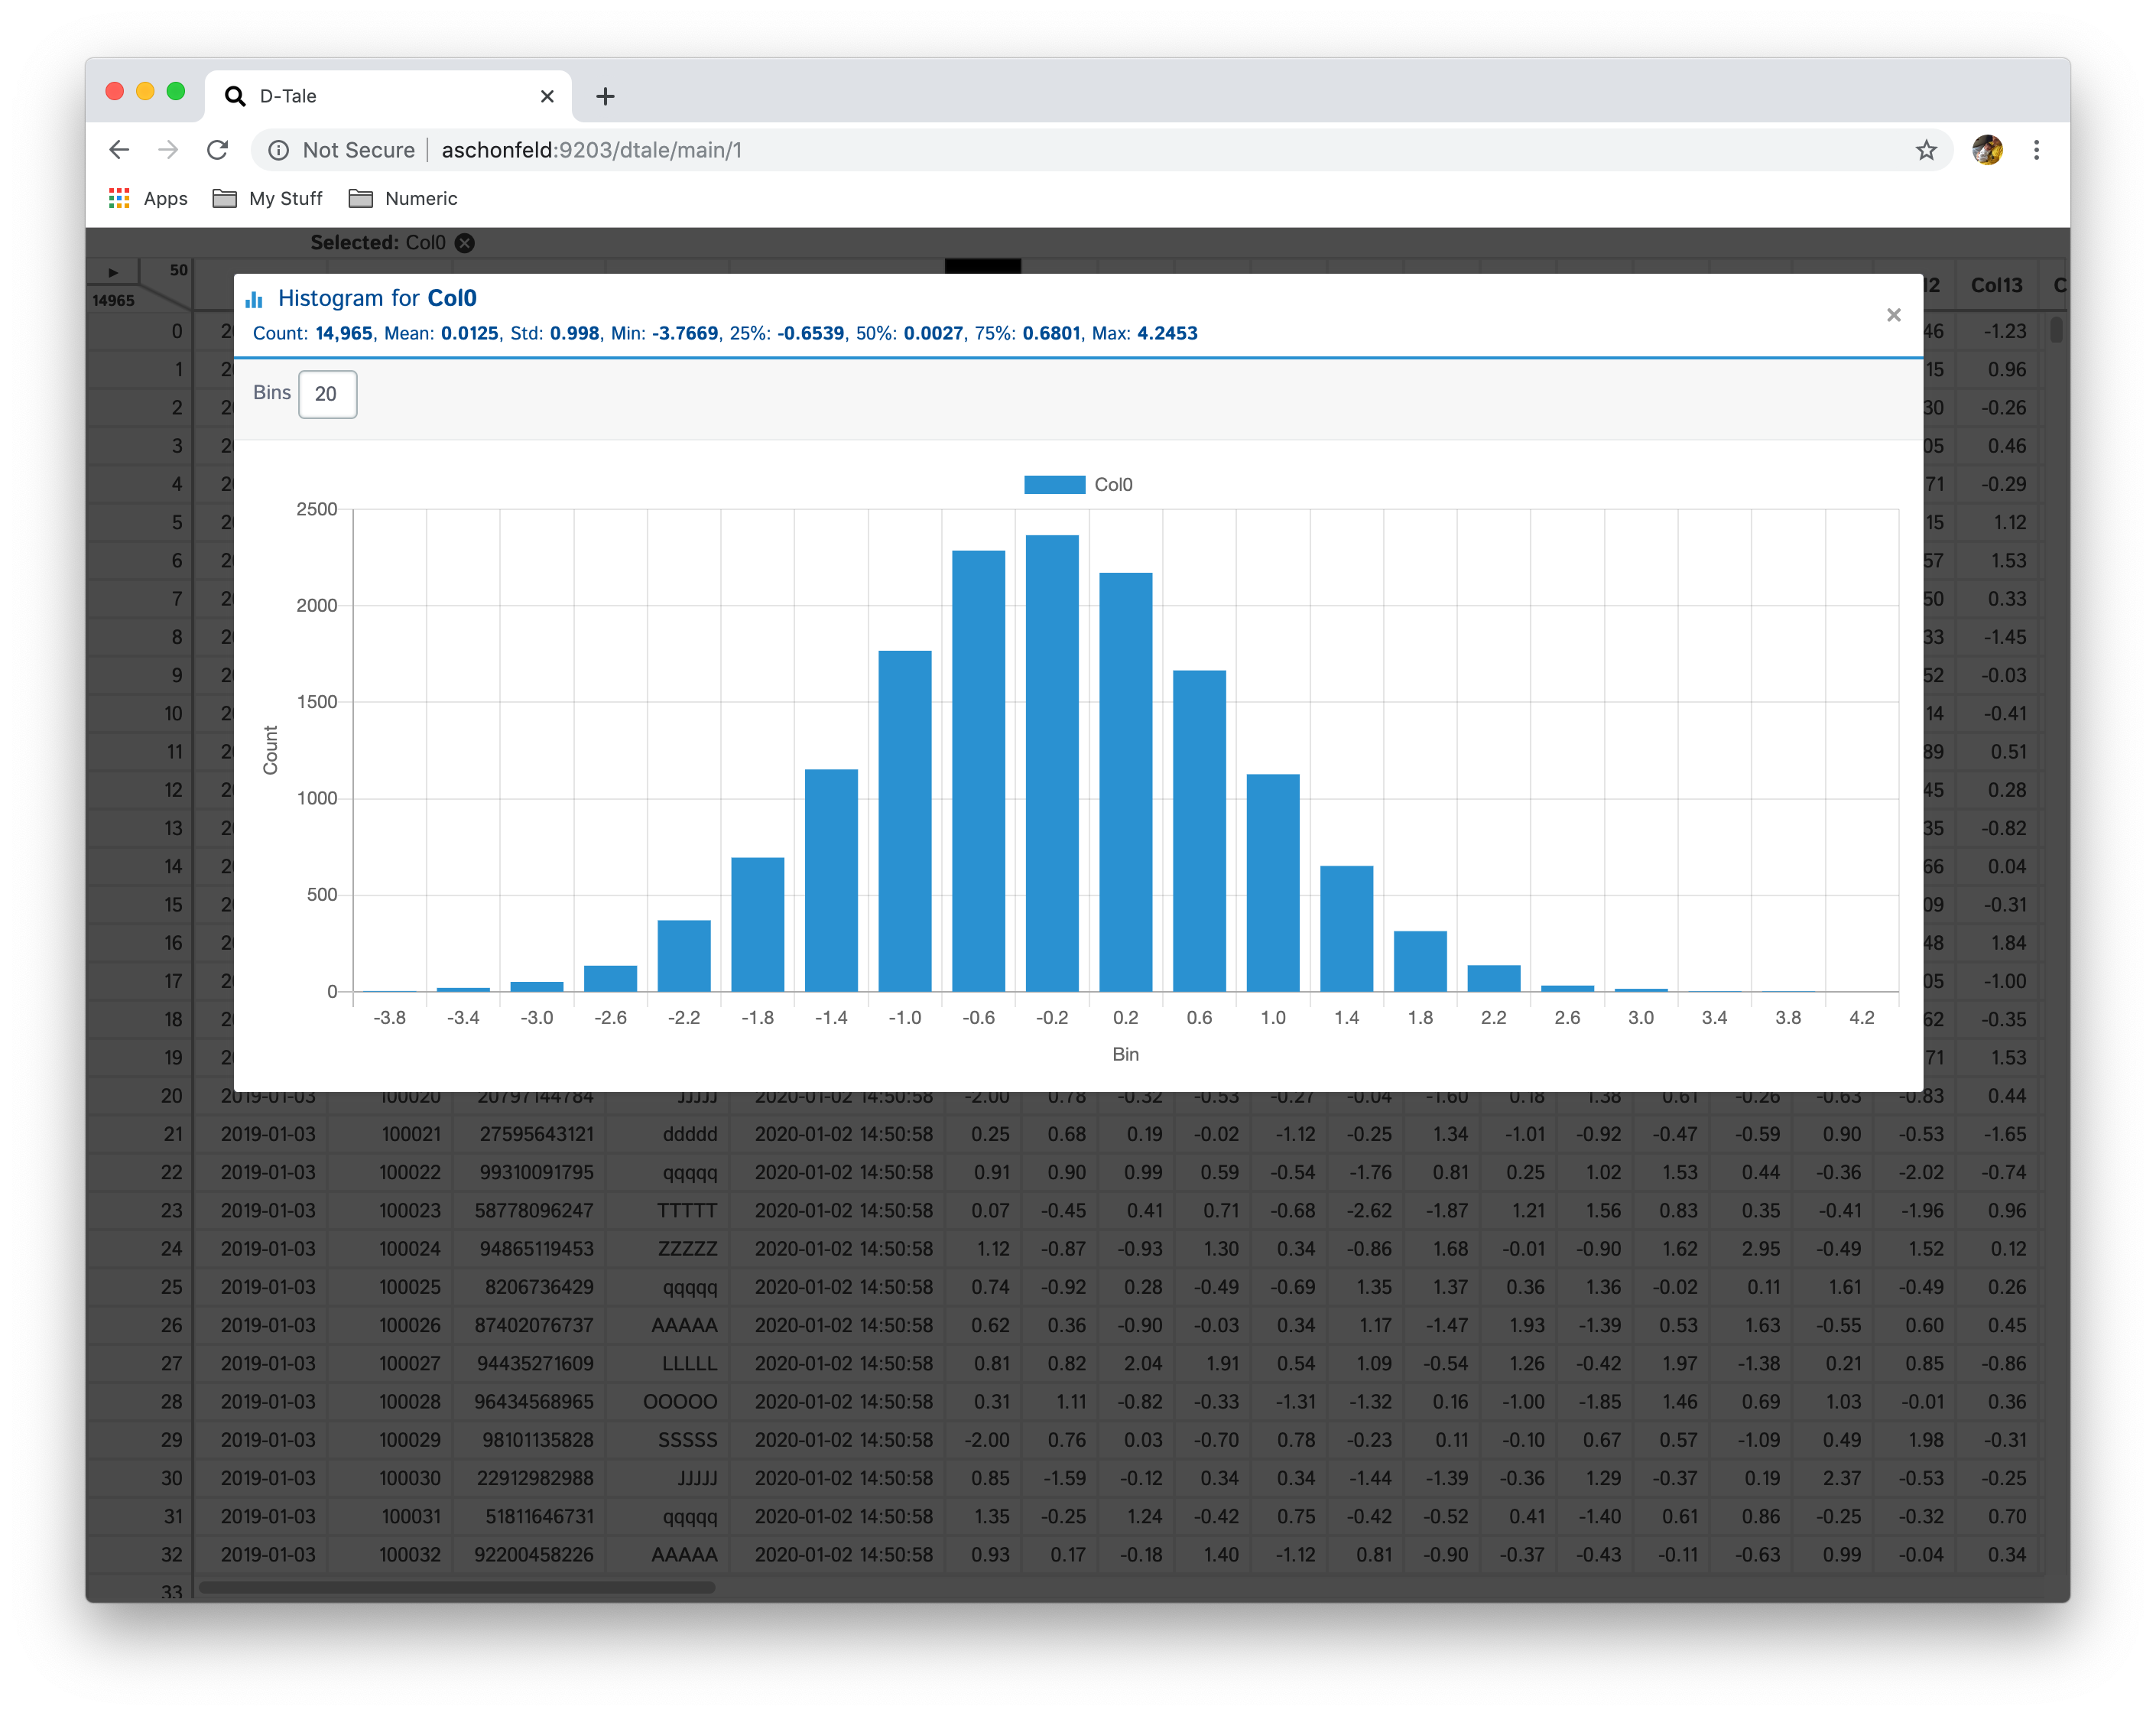
Value Counts are a bar chart containing the counts of each unique value in a column.
Menu Functions Depending on Browser Dimensions
Depending on the dimensions of your browser window the following buttons will not open modals, but rather separate browser windows: Correlations, Describe & Instances (see images from Jupyter Notebook, also Charts will always open in a separate browser window)
For Developers
Cloning
Clone the code (git clone ssh://git@github.com:manahl/dtale.git), then start the backend server:
$ git clone ssh://git@github.com:manahl/dtale.git
# install the dependencies
$ python setup.py develop
# start the server
$ python dtale --csv-path /home/jdoe/my_csv.csv --csv-parse_dates date
You can also run dtale from PyDev directly.
You will also want to import javascript dependencies and build the source:
$ npm install
# 1) a persistent server that serves the latest JS:
$ npm run watch
# 2) or one-off build:
$ npm run build
Running tests
The usual npm test command works:
$ npm test
You can run individual test files:
$ TEST=static/__tests__/dtale/DataViewer-base-test.jsx npm run test-file
Linting
You can lint all the JS and CSS to confirm there’s nothing obviously wrong with it:
$ npm run lint -s
You can also lint individual JS files:
$ npm run lint-js-file -s -- static/dtale/DataViewer.jsx
Formatting JS
You can auto-format code as follows:
$ npm run format
Docker Development
You can build python 27-3 & run D-Tale as follows:
$ yarn run build
$ docker-compose build dtale_2_7
$ docker run -it --network host dtale_2_7:latest
$ python
>>> import pandas as pd
>>> df = pd.DataFrame([dict(a=1,b=2,c=3)])
>>> import dtale
>>> dtale.show(df)
Then view your D-Tale instance in your browser using the link that gets printed
You can build python 36-1 & run D-Tale as follows:
$ yarn run build
$ docker-compose build dtale_3_6
$ docker run -it --network host dtale_3_6:latest
$ python
>>> import pandas as pd
>>> df = pd.DataFrame([dict(a=1,b=2,c=3)])
>>> import dtale
>>> dtale.show(df)
Then view your D-Tale instance in your browser using the link that gets printed
Global State/Data Storage
If D-Tale is running in an environment with multiple python processes (ex: on a web server running gunicorn) it will most likely encounter issues with inconsistent state. Developers can fix this by configuring the system D-Tale uses for storing data. Detailed documentation is available here: Data Storage and managing Global State
Startup Behavior
Here’s a little background on how the dtale.show() function works:
- by default it will look for ports between 40000 & 49000, but you can change that range by specifying the environment variables DTALE_MIN_PORT & DTALE_MAX_PORT
- think of sessions as python consoles or jupyter notebooks
- Session 1 executes
dtale.show(df)our state is:
| Session | Port | Active Data IDs | URL(s) |
|---|---|---|---|
| 1 | 40000 | 1 | http://localhost:40000/dtale/main/1 |
- Session 1 executes
dtale.show(df)our state is:
| Session | Port | Active Data IDs | URL(s) |
|---|---|---|---|
| 1 | 40000 | 1,2 | http://localhost:40000/dtale/main/[1,2] |
- Session 2 executes
dtale.show(df)our state is:
| Session | Port | Active Data IDs | URL(s) |
|---|---|---|---|
| 1 | 40000 | 1,2 | http://localhost:40000/dtale/main/[1,2] |
| 2 | 40001 | 1 | http://localhost:40001/dtale/main/1 |
- Session 1 executes
dtale.show(df, port=40001, force=True)our state is:
| Session | Port | Active Data IDs | URL(s) |
|---|---|---|---|
| 1 | 40001 | 1,2,3 | http://localhost:40001/dtale/main/[1,2,3] |
- Session 3 executes
dtale.show(df)our state is:
| Session | Port | Active Data IDs | URL(s) |
|---|---|---|---|
| 1 | 40001 | 1,2,3 | http://localhost:40001/dtale/main/[1,2,3] |
| 3 | 40000 | 1 | http://localhost:40000/dtale/main/1 |
- Session 2 executes
dtale.show(df)our state is:
| Session | Port | Active Data IDs | URL(s) |
|---|---|---|---|
| 1 | 40001 | 1,2,3 | http://localhost:40001/dtale/main/[1,2,3] |
| 3 | 40000 | 1 | http://localhost:40000/dtale/main/1 |
| 2 | 40002 | 1 | http://localhost:40002/dtale/main/1 |
- Session 4 executes
dtale.show(df, port=8080)our state is:
| Session | Port | Active Data IDs | URL(s) |
|---|---|---|---|
| 1 | 40001 | 1,2,3 | http://localhost:40001/dtale/main/[1,2,3] |
| 3 | 40000 | 1 | http://localhost:40000/dtale/main/1 |
| 2 | 40002 | 1 | http://localhost:40002/dtale/main/1 |
| 4 | 8080 | 1 | http://localhost:8080/dtale/main/1 |
- Session 1 executes
dtale.get_instance(1).kill()our state is:
| Session | Port | Active Data IDs | URL(s) |
|---|---|---|---|
| 1 | 40001 | 2,3 | http://localhost:40001/dtale/main/[2,3] |
| 3 | 40000 | 1 | http://localhost:40000/dtale/main/1 |
| 2 | 40002 | 1 | http://localhost:40002/dtale/main/1 |
| 4 | 8080 | 1 | http://localhost:8080/dtale/main/1 |
- Session 5 sets DTALE_MIN_RANGE to 30000 and DTALE_MAX_RANGE 39000 and executes
dtale.show(df)our state is:
| Session | Port | Active Data ID(s) | URL(s) |
|---|---|---|---|
| 1 | 40001 | 2,3 | http://localhost:40001/dtale/main/[2,3] |
| 3 | 40000 | 1 | http://localhost:40000/dtale/main/1 |
| 2 | 40002 | 1 | http://localhost:40002/dtale/main/1 |
| 4 | 8080 | 1 | http://localhost:8080/dtale/main/1 |
| 5 | 30000 | 1 | http://localhost:30000/dtale/main/1 |
Documentation
Have a look at the detailed documentation.
Requirements
D-Tale works with:
- Back-end
- arctic [extra]
- dash
- dash_daq
- Flask
- Flask-Compress
- Pandas
- scipy
- six
- Front-end
- react-virtualized
- chart.js
Acknowledgements
D-Tale has been under active development at Man Numeric since 2019.
Original concept and implementation: Andrew Schonfeld
Contributors:
- Phillip Dupuis
- Dominik Christ
- Chris Boddy
- Jason Holden
- Tom Taylor
- Fernando Saravia Rajal
- Wilfred Hughes
- Mike Kelly
- Vincent Riemer
- Youssef Habchi - title font
- … and many others …
Contributions welcome!
License
D-Tale is licensed under the GNU LGPL v2.1. A copy of which is included in LICENSE


