pry0cc/axiom
A dynamic infrastructure toolkit for red teamers and bug bounty hunters!
| repo name | pry0cc/axiom |
| repo link | https://github.com/pry0cc/axiom |
| homepage | |
| language | Shell |
| size (curr.) | 93796 kB |
| stars (curr.) | 647 |
| created | 2020-05-17 |
| license | GNU General Public License v3.0 |
Project Axiom is a set of utilities for managing a small dynamic infrastructure setup for bug bounty and pentesting.
Axiom right now is perfect for teams as small as one person, without costing you much at all to run. And by not much to run at all, I mean, less than 5 bucks a month if you use responsibly, and a free two months with my referral link below. Read more about the economics at the bottom.
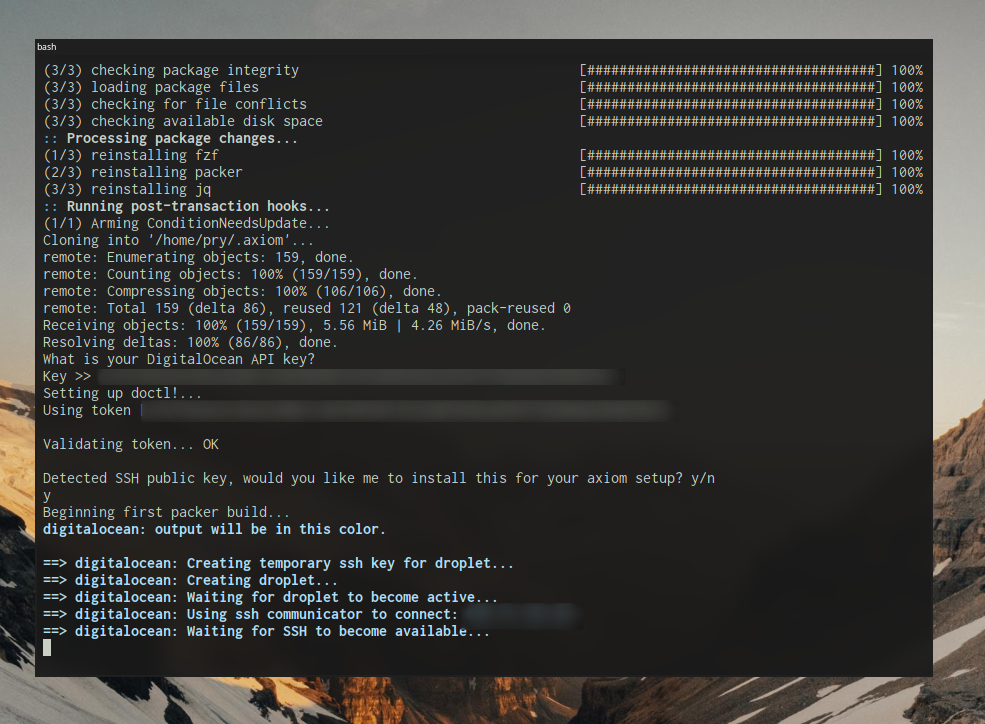
DigitalOcean API Key
To obtain a Digitalocean API Key for this to work, you can sign up with my referral link https://m.do.co/c/bd80643300bd and get $100 free credit to try it out!
I also get a small kickback so if you liked this project please use my link :)
https://m.do.co/c/bd80643300bd
Happy hacking! :)

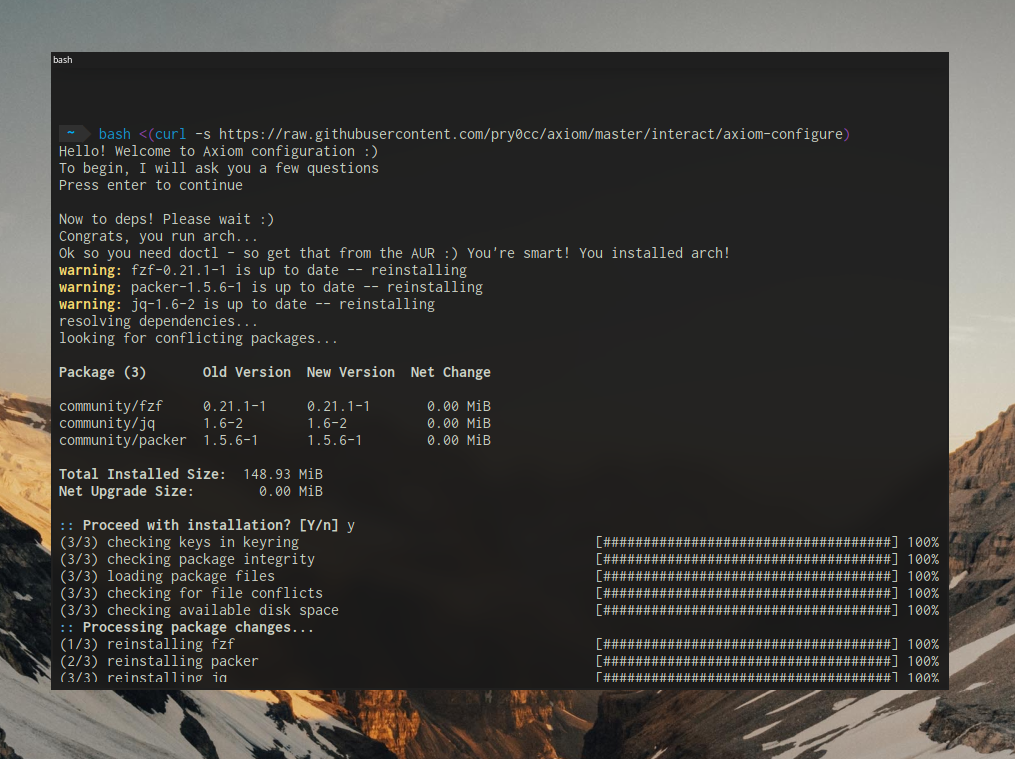
Bash One Liner
(You will need curl, which is not installed by default on Ubuntu 20.04, if you get a “command not found” error, run sudo apt update && sudo apt install curl)
bash <(curl -s https://raw.githubusercontent.com/pry0cc/axiom/master/interact/axiom-configure)
When I first began trying to get up and running my own dynamic cloud hacking setup, I noticed that the array of tools and ecosystems were so large, and there were 50 different ways to do just about everything, do I use ansible for provisioning on server boot, do I load ansible with packer? How much do I configure for image builds? There were a few ‘red team’ infra setup tools and aids, but they all required so much legwork just to get off the ground. It felt like in a lot of cases people were just publishing what they use without any help/documentation on getting started.
The other situation I faced, when looking at other pentesting distros, is that they had very little support for a lot of the common tools I was using in my day-day bug bounty and red team work. Distro’s such as Kali were great for traditional netsec, but for bug bounty and large-infrastructure projects they lacked a lot of the great stuff
Specifically Go tools, lots of really awesome small Go utilities such as the array of masterpieces from likes of Tom Hudson, Luke Stephens and Jason Haddix. Bug bounty has become overrun with fancy and clever Go utilities usually stitched together in bash one liners.
Setting up your own ‘hacking vps’, to catch shells, run enumeration tools, scan, let things run in the background in a tmux window, used to be an afternoon project. You would run through and install all the tools you need manually, configure your ZSH, configure vim, configure tmux.
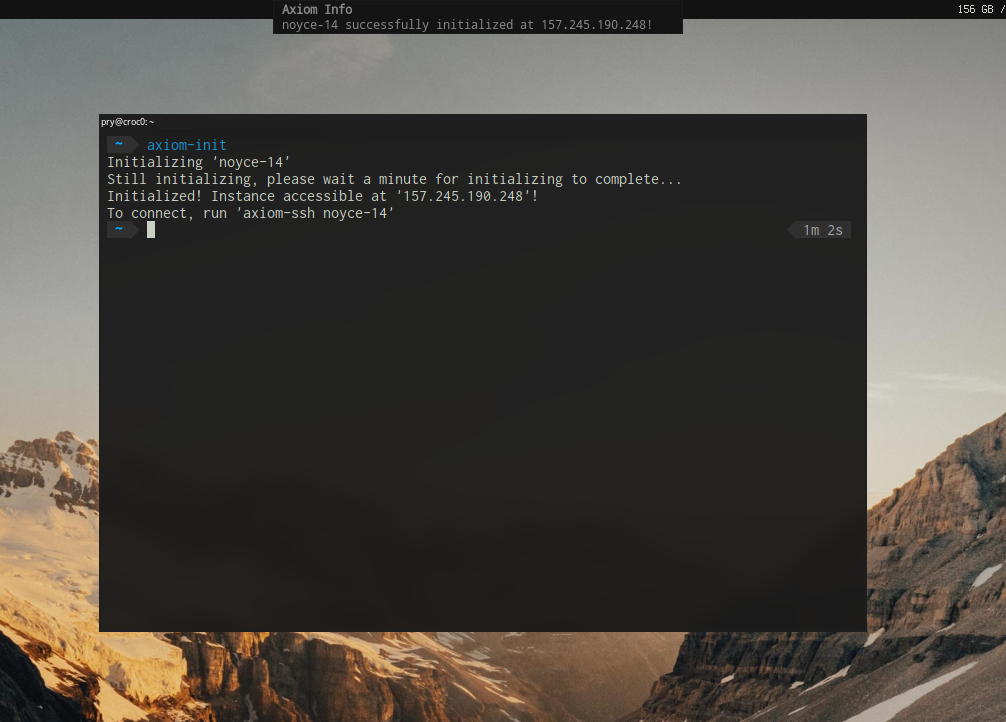
With Axiom, you just need to run a single command to get setup, and then you can use the Axiom toolkit scripts to spin up and down your new hacking VPS.
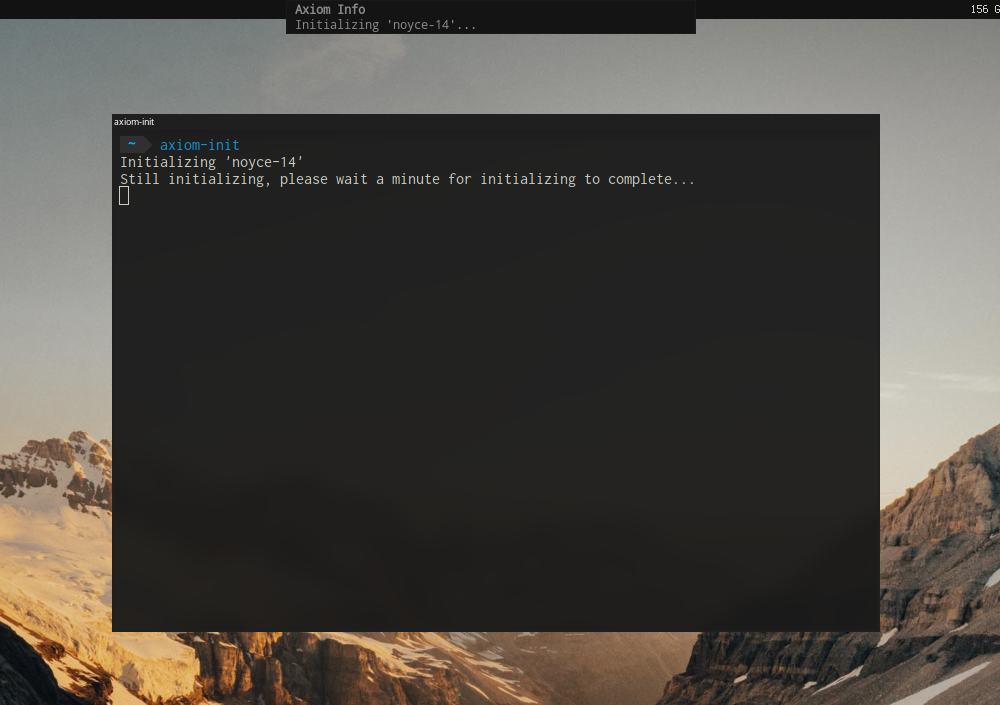
Run axiom-init and watch as a new instance is created in under 2 minutes containing everything you could ever want or need to run your reconnaissance for your pentest, catch a shell in netcat, or maybe you want to VPN through (axiom comes with support for one-click deployment profiles for things like openvpn, axiom-deploy openvpn and you soon have a fully configured openvpn server.
When you’re finished, simply bring down the instance with axiom-rm your-instance-12 a quick confirmation dialog, and your box is gone! It’s no longer costing you anything to run.

The init script, packed with notify-send hooks, can be run entirely headlessly while it spins up your machine of choice.
In this toolkit, I have attempted to make setting up your own cloud hacking box as simple as possible with as little touch from you as is necessary.
To aid you, I have created an array of bash wrappers to get started. The axiom base image has been developed with bug hunters and lean teams to quickly initialize and dispose of infrastructure (and actually have the tools that they use daily, preinstalled).
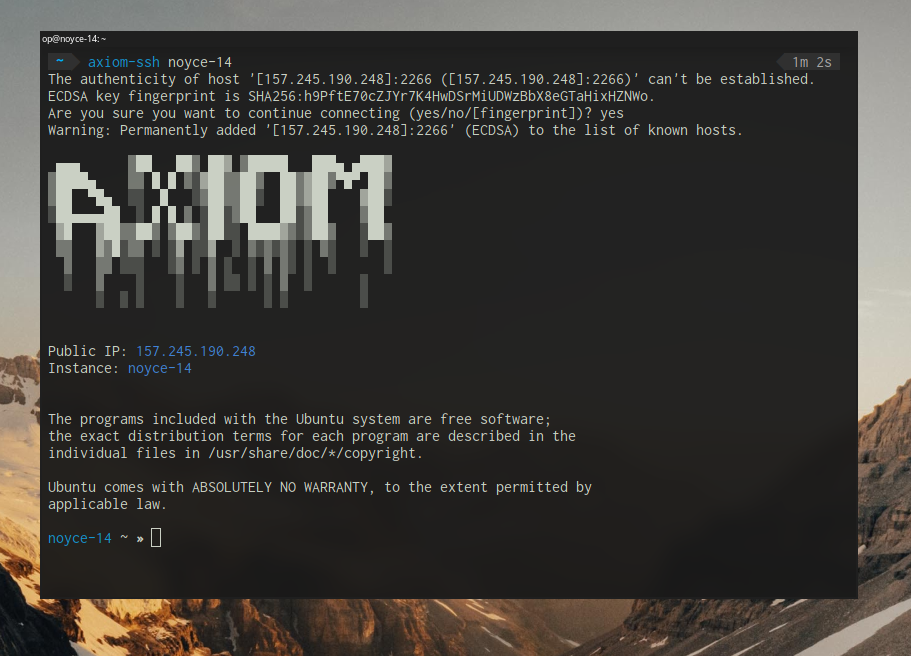
axiom-ssh host is used to connect to your machines, to see which machines you have available, use axiom-ls

One-liner setup with Axiom-configure
Installation
DigitalOcean API Key
To obtain a Digitalocean API Key for this to work, you can sign up with my referral link https://m.do.co/c/bd80643300bd and get $100 free credit to try it out!
I also get a small kickback so if you liked this project please use my link :)
https://m.do.co/c/bd80643300bd
Happy hacking! :)
Bash One Liner
(You will need curl, which is not installed by default on Ubuntu 20.04, if you get a “command not found” error, run sudo apt update && sudo apt install curl)
bash <(curl -s https://raw.githubusercontent.com/pry0cc/axiom/master/interact/axiom-configure)
OS Support
I am trying to add as many different operating systems to support, mainly going for *nix such as MacOS, Ubuntu, Debian, Arch Linux, and maybe Kali in the future.
The main trouble here is just the dependencies.
- MacOS - Supported
- Ubuntu - Supported
- Debian - Semi-Supported - Planned
- Arch Linux - Semi-Support - Planned
- Kali - Unknown
Dependencies
- Packer - Tested with v1.5.6
- fzf - Tested with 0.21.1
- doctl - Tested with 1.43
- jq - Tested with 1.6 (latest is better for this one)
Packer is pretty easy everywhere, although manual (its really important you get the right version, if its too old, then the var-file syntax will fail.
fzf is everywhere too, doctl can be a bit tricky (using snap to do that on ubuntu, ew). jq needs to be recent, they updated the command syntax!
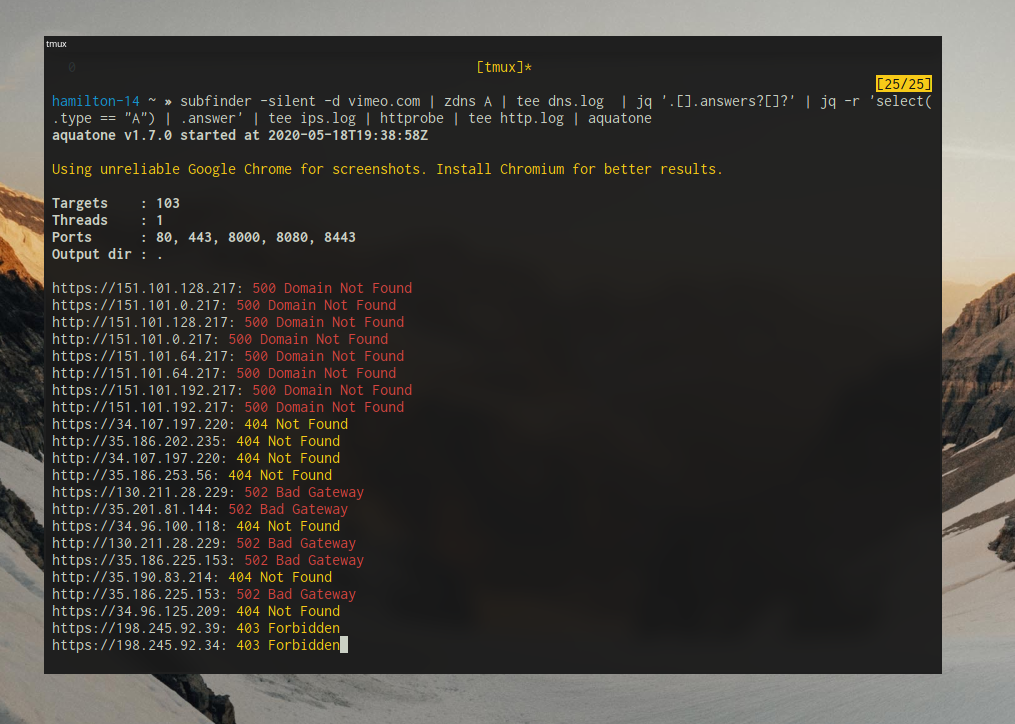
Fun Screenshots
A fun out of the box one-liner that gets subdomains with subfinder, looks them up and resolves them, passes the resolved and HTTP prob’ed response to have screenshots taken for further review!
Economics
Some people come to me, and they say, pry, Digital Ocean is so much more than using a dedi or bare metal, why do you use it and how can you say its cheap?
It’s how you use it. A lot of hacker hobbyists or bug bounty people are only part time, they may be a weekend warrior, or they may be a student. As such, their budget may be limited, and paying 5-20 bucks a month on a VPS FOREVER doesn’t sound particularly enticing, especially if you only need the “I need a public IP to catch a shell NOW” problem.
With Axiom, you can spin up and down boxes, and only pay for what you use. You can run a command such as:
axiom-init hades --restore=hades && axiom-ssh --tmux && axiom-rm hades -f
Assuming you have a previous hades machine backup, performed with the axiom-backup hades command, all go binaries, ZSH setup, working directory files and tmux/nvim configs will be backed up. With the one liner above, it will initialise a new machine, restore the hades backup, ssh in with tmux, and then when you detach, kill the instance.
If you’re planning on doing bug bounty for say, 2 hours, and you use this command on your weekend hacking-session, with the default instance size with Axiom, this would cost you a total of: $0.014. Now I don’t know about you, but considering if i was a student I could wash somebodies car once and have months worth of VPS time. Pretty nice.
Pre-installed History Feature
So since we have ZSH, with some pretty badass backward lookup features, I am planning on building an extensive one-liner ZSH-History so that you can just ctrl+r and search for a command and get a demo command that has been tested on a wildcard bug bounty platform.
That way, you can just literally type “sub[up arrow]” and be auto completed to a huge subfinder one liner, on a brand new box, this brings a homely feel to the machine and can massively increase your productivity.
Deployment Profiles
These are a work in progress, also, my vision for the deployment profiles, is for quick deployment of ‘optional extras’ that you might want to deploy after your machine is already live and running. Such as openvpn and covenant (both have the setup scripts ready to go).
Instance Profile Selectors
One little tid-bit for the power users out there, I’ve added both the axiom-select , and axiom-connect script. Axiom-select allows you to select an instance name, and have it stored in a state-file called ‘profile.json’ in the ~/.axiom/ directory. This selection also occurs when you initialize a new server. Now, with an instance selected, you can run axiom-connect from anywhere and get dropped into an SSH shell. This is really useful for creating ‘transparent’ connections to your VPS hackbox and can hook up to keybindings for opening new terminal windows.
Because of the heavy integration of notify-send, you can basically use this entire ecosystem heedlessly (about to get better too).
Hint, if you’re running MacOS, drop this in your bin path:
notify-send
#!/bin/bash

 osascript -e "display notification \"$2\" with title \"$1\""
All The Commands - Explained
axiom-backup
axiom-backup is a command used for backing up the instance of your choice, this command works as follows:
axiom-backup <instance>
What this will do on the backend, is run an rsync transfer against the ~/ directory of the op user. This rsync transfer will exclude the main current directories and pre-installed files. So you will only transfer the files that you have put in the main directory. I recommend making a work directory and storing any text files / recon loot you might accumulate in there. You can run axiom-backup <instance> periodically as much as you want and synchronise in near realtime.
This way, if you need to quickly shut down that instance, you can do so, and you can quickly restore using the next command.
axiom-restore
axiom-restore will restore a previously backed up box (as shown in the above command). Backed-up boxes are stored in ~/.axiom/boxes/<box-name>, if you would like to add custom files to your box on restore, you can make a custom file/folder structure in a directory in ~/.axiom/boxes/<box>. One case might synchronising custom wordlists. I’m considering backing up the $GOPATH/bin path too in future so that you can sync custom binaries and go tools. Please open a issue if this sounds like a good idea to you!
axiom-restore is another command that uses profile selectors. When you initialise a new machine using the axiom-init command, the instance’s name will be put into the ~/.axiom/profile.json file. This file describes the state of the profile selector. You can modify which machine is ‘selected’ by using the axiom-select command (covered below).
A typical example of the axiom-restore command can be demonstrated as such:
axiom-init
axiom-restore originalbox-13

# Selecting a different box

axiom-select anotherbox-5
axiom-restore originalbox-13
axiom-select
axiom-select is the command that is responsible for perfoming manual profile selects. When you run axiom-select <instance>, it will set the profile to that instance, and it will remember which instance you mean when you run commands such as axiom-connect, axiom-restore and axiom-deploy.
When you initialise a new instance, the profile selector is automatically set to that new instance. However, what if you want to deploy something on another box? Or what if you want to restore one config from one machine to another?
axiom-select instance-32
axiom-deploy
axiom-deploy is a command that can be used to deploy profiles after a machine has been initialised. You might not want an openvpn server or a covenant team server out of the box, but you might want to deploy it after!
Using axiom-deploy, once you have an instance selected, you can deploy profiles as the following:
axiom-select instance-32
axiom-deploy openvpn
And then that’s it! It will be completely hands-free from here while your profile is installed :) I’d be appreciative to anybody who would like to add some more profiles here, at the time of writing it’s just covenant and openvpn, but theres no reason why we can’t write a Wireguard install profile or a cobalt strike c2 profile!
If you want some examples, just look at the ~/.axiom/profiles/openvpn/manifest.json file
axiom-update
axiom-update is dead simple, it just runs a full system-wide update for axiom. Cd’s into the ~/.axiom/ directory, runs git pull. Easy!
axiom-build
Once you’ve updated your axiom setup with axiom-update, you can rebuild an image using axiom-build. It is important to build new images regularly as there may be security improvements or new features!
axiom-connect
axiom-connect is another command that can be used to SSH into an Axiom instance. The fun thing with this command however, is that it requires absolutely no arguments, it will just read whatever instance is currently in the selection profile, and it will connnect!
Personally, I have this mapped to a keybinding with termite -e axiom-connect, so after I’ve initialised a new instance, I can open a new SSH connection to the machine (like its local!).
axiom-ls
axiom-ls is used to list your current instances (and any other droplets you have running).
It requries no arguments.
axiom-rm
axiom-rm is used to remove a machine, if you have a machine initalised, you can completely rm it by using axiom-rm <instance>
axiom-vpn
axiom-vpn is used for connecting to a deploy openvpn server (using the deployment script).
After you have run axiom-deploy openvpn, you can run axiom-vpn <instance> and it will download the openvpn connection file, and run openvpn against it.
axiom-configure
axiom-configure is a command that can be used for configuration, ideally it should only be run once, if you’ve made a mistake and messed up your configuration, I would recommend running sudo rm -rf ~/.axiom/ and then run the bash one liner to install above ^^
This command will install deps, download and clone the axiom repository, add the interact/ folder to your $PATH and then run your first build. You will need a single Digitalocean API key.
axiom-ssh
axiom-ssh is used for SSH’ing to your machines, you can use it as follows:
axiom-ssh <instance>
axiom-ssh <instance> --tmux
If you use the --tmux flag, it will drop you into a tmux session named main on the axiom box. However, if the tmux session already exists, it will simply reattach you. This can be useful for doing work on the go or in a place with perhaps bad connectivity (a plane!) or running mulitple tasks.
Contributors
Below is a list of amazing people that have contributed to this project! Thank you to everybody on this list! If I missed you out, just make a PR for this readme and I’ll make sure you’re added! There are some amazing people here :)
- maverickNerd
- t3chbits
- paralax
- mcrmonkey
- razcodesdotdev
- icyphox
- Dan GITC (@ghostinthecable)
- myrdn
- Cgboal
- ericho
- mswell
- kpcyrd
- s0mdev (made the logo!!!)
Packages To Date
- aquatone
- httprobe
- subfinder
- assetfinder
- gf
- masscan
- sn0int
- kxss
- jq
- SecLists
- gobuster
- nmap
- waybackurls
- amass
- anti-burl
- Golang (setup, path configured, latest version)
- hakrawler
- zdns
- zmap
- ffuf
- gau
- dirb
- subjack
- SQLMap
- fbrobe
- getjs
- openvpn
- projectdiscovery chaos-client
- projectdiscovery nuclei
- projectdiscovery chaos
- projectdiscovery shuffledns
- dnsprobe
- dnsvalidator
- urlprobe
- oh-my-zsh
- tmux
- masscan
- subgen
- proxychains w/ Tor setup
- mosh
- docker
- metasploit
- dalfox
- subjack


