richzhang/colorization
Automatic colorization using deep neural networks. “Colorful Image Colorization.” In ECCV, 2016.
| repo name | richzhang/colorization |
| repo link | https://github.com/richzhang/colorization |
| homepage | http://richzhang.github.io/colorization/ |
| language | Jupyter Notebook |
| size (curr.) | 179756 kB |
| stars (curr.) | 2209 |
| created | 2016-03-26 |
| license | BSD 2-Clause “Simplified” License |
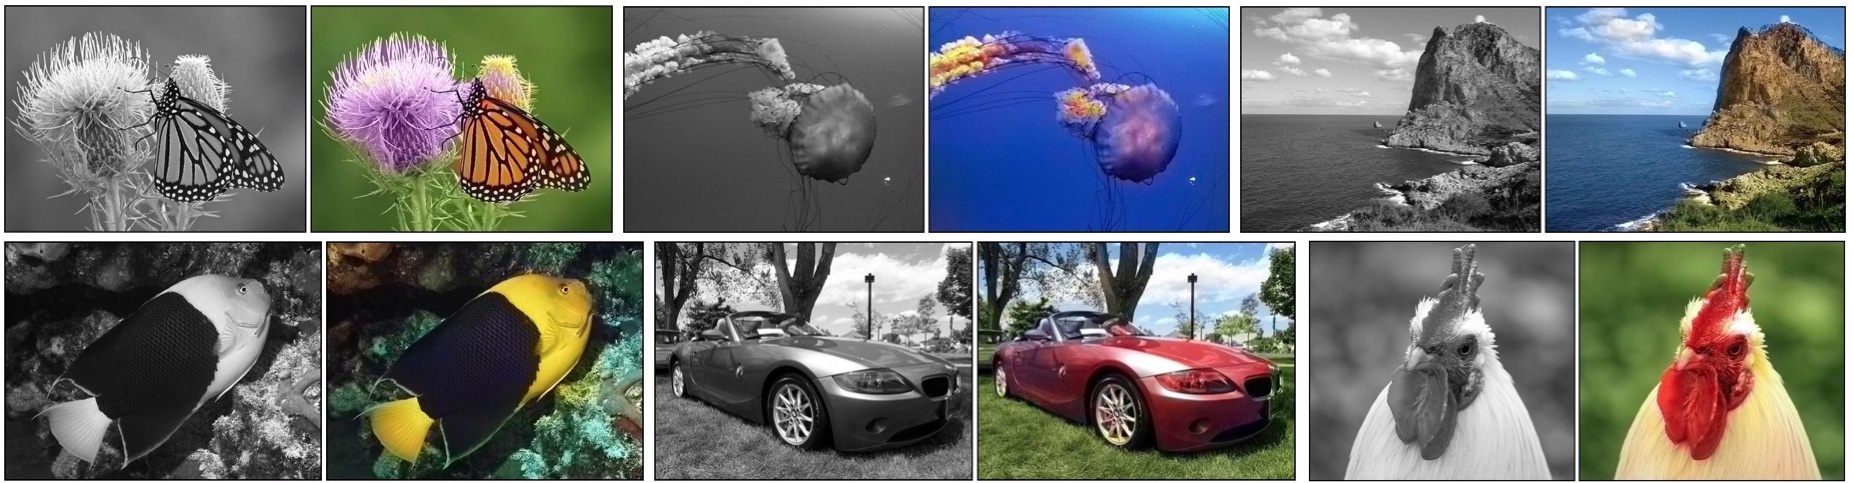
Colorful Image Colorization [Project Page]
Richard Zhang, Phillip Isola, Alexei A. Efros. In ECCV, 2016.
Overview
This repository contains:
Colorization-centric functionality
- (0) a test time script to colorize an image (python script)
- (1) a test time demonstration (IPython Notebook)
- (2) code for training a colorization network
- (3) links to our results on the ImageNet test set, along with a pointer to AMT real vs fake test code
Representation Learning-centric functionality
- (4) pre-trained AlexNet, used for representation learning tests (Section 3.2)
- (5) code for training AlexNet with colorization
- (6) representation learning tests
Appendices
- (A) Related follow-up work
Clone this repository
Clone the master branch of the respository using git clone -b master --single-branch https://github.com/richzhang/colorization.git
Dependencies
This code requires a working installation of Caffe and basic Python libraries (numpy, pyplot, skimage, scipy). For guidelines and help with installation of Caffe, consult the installation guide and Caffe users group.
Colorization-centric Functionality
(0) Test-Time Python Script
We provide a script for colorizing a single image. Run ./models/fetch_release_models.sh to download the model. Then, run python ./colorize.py -img_in [[INPUT_IMG_PATH]] -img_out [[OUTPUT_IMG_PATH]]. For example, try python ./colorize.py -img_in ./demo/imgs/ILSVRC2012_val_00041580.JPEG -img_out ./out.png.
(1) Test-Time Demo in IPython Notebook
We also include demo usage as an iPython notebook, under ./demo/colorization_demo_v2.ipynb. This IPython Notebook demonstrates how to use our colorization network to colorize a grayscale image. To run this, after cloning the directory, cd into the demo directory, run ipython notebook and open colorization_demo_v2.ipynb in your web browser.
(2) Training Usage
The following contains instructions for training a colorization network from scratch. After cloning the repository, from the root directory:
(1) Run ./train/fetch_init_model.sh. This will load model ./models/init_v2.caffemodel. This model was obtained using the k-means initialization implemented in Kraehenbuehl et al, ICLR 2016.
(2) Run ./train/fetch_caffe.sh. This will load a modified Caffe into directory ./caffe-colorization. For guidelines and help with installation of Caffe, consult the installation guide and Caffe users group.
(3) Add the ./resources/ directory (as an absolute path) to your system environment variable $PYTHONPATH. This directory contains custom Python layers.
(4) Modify paths in data layers ./models/colorization_train_val_v2.prototxt to locate where ImageNet LMDB files are on your machine. These should be BGR images, non-mean centered, in [0,255].
(5) Run ./train/train_model.sh [GPU_ID], where [GPU_ID] is the gpu you choose to specify. Notes about training:
(a) Training completes around 450k iterations. Training is done on mirrored and randomly cropped 176x176 resolution images, with mini-batch size 40.
(b) Snapshots every 1000 iterations will be saved in ./train/models/colornet_iter_[ITERNUMBER].caffemodel and ./train/models/colornet_iter_[ITERNUMBER].solverstate.
(c) If training is interupted, resume training by running ./train/train_resume.sh ./train/models/colornet_iter_[ITERNUMBER].solverstate [GPU_ID], where [ITERNUMBER] is the last snapshotted model.
(d) Check validation loss by running ./val_model.sh ./train/models/colornet_iter_[ITERNUMBER].caffemodel [GPU_ID] 1000, where [ITERNUMBER] is the model you would like to validate. This runs the first 10k imagenet validation images at full 256x256 resolution through the model. Validation loss on colorization_release_v2.caffemodel is 7715.
(e) Check model outputs by running the IPython notebook demo. Replace the release model with your snapshotted model.
(f) To download reference pre-trained model, run ./models/fetch_release_models.sh. This will load reference model ./models/colorization_release_v2.caffemodel. This model used to generate results in the ECCV 2016 camera ready.
For completeness, this will also load model ./models/colorization_release_v2_norebal.caffemodel, which is was trained without class rebalancing. This model will provide duller but “safer” colorizations. This will also load model ./models/colorization_release_v1.caffemodel, which was used to generate the results in the arXiv v1 paper.
(3) Results / Real vs Fake Test
To run the “real vs fake” Amazon Mechanical Turk test (Table 1 of the paper), see this repository. See line 1 of the Usage section. Corresponding paths are: Ours (full), Ours (class, no rebal), Ours (L2), Ours (L2, ft from class), Ground Truth.
Representation Learning-centric Functionality
(4) Pre-trained Representation Learning models
(1) Run ./models/fetch_alexnet_model.sh. This will load the following model variants into ./models/
(i) alexnet_release_450000_nobn_rs.caffemodel - fully convolutional model, used for ILSVRC 2012 linear readoff, PASCAL classification, and PASCAL segmentation tests
(ii) alexnet_release_450000_nobn_fc_rs.caffemodel - same as above, with fc6,fc7 as InnerProduct layers instead of Convolution layers; used for PASCAL detection tests
(2) You have two choices:
(i) If you do the color conversion into Lab space outside of the network, use prototxt ./models/alexnet_deploy_lab.prototxt, ./models/alexnet_deploy_lab_fc.prototxt. The input blob will be an image in Lab color space.
(ii) If you wish to do the color conversion inside of the network, use prototxt ./models/alexnet_deploy.prototxt, ./models/alexnet_deploy_fc.prototxt. The input should be BGR images, non-mean centered, in [0,255]. You will have to follow Caffe installation (described in step (2) in Section 2).
(5) Training AlexNet with Colorization
(0) Link training and validation lmdbs to ./data/caffe-train-lmdb/ and ./data/caffe-val-lmdb/, respectively.
(1) Run ./train_alexnet/run_init.sh. This runs the k-means initialization implemented in Kraehenbuehl et al, ICLR 2016 and will create model ./train_alexnet/mi.caffemodel.
(2) Run ./train_alexnet/train_model.sh [GPU_ID]. Training takes 2 sec/iter = 10.5 days/450k iters on a Titan X PASCAL.
(3) Run ./postprocess_model.sh [GPU_ID] 450000 (or an intermediate iteration number). This script will…
(a) Absorb batch norm, save a model into ./train_alexnet/colornet_iter_450000_nobn.caffemodel
(b) Rescaling with Kraehenbuehl et al, ICLR 2016, save a model into ./train_alexnet/colornet_iter_450000_nobn_rs.caffemodel
(c) Save a model with fc6,fc7 layers into colornet_iter_450000_nobn_rs_fc.caffemodel
(6) Representation Learning Tests
The provided scripts run representation learning tests. Note that the scripts run on release models. Modify scripts accordingly if you want to test your own trained model.
(A) ILSVRC Linear Classification Run ./feature_learning_tests/linear/run_linear_tests.sh [GPU_ID]. This will save results in ./feature_learning_tests/linear/test_acc_log. Training takes roughly 0.25 sec/iter = 10 hrs/140k iters on a Titan X Pascal. Note that this test was slightly changed from the ECCV paper (instead of average pooling, we do bilinear resizing here). The updated test was used in our Split-Brain Autoencoder paper. File ./feature_learning_tests/linear/test_acc_log/loss_log shows results for layers conv1, pool1, conv2, pool2, conv3, conv4, conv5, pool5.
(B) PASCAL Classification
(a) Clone VOC-Classification Repo. Set up directories as instructed.
(b) Run ./feature_learning_tests/run_classification_test_[LAYER].sh [PATH_TO train_cls.py] [GPU_ID], where [LAYER] is {fc7,pool5,conv1}, depending on which layers you would like to fine-tune from. Results will be printed on console. The value of interest is the 10-crops on the test set. This will also generate directories ./feature_learning_tests/classification/[LAYER]. Each test takes ~30-60 minutes on a Titan X Pascal.
(C) PASCAL Segmentation
This code borrows from the FCN repo. Prepare data as instructed. Then run ./run_segmentation.sh [GPU_ID]. Results will be printed every 1000 iterations on screen. Training takes ~1 sec/iter = 44 hours/150k iterations on a Titan X Pascal.
(D) PASCAL Detection
We use Fast R-CNN with multi-scale training and single scale testing. Run for 150k total iterations, dropping the LR by a factor of 10 every 50k iterations. This was to follow the Kraehenbuehl et al. ICLR 2016 procedure. Set __C.PIXEL_MEANS = np.array([[[0,0,0]]]).
Related follow-up work
Interactive Colorization: Real-Time User-Guided Image Colorization with Learned Deep Priors. R. Zhang*, J.Y. Zhu*, P. Isola, X. Geng, A. S. Lin, T. Yu, A. A. Efros. In CVPR, 2017. WebsiteGitHub
Representation Learning: Split-Brain Autoencoders: Unsupervised Prediction by Cross-Channel Prediction. R. Zhang, P. Isola, A. A. Efros. In SIGGRAPH, 2017. WebsiteGitHub
Citation
If you find this model useful for your resesarch, please use this bibtex to cite.
Misc
Contact Richard Zhang at rich.zhang at eecs.berkeley.edu for any questions or comments.


