totalgood/nlpia
Examples and libraries for “Natural Language Processing in Action” book
| repo name | totalgood/nlpia |
| repo link | https://github.com/totalgood/nlpia |
| homepage | http://bit.ly/gh-nlpia-book |
| language | HTML |
| size (curr.) | 126993 kB |
| stars (curr.) | 234 |
| created | 2016-10-25 |
| license | MIT License |

![]()


NLPIA
Community-driven code for the book Natural Language Processing in Action.
Description
A community-developed book about building socially responsible NLP pipelines that give back to the communities they interact with.
Getting Started
You’ll need a bash shell on your machine. Git has installers that include bash shell for all three major OSes.
Once you have Git installed, launch a bash terminal.
It will usually be found among your other applications with the name git-bash.
Step 1. Install Anaconda3
If you’re installing Anaconda3 using a GUI, be sure to check the box that updates your PATH variable. Also, at the end, the Anaconda3 installer will ask if you want to install VSCode. Microsoft’s VSCode is a decent Python editor/linter if you’re willing to send your data to Microsoft to enable all the linting features.
Some of us prefer Sublime Text 3 to the open source IDEs like Atom and VSCode. In Sublime you can get complete linting and spellchecking and auto-delinters for free, even in offline mode (no intrusive data slurping or EULA).
Step 2. Install an Editor
You can skip this step if you are happy using jupyter notebook or VSCode or Spyder (built into Anaconda).
I like Sublime Text. It’s a lot cleaner and more mature than the alternatives. Plus it has more plugins written by individual developers like you.
Step 3. Install Git and Bash
- Linux – already installed
- MacOSX – already installed
- Windows
If you’re on Linux or Mac OS, you’re good to go. Just figure out how to launch a terminal and make sure you can run ipython or jupyter notebook in it. This is where you’ll play around with your own NLP pipeline.
Windows
On Windows you have a bit more work to do. Supposedly Windows 10 will let you install Ubuntu with a terminal and bash. But the terminal and shell that comes with git is probably a safer bet. It’s maintained by a broader open source community.
You need to make sure your PATH variable includes a path to conda, python and other command line apps installed by Anaconda. This can sometimes be set with something like this:
echo "PATH=$HOME/Anaconda3/bin:$PATH" >> ~/.bashrc
or
echo "PATH=/c/Users/$USER/AppData/Local/Continuum/Anaconda3/:$PATH" >> ~/.bashrc
You’ll need to make sure you new MINGW64 terminal is launched with winpty to trick windows into treating the MINGW64 terminal (git-bash) like a standards-compliant TTY terminal application. So add these aliases to your ~/.bashrc from within your git-bash terminal:
echo "alias python='winpty python'" >> ~/.bashrc
echo "alias jupyter='winpty jupyter'" >> ~/.bashrc
echo "alias ipython='winpty ipython'" >> ~/.bashrc
Step 4. Clone this repository
git clone https://github.com/totalgood/nlpia.git
Step 5. Install nlpia
You have two alternative package managers you can use to install nlpia:
A helpful NLPIA reader, Hoang Chung Hien, created a Dockerfile you can use for a third way to manage your environment:
5.3. docker
In most cases, conda will be able to install python packages faster and more reliably than pip. Without conda Some packages, such as python-levenshtein, require you to compile a C library during installation. Windows doesn’t have a a compiler and python package installer that will “just work.”
Alternative 5.1. conda
Use conda (from the Anaconda3 package that you installed in Step 1 above) to create an environment called nlpiaenv:
cd nlpia  # make sure you're in the nlpia directory that contains `setup.py`
conda env create -n nlpiaenv -f conda/environment.yml
conda install -y pip  # to get the latest version of pip
conda activate nlpiaenv
pip install -e .
Whenever you want to be able to import or run any nlpia modules, you’ll need to activate this conda environment first:
$ conda activate nlpiaenv
On Windows CMD prompt (Anaconda Prompt in Applications) there is no source command so:
C:\ activate nlpiaenv
Now make sure you can import nlpia with:
python -c "print(import nlpia)"
Skip to Step 6 (“Have fun!") if you have successfully created and activated an environment containing the nlpia package and its dependencies.
Alternative 5.2. pip
You can try this first, if you’re feeling lucky:
cd nlpia
pip install --upgrade pip
pip install -e .
Or if you don’t think you’ll be editing any of the source code for nlpia and you don’t want to contribute to the community here you can just:
pip install nlpia
Linux-based OSes like Ubuntu and OSX come with C++ compilers built-in, so you may be able to install the dependencies using pip instead of conda.
But if you’re on Windows and you want to install packages, like python-levenshtein that need compiled C++ libraries, you’ll need a compiler.
Fortunately Microsoft still lets you download a compiler for free, just make sure you follow the links to the Visual Studio “Build Tools” and not the entire Visual Studio package.
Once you have a C/C++ compiler and the python source code files, you can install nlpia using pip:
cd nlpia  # make sure you're in the nlpia directory that contains `setup.py`
pip install --upgrade pip
mkvirtualenv nlpiaenv
source nlpiaenv/bin/activate
pip install -r requirements-test.txt
pip install -e .
pip install -r requirements-deep.txt
The chatbots(including TTS and STT audio drivers) that come with nlpia may not be compatible with Windows due to problems installing pycrypto.
If you are on a Linux or Darwin(Mac OSX) system or want to try to help us debug the pycrypto problem feel free to install the chatbot requirements:
# pip install -r requirements-chat.txt
# pip install -r requirements-voice.txt
Alternative 5.3. docker
5.3.1. Build your image
This might take a few minutes to download the jupyter docker image:
docker build -t nlpia .
5.3.2. Run your image
docker run -p 8888:8888 nlpia- Copy the
tokenobtained from the run log - Open Browser and use the link
http://localhost:8888/?token=...
5.3.3. Play around
If you want to keep your notebook file or share a folder with the running container then use:
docker run -p 8888:8888 -v ~:/home/jovyan/work nlpia
Then open a new notebook and test your code. Make sure save it inside work directory so it’s accessible outside the container.
6. Have Fun!
Check out the code examples from the book in nlpia/nlpia/book/examples to get ideas:
cd nlpia/book/examples
ls
Help other NLP practitioners by contributing your code and knowledge.
Below are some nlpia feature ideas others might find handy. Contribute your own ideas to https://github.com/totalgood/nlpia/issues .
6.1. Feature 1: Glossary Compiler
Skeleton code and APIs that could be added to the https://github.com/totalgood/nlpia/blob/master/src/nlpia/transcoders.py:`transcoders.py` module.
def find_acronym(text):
    """Find parenthetical noun phrases in a sentence and return the acronym/abbreviation/term as a pair of strings.

    >>> find_acronym('Support Vector Machine (SVM) are a great tool.')
    ('SVM', 'Support Vector Machine')
    """
    return (abbreviation, noun_phrase)
def glossary_from_dict(dict, format='asciidoc'):
    """ Given a dict of word/acronym: definition compose a Glossary string in ASCIIDOC format """
    return text
def glossary_from_file(path, format='asciidoc'):
    """ Given an asciidoc file path compose a Glossary string in ASCIIDOC format """
    return text


def glossary_from_dir(path, format='asciidoc'):
    """ Given an path to a directory of asciidoc files compose a Glossary string in ASCIIDOC format """
    return text
6.2. Feature 2: Semantic Search
Use a parser to extract only natural language sentences and headings/titles from a list of lines/sentences from an asciidoc book like “Natural Language Processing in Action”. Use a sentence segmenter in https://github.com/totalgood/nlpia/blob/master/src/nlpia/transcoders.py:[nlpia.transcoders] to split a book, like NLPIA, into a seequence of sentences.
6.3. Feature 3: Semantic Spectrograms
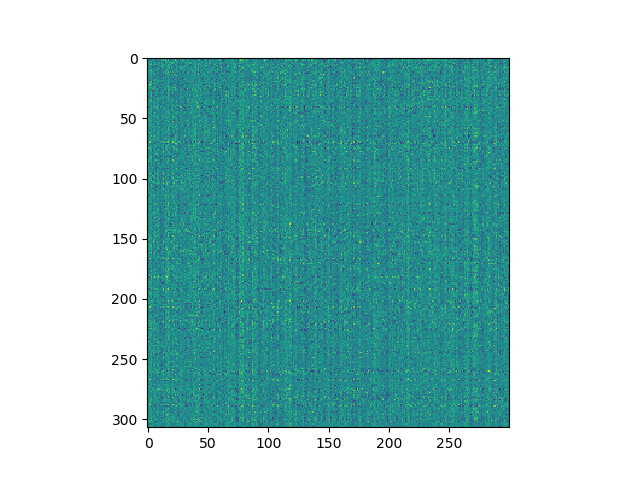
A sequence of word vectors or topic vectors forms a 2D array or matrix which can be displayed as an image. I used word2vec (nlpia.loaders.get_data('word2vec')) to embed the words in the last four paragraphs of Chapter 1 in NLPIA and it produced a spectrogram that was a lot noisier than I expected. Nonetheless stripes and blotches of meaning are clearly visible.
First, the imports:
>>> from nlpia.loaders import get_data
>>> from nltk.tokenize import casual_tokenize
>>> from matplotlib import pyplot as plt
>>> import seaborn
First get the raw text and tokenize it:
>>> lines = get_data('ch1_conclusion')
>>> txt = "\n".join(lines)
>>> tokens = casual_tokenize(txt)
>>> tokens[-10:]
['you',
 'accomplish',
 'your',
 'goals',
 'in',
 'business',
 'and',
 'in',
 'life',
 '.']
Then you’ll have to download a word vector model like word2vec:
>>> wv = get_data('w2v')  # this could take several minutes
>>> wordvectors = np.array([wv[tok] for tok in tokens if tok in wv])
>>> wordvectors.shape
(307, 300)
Now you can display your 307x300 spectrogram or “wordogram”:
>>> plt.imshow(wordvectors)
>>> plt.show()
Can you think of some image processing or deep learning algorithms you could run on images of natural language text?
Once you’ve mastered word vectors you can play around with Google’s Universal Sentence Encoder and create spectrograms of entire books.
6.4. Feature 4: Build your own Sequence-to-Sequence translator
If you have pairs of statements or words in two languages, you can build a sequence-to-sequence translator. You could even design your own language like you did in gradeschool with piglatin or build yourself a L337 translator.
Or you could create a universal sentence embedding using dfs = [get_data(lang) for lang in nlpia.loaders.ANKI_LANGUAGES] and then replacing the movie character chatbot dataset in Chapter 10 with these translation pairs, one at a time. Start with a fresh clean decoder for each new language. That way you’ll have a separate decoder that you can use to translate into any language. But you want to reuse the encoder so that you end up with a Universal thought vector for encoding English sentences. This will be similar to Google’s Unversal Sentence Encoding, but yours will be character-based so it can handle mispelled English words.
Other Ideas
There are a lot more project ideas mentioned in the “Resources” section at the end of the NLPIA Book. Here’s an early draft of that resource list.


