BitconFeng/Deep-Feature-video

Deep Feature Flow for Video Recognition
| repo name | BitconFeng/Deep-Feature-video |
| repo link | https://github.com/BitconFeng/Deep-Feature-video |
| homepage | |
| language | Python |
| size (curr.) | 2556 kB |
| stars (curr.) | 211 |
| created | 2015-11-20 |
| license | MIT License |
Deep Feature Flow for Video Recognition
Introduction
Deep Feature Flow is initially described in a [CVPR 2017 paper]
It provides a simple, fast, accurate, and end-to-end framework for video recognition (e.g., object detection and semantic segmentation in videos). It is worth noting that:
- Deep Feature Flow significantly speeds up video recognition by applying the heavy-weight image recognition network (e.g., ResNet-101) on sparse key frames, and propagating the recognition outputs (feature maps) to the other frames by the light-weight flow network (e.g., [FlowNet].
- The entire system is end-to-end trained for the task of video recognition, which is vital for improving the recognition accuracy. Directly adopting state-of-the-art flow estimation methods without end-to-end training would deliver noticable worse results.
- Deep Feature Flow can easily make use of sparsely annotated video recognition datasets, where only a small portion of the frames are annotated with ground-truth labels.
Click image to watch our demo video
[ ]
]
[ ]
]
Disclaimer
This is an official implementation for Deep Feature Flow for Video Recognition (DFF) based on MXNet. It is worth noticing that:
- The original implementation is based on our internal Caffe version on Windows. There are slight differences in the final accuracy and running time due to the plenty details in platform switch.
License
© Microsoft, 2018. Licensed under the MIT License.
Citing Deep Feature Flow
If you find Deep Feature Flow useful in your research, please consider citing:
@inproceedings{zhu17dff,
    Author = {Xizhou Zhu, Yuwen Xiong, Jifeng Dai, Lu Yuan, Yichen Wei},
    Title = {Deep Feature Flow for Video Recognition},
    Conference = {CVPR},
    Year = {2017}
}

@inproceedings{dai16rfcn,
    Author = {Jifeng Dai, Yi Li, Kaiming He, Jian Sun},
    Title = {{R-FCN}: Object Detection via Region-based Fully Convolutional Networks},
    Conference = {NIPS},
    Year = {2016}
}
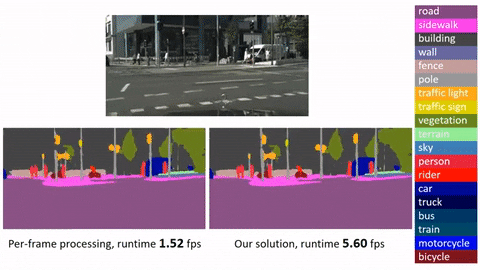
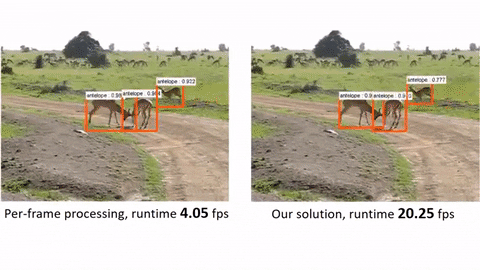
Main Results
| training data | testing data | mAP@0.5 | time/image (Tesla K40) | time/image(Maxwell Titan X) | |
|---|---|---|---|---|---|
| Frame baseline(R-FCN, ResNet-v1-101) | ImageNet DET train + VID train | ImageNet VID validation | 74.1 | 0.271s | 0.133s |
| Deep Feature Flow(R-FCN, ResNet-v1-101, FlowNet) | ImageNet DET train + VID train | ImageNet VID validation | 73.0 | 0.073s | 0.034s |
Running time is counted on a single GPU (mini-batch size is 1 in inference, key-frame duration length for Deep Feature Flow is 10).
The runtime of the light-weight FlowNet seems to be a bit slower on MXNet than that on Caffe.
Requirements: Software
-
MXNet from Due to the rapid development of MXNet, it is recommended to checkout this version if you encounter any issues. We may maintain this repository periodically if MXNet adds important feature in future release.
-
Python 2.7. We recommend using Anaconda2 as it already includes many common packages. We do not suppoort Python 3 yet, if you want to use Python 3 you need to modify the code to make it work.
-
Python packages might missing: cython, opencv-python >= 3.2.0, easydict. If
pipis set up on your system, those packages should be able to be fetched and installed by runningpip install Cython pip install opencv-python==3.2.0.6 pip install easydict==1.6``
-
For Windows users, Visual Studio 2015 is needed to compile cython module.
Requirements: Hardware
Any NVIDIA GPUs with at least 6GB memory should be OK
Installation
- Clone the Deep Feature Flow repository, and we’ll call the directory that you cloned Deep-Feature-Flow as ${DFF_ROOT}.
git clone https://github.com/msracver/Deep-Feature-Flow.git
-
For Windows users, run
cmd .\init.bat. For Linux user, runsh ./init.sh. The scripts will build cython module automatically and create some folders. -
Install MXNet:
3.1 Clone MXNet and checkout to [MXNet@(commit 62ecb60)] by
git clone --recursive https://github.com/dmlc/mxnet.git
git checkout 62ecb60
git submodule update
`` 3.2 Copy operators in
$(DFF_ROOT)/dff_rfcn/operator_cxxor$(DFF_ROOT)/rfcn/operator_cxxto$(YOUR_MXNET_FOLDER)/src/operator/contribbycp -r $(DFF_ROOT)/dff_rfcn/operator_cxx/* $(MXNET_ROOT)/src/operator/contrib/`` 3.3 Compile MXNet
cd ${MXNET_ROOT}
make -j4
`` 3.4 Install the MXNet Python binding by
Note: If you will actively switch between different versions of MXNet, please follow 3.5 instead of 3.4
cd python
sudo python setup.py install
`` 3.5 For advanced users, you may put your Python packge into
./external/mxnet/$(YOUR_MXNET_PACKAGE), and modifyMXNET_VERSIONin./experiments/dff_rfcn/cfgs/*.yamlto$(YOUR_MXNET_PACKAGE). Thus you can switch among different versions of MXNet quickly.
Demo
-
To run the demo with our trained model (on ImageNet DET + VID train), please download the model manually from [OneDrive](for users from Mainland China, please try [Baidu Yun]), and put it under folder
model/.Make sure it looks like this:
./model/rfcn_vid-0000.params
./model/rfcn_dff_flownet_vid-0000.params
``
-
Run (inference batch size = 1)
python ./rfcn/demo.py
python ./dff_rfcn/demo.py
`` or run (inference batch size = 10)
python ./rfcn/demo_batch.py
python ./dff_rfcn/demo_batch.py
``
Preparation for Training & Testing
-
Please download ILSVRC2015 DET and ILSVRC2015 VID dataset, and make sure it looks like this:
./data/ILSVRC2015/
./data/ILSVRC2015/Annotations/DET
./data/ILSVRC2015/Annotations/VID
./data/ILSVRC2015/Data/DET
./data/ILSVRC2015/Data/VID
./data/ILSVRC2015/ImageSets
``
FAQ
Q: It says AttributeError: 'module' object has no attribute 'MultiProposal'.
A: This is because either
-
you forget to copy the operators to your MXNet folder
-
or you copy to the wrong path
-
or you forget to re-compile and install
-
or you install the wrong MXNet
Please print
mxnet.__path__to make sure you use correct MXNet
Q: I encounter segment fault at the beginning.
A: A compatibility issue has been identified between MXNet and opencv-python 3.0+. We suggest that you always import cv2 first before import mxnet in the entry script.
Q: I find the training speed becomes slower when training for a long time.
A: It has been identified that MXNet on Windows has this problem. So we recommend to run this program on Linux. You could also stop it and resume the training process to regain the training speed if you encounter this problem.
Q: Can you share your caffe implementation?
A: Due to several reasons (code is based on a old, internal Caffe, port to public Caffe needs extra work, time limit, etc.). We do not plan to release our Caffe code. Since a warping layer is easy to implement, anyone who wish to do it is welcome to make a pull request.


