jcl5m1/ventilator

Low-Cost Open Source Ventilator or PAPR
| repo name | jcl5m1/ventilator |
| repo link | https://github.com/jcl5m1/ventilator |
| homepage | |
| language | C++ |
| size (curr.) | 3771 kB |
| stars (curr.) | 911 |
| created | 2020-03-16 |
| license | MIT License |
Last updated 2020/03/20
Low-Cost Open-Source Ventilator-ish Device or PAPR
- In the event that COVID-19 hospitalizations exhaust the availability of FDA approved ventilators. This project documents the process of converting a low-cost CPAP (Continuous Positive Airway Pressure) blower into a rudimentary non-invasive pressure support ventilator that could help with breathing during respiratory distress.
- This same project can also be used to create a reasonable low-cost Powered Air Purifying Respirator (PAPR) with filter adapter and mask. PAPRs are effective pieces of Personal Protective Equipment (PPE) that could be helpful to caregivers. PAPRs will also be in extremely short supply and are much less risky and controversial than a DIY ventilator. You may be able to save many more lives by building a PAPR that protects a caregiver than a mediocre ventilator for one patient. Unless you are able to participate in the detailed engineering and medical discussions regarding mitigating the risks of high pressure ventilation, I would highly recommend focusing on the PAPR version of this build.
WARNING/DISCLAIMER: Whenever possible, please seek professional medical care with proper equipment setup by trained individuals. Do not use random information you found on the internet. I am not a medical professional, just a random person putting information on the internet. There are significant risks associated with using a high pressure BiPAP as a DIY ventilator without medical supervision.
What are the primary risks of a DIY ventilator?
- Being viewed as a viable alternative to available professional care or delaying seeking professional care. This should be viewed as an educational resource or a last resort option only. Community driven engineering efforts like this run the risk of making it “too easy to be harmful” which would be a bad outcome.
- Using non-invasive interfaces (such as masks and mouth pieces) can create aerosolized virus infecting many others in clean environments. Infecing yourself or other healthy individuals multiplies the problem. Usage should be restricted to places where aerosolized viruses are already abundant (lots of unmasked symptomatic individuals), COVID wards, or in isolation. NOTE: Self-quarantine in an apartment or multi-unit residence is NOT proper isolation due to potential shared ventilation and sewage.
- Giving too high a pressure (such as 20cmh2o and up) without observing lung compliance can cause rupture of infected lung tissue. This design currently lacks several features that provide enough feedback to a caregiver to monitor that risk.
- See more detailed discussion of these risks and potential engineering/administrative controls to address them.
Too risky? Build a low-cost PAPR!
One more time, a low-cost Powered Air Purifying Respirator (PAPR) is highly vaulable for caregivers, and may have much more positive impact than bulding a mediocre ventilator.
Hardware Capabilities
- This rudimentary design can have a programmable breathing rate (ex: 10-16/min)
- It can have a programmed Positive End-Expiratory Pressure (PEEP)
- The blower is physicially able to hit a peak airway pressure of up to 45cmh2o. However, going above 20cmh2o can be DANGEROUS.
- It cannot yet hit a target tidal volume. What level of accuracy in volume would be sufficient? 100mL? 10mL?
- It does not regulate fractional oxygen (FiO2). But, a down stream connection to an O2 tank is possible to boost O2 concentration with manual flow adjustment. I could use a pointer to a low cost O2 sensor.
- It is lacking in many other ways, but it is possible that this limited functionality could be helpful when better care is not available. It is also a starting point for making progress. Critical features can be added over time.
Here’s a youtube video walking through the components as of 2020/03/17:
There are also many other efforts in this direction. Here’s a short list of them Thanks! discussion
To Do’s (aka. things I could use help with):
- I had a long conversation with a pulmonologist to discuss the critical features of a proper ventilator and trade offs. Here are my notes. If you know someone with domain expertise, I would like confirmation that my take away notes are reasonable since this will drive priorities on engineering effort/conversations.
- Develop a simple low-cost sensor configuration that can provide a similar approximation of lung compliance provided by a ventilator loop display
- Test lung sourcing/research. Example high end one from Michigan Instruments.
- A supply chain person that can help us find good suppliers of parts, if there is desire to make these. I don’t have a supply chain setup. The few parts I have on hand may not be easily sourcable in any volume quickly.
- Figure out how to reprogram an existing BiPAP. If this operating mode is helpful, there’s a large number of these devices already in the field which could be enabled. I don’t have good stats on the popularity of different makes/models. There could be on the order of a 1M devices worldwide?
- Design modifications to recapture exhaust to minimze addition viral spread. This only works in already “dirty” environments, where there is likely already airborne droplets containing virus - such as quarnateened spaces or other negative air pressure environments.
- Develop Arduino compatible algorithms to align blower cycle to the breathing cycle by looking at backpressure load on the blower, or very simple air pressure sensor that can be inserted into the output of the pump. For ease of developing algorithms see Colab notebook with data visualization.
- Solutions to prevent the system from becoming unsafe if power is lost. It’s not obvious to me on how to do this. Ideas are welcome.
- A 3D model for an inline air filter with link to common filter supply such as this.
- Test with a simple inflator pump and achieve the same pressure control.
- Develop a low-cost simple minute volume sensor/approximator. Here is some information about the downsides of being over/under on target volume. Critical care seems to want up to 10-12L/Min.
To provide comments/feedback/offer help, create a new issue on the project. Thanks!
Useful References/Docs about the supply shortages, and guidance around unapproved devices:
There is a growing list of useful documents around guidance for use of unapproved equipment, and information around estimated shortages of both ventilators and personal protective equipment. We have moved them to References Wiki to enable better updates to make it easier to maintain.
Materials
- Continuous Positive Airway Pressure (CPAP) devices are commonly used by individuals to treat sleep apnea. As a result, CPAP blower components are fairly abundant. Used ones are available on eBay and new ones on Alibaba. In many of these devices, the blower is a simple BLDC motor that can be driven with an Electronics Speed Controller (ESC) used by quadrotors and RC cars. The one I used is pulled from a Respironics REMStar. In volume, these blower components can be under $20.
- Alternative: test a 12v inflator pump which is even more abundant.
- Alternative: print a blower [discussion]
-
Arduino Compatible Nano/Clone to control the motor speed, breathing cycles, and handle user input. Download the Arduino IDE to program the microcontroller software.
-
Brushless DC Motor Electronic Speed Controller capable of at least 10A.
-
Button or switch for input control. The code cycles through 5 levels of pressure. Double click to switch between CPAP and BiPAP/Fixed PEEP mode.
-
12v DC power supply that can handle at least 5A. The blower works pretty hard, and the breathing cycles can create voltage drops which will reset the Arduino if the supply is not strong enough.
-
Tubing and face mask. If you search for CPAP face mask, you’ll find many options/suppliers. A full face mask that covers both the mouth and nose will enable pressure buildup in the lungs. As an alternative, see below for draft 3D printable parts.
-
Optional inline 12v battery backup.
Building
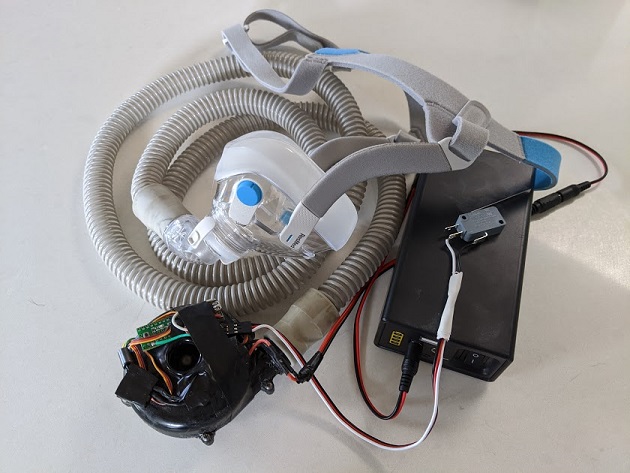
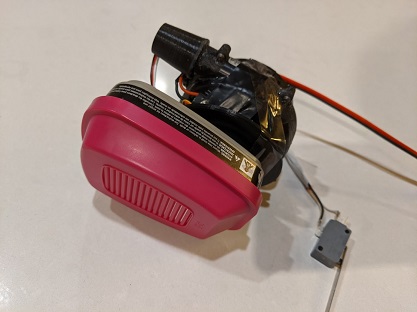
This is the full system with mask, tubing, pump, 12v battery, and switch for input. However, I would strongly recommend running this with a DC power supply since the battery will only last about 3-4 hours. Wearing the mask with a dead battery could cause dangerous CO2 build up. This particular battery can charge and supply power at the same time, acting as an inline battery backup to wall power.
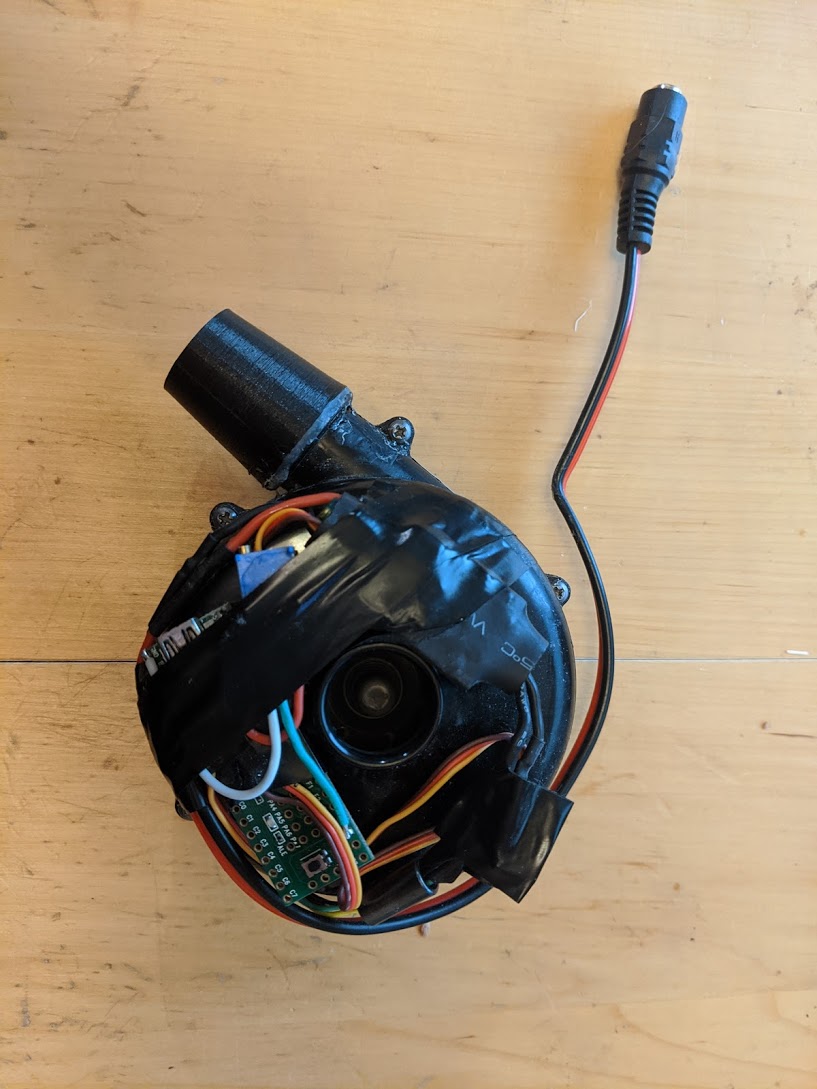
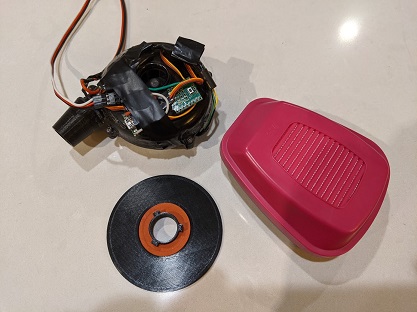
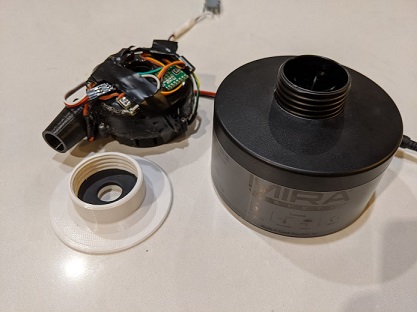
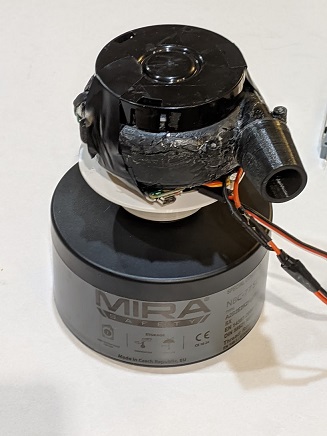
Below is a close up of the extracted blower. It is simply a BLDC motor driving a blower fan. A small ESC and Arduino are attached (technically a Teensy2.0++, but the code has now been changed to an Arduino Nano). It has a 3d printed tapered hose adpater on it to fit in the hose. The microcontroller software can be programmed with the Arduino IDE. The software goes through a short initialization sequence to configure the ESC; it then starts at the lowest CPAP setting. You can use the switch to cycle through pressure levels, and double click to cycle through operating modes.
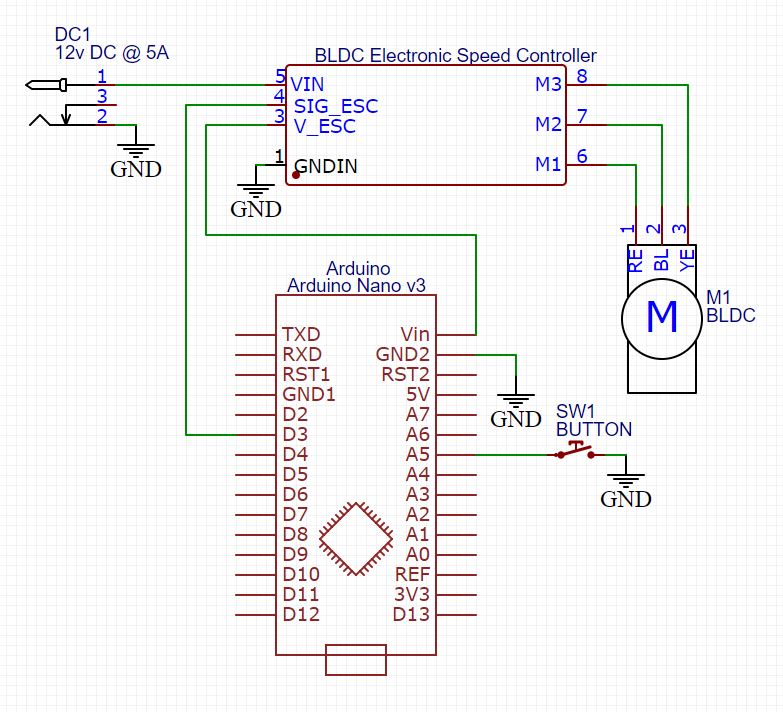
Here is the schematic for the electronics. As you can see, it is very simple with only a few parts. A slightly modifed version that is able to sense the blower current is here.
Face mask / Tube Adapter
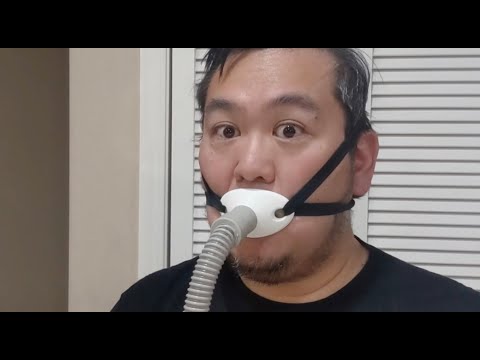
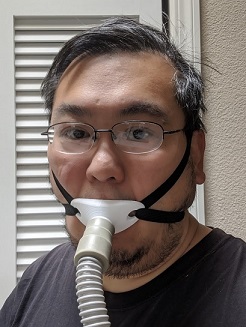
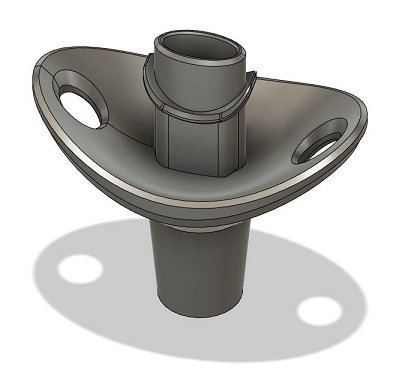
Since I have a CPAP, I happen to have a Resmed AitFit F20 mask that I can use. This is quite comfortable and covers both the nose and mouth to make a good seal. However, if you can’t get a mask, below is a prototype mouthguard that fits in the category of not-so-great-but-usable-if-you-have-a-lot-of-tape. I am using some elastic straps as head gear. However, in order to get a good air seal to get enough positive pressure, this would require some tape. A little bit of leakage is actually desirable to allow CO2 to escape near the mouth and nose to flush out the air over time; this prevents CO2 from being stuck in the tube. WARNING: wearing this sealed to the mouth with tape without power may cause dangerous CO2 build up.
Download the [3D model] [Fusion 360 link].
Pressure Testing
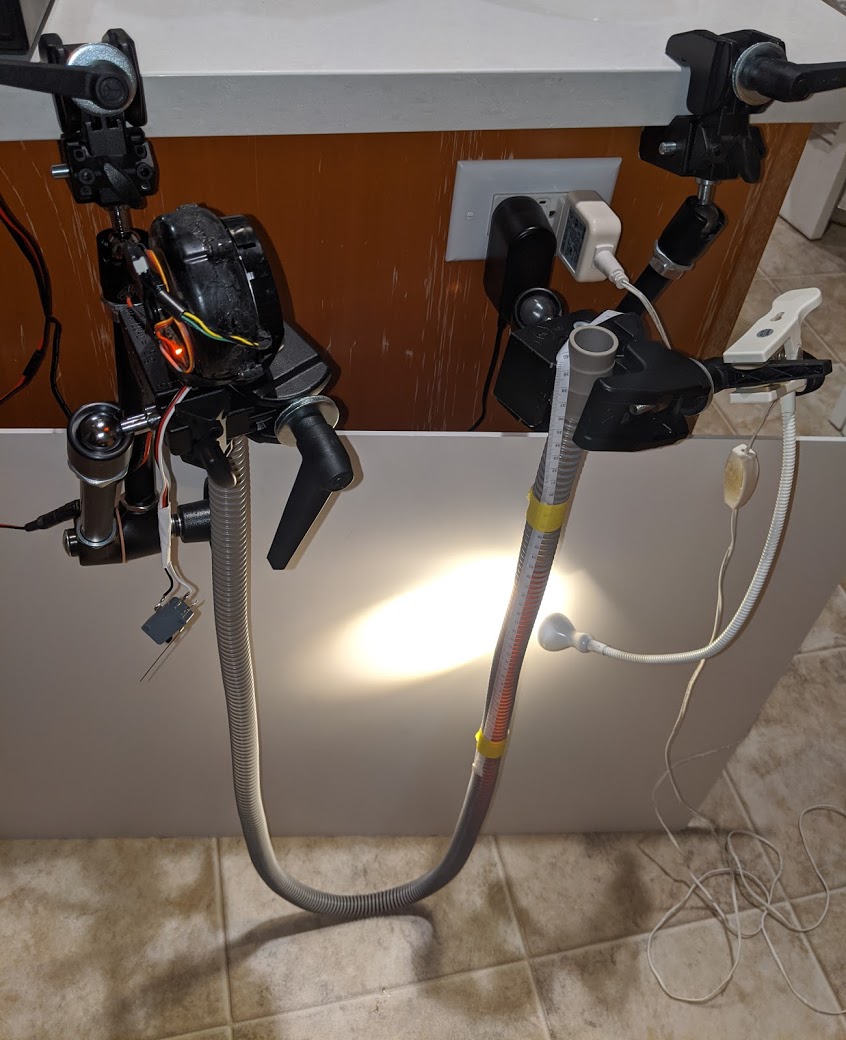
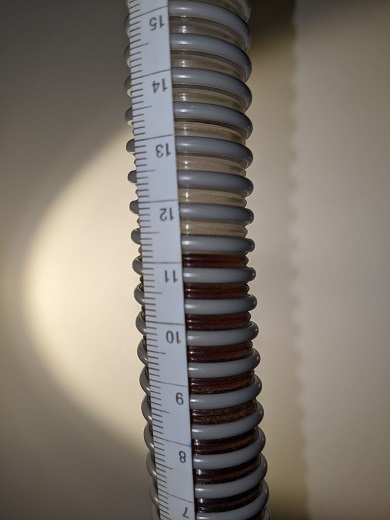
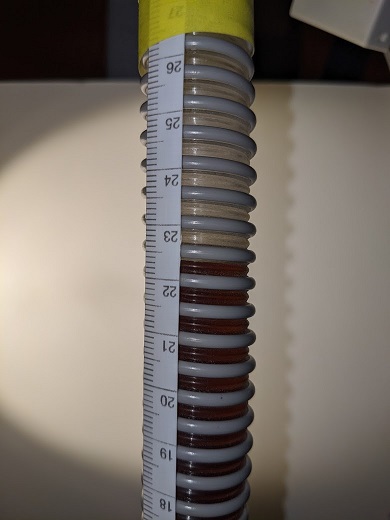
This is a picture of my test rig to measure the output pressure. It is a U-shaped tube with an attached measuring tape to check displacement of water. The actual liquid displacement is 2x the measured line since liquid is being pushed downwards an equal amount on the other side of the U, doubling the displacement. (I think this is the correct way to measure). At full blast at 12v, it is achieving 45cmh2o. WARNING: Going above 20cmh2o can be DANGEROUS. So, these blowers are plently powerful.
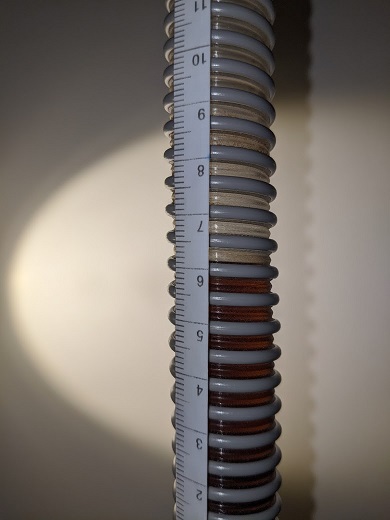
Here are some images showing the dislacement of the liquid at different speeds. I happen to have Diet Dr. Pepper on hand which makes it easier to see the liquid level rather than just plain water.

Here’s a video of the blower pushing a breathing cycle of 16 cycles/min oscilating between 12 and 22cmh2o.
Air Filtration - PAPR Option
An open air blower into someone’s airway isn’t great. If possible, some filtration is preferred. These parts were originally used for a DIY Powered Air Purifying Respriator (PAPR). However, adding a filter will definitely affect the output pressure. It will depend on the blower you have if the motor can handle the additional load. Given the headroom of the blower I tested, these CPAP blowers can probably handle the filter and still hit the target pressure. However, I haven’t done long term thermal testing at high pressure and with a strong filter. These adapter plates can be attached with liberal amounts of hot glue and wrapping the unit in vinyl tape to get a reasonably airtight seal. My blower’s enclosure was not air-tight, so it is difficult to guarantee that 100% of the air is coming only through the filter. Setting the blower to a low CPAP pressure, and leaving the face mask vent holes open will allow it to function reasonably as a PAPR.
- This is an adapter plate for a 3M P100 or N95 face mask filter cartridge. Download [3D model] [Fusion 360 link]
- This is an adapter plate for a NATO 40mm gas mask filter cartridge. These fitlers are available with CBRN ratings which are needed for viral and bacterial defense similar to those approved by the CDC/NIOSH. Download [3D model] [Fusion 360 link]
- This is an option for an inline filter [discussion] that looks easy to install, and would be helpful for non-CPAP blowers.
Update Log
Click here to see updates.


